Home and Learn: Intermediate Programming
Creating the First Sql Server Database Table

We created the database in our previous lesson. In this lesson, we'll create the first table, which is going to hold alist of students.
In the Server Explorer on the left, right-click on Tables and select Add New Table from the menu:

When you click on Add New Table, the Table Designer will open up in the middle of Visual Studio. It should look like this:
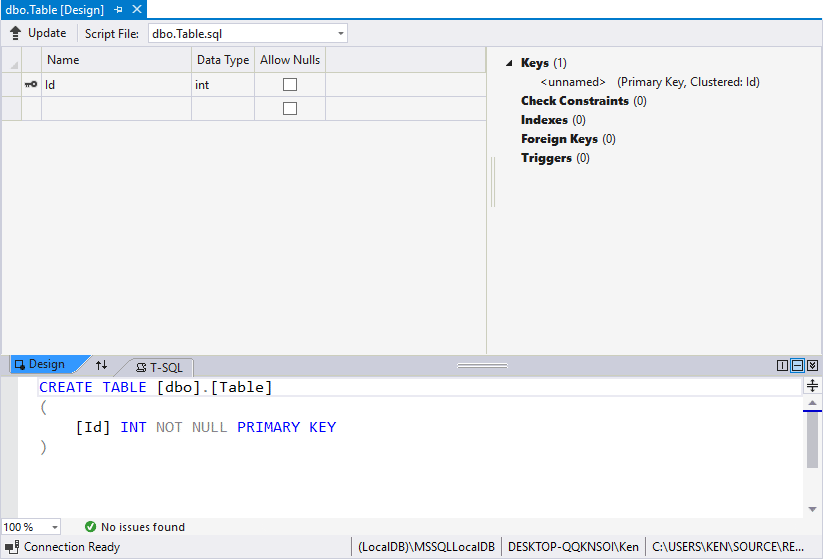
Our Students table will contain an ID column, a Family Name column, and a Given Name column. The second table we'll create will link the two tables via the ID column. You'll see how this works in a moment. For now, let's add the columns to this table.
Click in the Id column, under Name. Notice the key symbol just to the left of it. This means that the Id column is the Primary Key, which is what we want. A Primary Key, remember, is one that uniquely identifies a row in the table. So you can't have two rows in the table with the same Id.
But change the Id column to StudentID. Keep the type on int and Allow Nulls should be left unchecked.
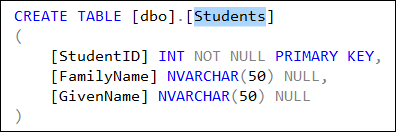
Click under the StudentID name and enter FamilyName as a new Column. Set its Data Type to NVARCHAR(50). Allow Nulls. Create a third Column. Set the Name to GivenName and the Data Type to NVARCHAR(50) again. Check Allow Nulls. Your Table Designer should look like this:

Notice the bottom half of the Table Designer, where it says CREATE TABLE. This is T-SQL. The table name has a default name of [dbo].[TABLE] (the one highlighted). Change Table to Students. This will be the name of our first table:
Once you've changed the name of the table, click the Update button in the top left:

When you click Update, you should see a dialog box appear. This one:

Click the Update Database button.
Now that we have one table set up, let's do the other one. We're going to set up a relation between the two tables, with the help of a Foreign Key. We'll do that in the next lesson below.

Create a Second table with a Foreign Key >>
Back to the Intermediate Programming Contents Page