Home and Learn: Intermediate Programming
Adding Data to the Two Tables

In previous lessons, we set up our two tables. Now, we can enter some data into them.
In the Server Explorer area, right-click the Students table. From the menu, select Show Table Data:

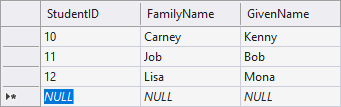
Start entering data. For the StudentID column, you could have some complex ID here, but we'll keep it simple. Enter a value of 10 as the first ID, then a name:
10, Carney Kenny
Enter another student, anything you like. But have the ID on 11. You don't have to keep the numbers sequential, but it will help us to remember them for this tutorial:
11, Job, Bob
Let's have a third Student:
12, Lisa, Mona
Your Table Data area should look something like this:
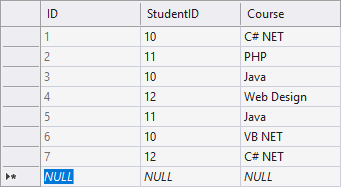
Now open up the Course table. You don't have to enter anything in the ID column because it's set to autoincrement, meaning it will take care of itself. Click into the StudentID column and enter 10. A value of 10 was the value we gave to our first student. In the Course column, enter a course like C# NET:

Now enter more values. (You can reuse the 10 value as many times as you like.) Enter courses for students 11 and 12. You might have something like this, when you're done:
And here's a visual representation of what we're trying to do here:

This is the One to Many relationship mentioned earlier. The student called
Kenny Carney, with an ID of 10, is linked to three courses: C# NET,
Java, and VB NET.
The point of doing things this way is so that we can write some SQL
to get at the records from both tables. Let's do that now as we turn
to SQL Queries.

Sql Queries, Joins, Stored Procedures >>
Back to the Intermediate Programming Contents Page