Home and Learn: Intermediate Programming
The Second Database Table - Foreign Keys

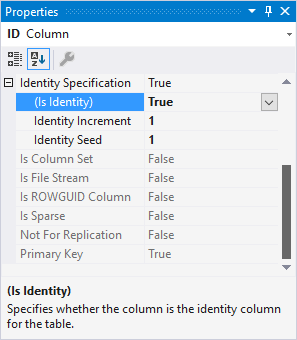
Create a second table, just like you did for the first one. You can leave the ID column in place. But notice we've change it to all capital letters. The default is capital "I" lowercase "d". Keep it on int as the Data Type and Allow Nulls unchecked. We want this ID column to autoincrement, so change IsIdentity (under Identity Specification) to True in the Properties area:
Add another Column. Call this one StudentID. Set the Data Type to int and leave Allow Nulls unchecked. Add a third Column. Call it Courses. Set the Data type to NVARCHAR(10) and check the Allow Nulls box. In the T-SQL area at the bottom, change [dbo].[Table] to [dbo].[Course]. Your Table Design window should look like this:

Now click the Update button in the top left.
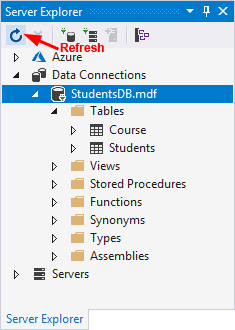
In the Server Explorer on the left, highlight your table name and click the Refresh button to see your new table:
You may have noticed that we have a StudentID column in both tables. This is deliberate. We want to link both tables. And the way you do this is with something called a Foreign Key. The Foreign Key in one table is usually the Primary Key in another table. For example, here's the Students table again:

And here's the Course table:

We want to link a student in the Students table to one or more courses in the Course table. If we ensure that the StudentID values are the same in both tables then we have our link. All we need to do to link the two is to make the StudentID in the Course table a Foreign Key. The link would look like this:

We can enter 10, say, as the value for the StudentID Columns in both tables. We can then tell SQL Server to, "Fetch all the records from both tables where the StudentID values are both 10".
In order to do that, we need to set the StudentID column in the Course table to be a Foreign Key. That way, the Primary Key in the first table becomes a Foreign Key in the Second table. (This, by the way, is known as a One to Many Relationship. Because one record in the first table can have many matching records in the second table. They will match because they'll both have the same StudentID values.)
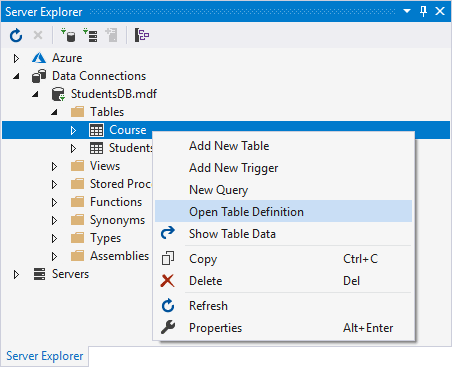
To set a Foreign Key, make sure your Course table is displayed in the
Table Design window. If it's not, right-click the table in the Server
Explorer. From the menu, select Open Table Definition:
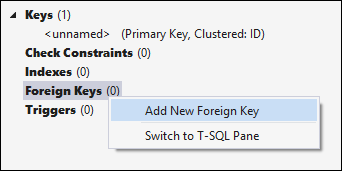
In the Table Designer, just to the right of the table definition, you'll see an area that has items for Keys, Check Constraints, Indexes, Foreign Keys, and Triggers. Right-click the Foreign Keys item and select Add New Foreign Key:
You'll see a small textbox:
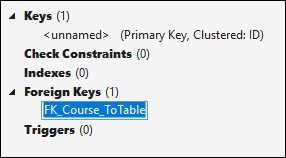
FK_Course_ToTable is a default name. You can change this to anything you like. Type CourseFK instead. Press the enter key on your keyboard and the Foreign Key area will look like this:

Now look at the T-SQL area at the bottom. You should see this rather complicated addition, with some red underlines:
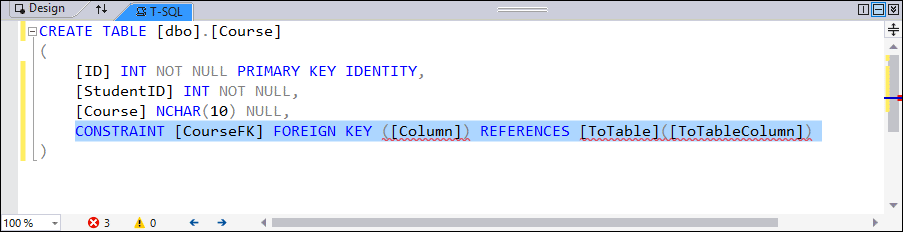
The Constraint is the Foreign Key, and CourseFK is the name we just gave it. After the T-SQL keywords FOREIGN KEY, you need the name of the column where you have your Foreign Key. Change the word Column to StudentID. This REFERENCES a column in the Students table. So change [ToTable].([ToColumn]) to [Students].([StudentId]). You T-SQL area should look like this:

The red underlines will go away, if you get it right. If you do, save your changes by clicking the Update button in the top left.
If you look top right, you should see a 1 appear next to Foreign Keys:

Now that we've set up our two tables, we can enter some data into them. We'll do that in the next lesson below.

Back to the Intermediate Programming Contents Page