Home and Learn: Intermediate Programming
Undo and Redo

Stick Figure App - Head, Arms, Legs
OK, you now have a program where you can draw stick figures on a Picture Box. In this lesson, you'll learn how to add a feature so that you can Undo and Redo your drawings.
To be able to undo and redo a drawing on a Picture Box surface, we need something called a Stack. The idea is that you Push a drawing to the Stack when you first hold down your left mouse button. This stores it in memory. If you click the Undo button you then Pop the drawing off the Stack. This Pushing and Popping is the main feature of a Stack.
If that's not clear, take a look at this stack of items:
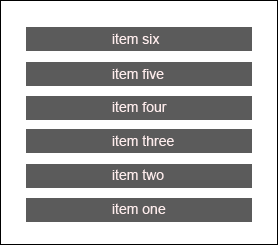
The first item to go on the stack was item one. The last item to go on the stack was item six. If you want to push another item onto the stack, it would go at the top and become item seven. If you issue the Pop command then it would pull item six from the stack in the image above. The next Pop command would pull item five from the stack, then item four, and so on. You can't just grab, say, item three from the stack because it's in the middle.
In our code, we'll Push and Pop Bitmap items to and from the stacks we'll create. But you can create stacks of other types, like Integers, String, Booleans - anything.
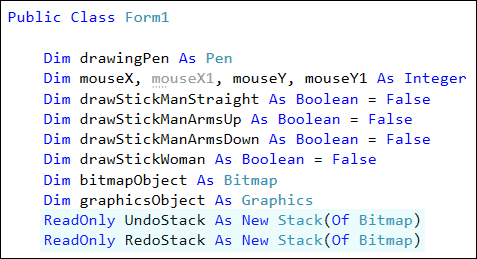
To create your two stacks, add these lines to the top of your code, along with the other globals (your x and y coordinates, your Booleans, Bitmap and Graphic objects, etc):
VB Net:
ReadOnly UndoStack As New Stack(Of Bitmap)
ReadOnly RedoStack As New Stack(Of Bitmap)
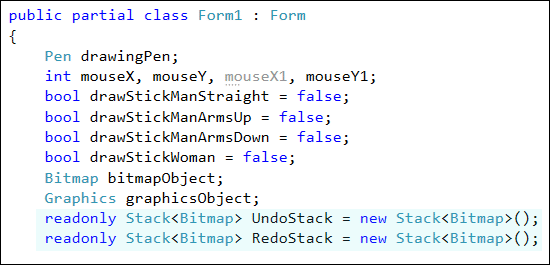
C#
readonly Stack<Bitmap> UndoStack = new Stack<Bitmap>(
);
readonly Stack<Bitmap> RedoStack = new Stack<Bitmap>( );
So the two Stacks are called UndoStack and RedoStack. We're creating objects from the Stack Class. You need to specify the Type of variable or object going into you stack. Ours are of the Bitmap type. In VB Net, you need a pair of round brackets. In between the round brackets of Stack, you say Of Bitmap. In C#, you need pointy brackets after new Stack. You don't need the Of keyword. But you do need an empty pair of round brackets after the pointy brackets. We can make these two stacks Read Only. That's because you can't overwrite a value in a stack.
The top of your code should look like this in VB Net:
And this in C#:
Now we need to push something onto the Stack.
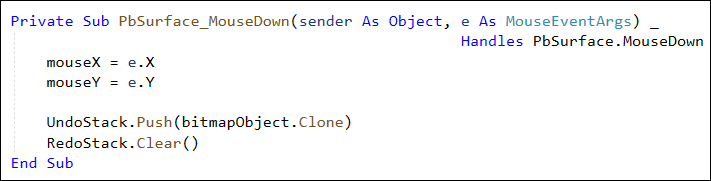
Locate your MouseDown event. After your MouseX and MouseY code, add these two lines in VB Net:
UndoStack.Push(bitmapObject.Clone)
RedoStack.Clear()
And these two in C#:
UndoStack.Push((Bitmap)bitmapObject.Clone());
RedoStack.Clear();
The first line is where we issue the Push command. In between the round brackets of Push, you need a variable or object to Push on the stack. We're pushing our bitmap object. But we're pushing a copy of it, which is what the Clone part does. Notice in C# that you need make sure to convert the object (bitmapObject) to a Bitmap, otherwise you'll get an error "Cannot convert object to Image".
The second line of code issues the Clear command of the Stack. This erases everything in a Stack. We're doing this is just to make sure that's there's nothing in the RedoStack. Both Stacks will then be synchronised.
Your MouseDown Event should look like this in VB Net:
And like this in C#:

Now go back to Design View. Double click your Undo button to create a code stub.
There is a Property of the Stack Class called Count. You use this to count how many items are on your stack. If it's greater than zero, we can go ahead and run the undo code.
So, add this If Statement in VB Net:
If UndoStack.Count > 0 Then
Else
MessageBox.Show("Nothing to Undo")
End If
And this one in C#:
if (UndoStack.Count > 0)
{
}
else
{
MessageBox.Show("Nothing to Undo");
}
(The else part is just a Message Box. You can miss it out entirely, if you want.)
As the first line for the IF part, we can push a Bitmap onto the Redo Stack. That way, you can redo the undo, if you change your mind. Add this line to the IF part in VB Net:
RedoStack.Push(bitmapObject.Clone)
And this one in C#:
RedoStack.Push((Bitmap)bitmapObject.Clone());
Now comes the Undo operation. Add these two lines in VB Net:
bitmapObject = UndoStack.Pop()
graphicsObject = Graphics.FromImage(bitmapObject)
And here's the two to add in C#:
bitmapObject = UndoStack.Pop();
graphicsObject = Graphics.FromImage(bitmapObject);
We're issuing the Pop command now. Whatever is on the top of the Undo Stack will be retrieved and placed into the Bitmap Object. This is then converted to a graphics object using the FromImage routine, just like we did before.
The final line to add is this (with a semicolon on the end in C#):
PbSurface.Invalidate()
The Invalidate command calls the Paint event of the Picture Box, remember. This will redraw what is in the graphics object, which is our bitmapObject.
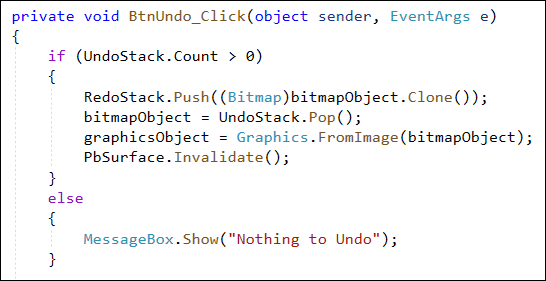
Your Undo button code should be this in VB Net:

And here's the Undo button code in C#:
You can try it out now. Run your program. Draw a few stick figures on your canvas. Now click the Undo button. You should find that the figures vanish. If there's nothing on the Undo Stack then you'll see the Message Box.
OK, now we can code for the Redo button.
Redo a Drawing on a Picture Box
The code to redo a drawing it pretty much the same as the undo code.
In Design View, double click your Redo button to create a code stub. Now copy and paste the code from your undo button into your redo code stub. Change the first three lines to these in VB Net: (Changes are in bold.)
If RedoStack.Count > 0 Then
UndoStack.Push(bitmapObject.Clone)
bitmapObject = RedoStack.Pop()
Here's your changes, C# programmers: (Again, changes are in bold.)
if (RedoStack.Count > 0)
{
UndoStack.Push((Bitmap)bitmapObject.Clone());
bitmapObject = RedoStack.Pop();
Also, change your message to "Nothing to Redo".
Your Redo button code should look like this in VB Net:
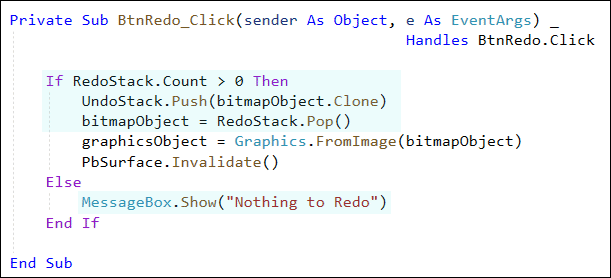
And this in C#:

Try it out again. Run your program. Add a few stick figures. Undo a few times. Now click your Redo button to bring them back.
OK, we're looking pretty good. The next thing we'll do is to draw the stick figure female.
