Home and Learn: AI Beginners Course
Learn how to change an AI Image with Inpainting and Outpainting
Created:
In this lesson, you'll learn about Inpainting and Outpainting. You'll also install another AI image creation app that has the features we need for this lesson.
What is Inpainting? What is Outpainting?
Inpainting allows you to edit specific parts of an existing image without altering the rest of the scene. By masking or painting over a small area, you can tell the AI to replace that section with something new, such as changing a character's outfit, removing an unwanted object from the background, or fixing a small detail. It is essentially a targeted replacement tool that lets you refine an image until it is exactly right.
Outpainting works in the opposite direction by extending an image beyond its original borders. Instead of modifying the interior, you expand the canvas and ask the AI to imagine and generate what lies outside the original frame. This is particularly useful for changing the composition of a shot, such as turning a head-and-shoulders portrait into a waist-up shot or transforming a tight square image into a wide cinematic landscape while keeping the style and lighting consistent.
Suppose you had a head and shoulder shot like the one below:

You like this image and want to know if you can maybe extend it. That's where Outpainting comes in. What we'll do first is to extend the canvas area and tell our AI to add more of her.
Install the Software
For this lesson, we'll install an AI app called FooocusPlus (yes, that's three o's). Fooocus is an open-source app that enables you to do a lot of different things using one web page. FooocusPlus is a fork of Fooocus. It's designed to run on machines with low VRAM, like the 8GB we've been using for all our lessons.
Again, we'll use Pinokio to do the installing for us, just like last time. So fire up Pinokio. (If you haven't yet installed Pinokio, see this tutorial here on our site - Pinokio Install).
In Pinokio, do a search at the top for Fooocus:
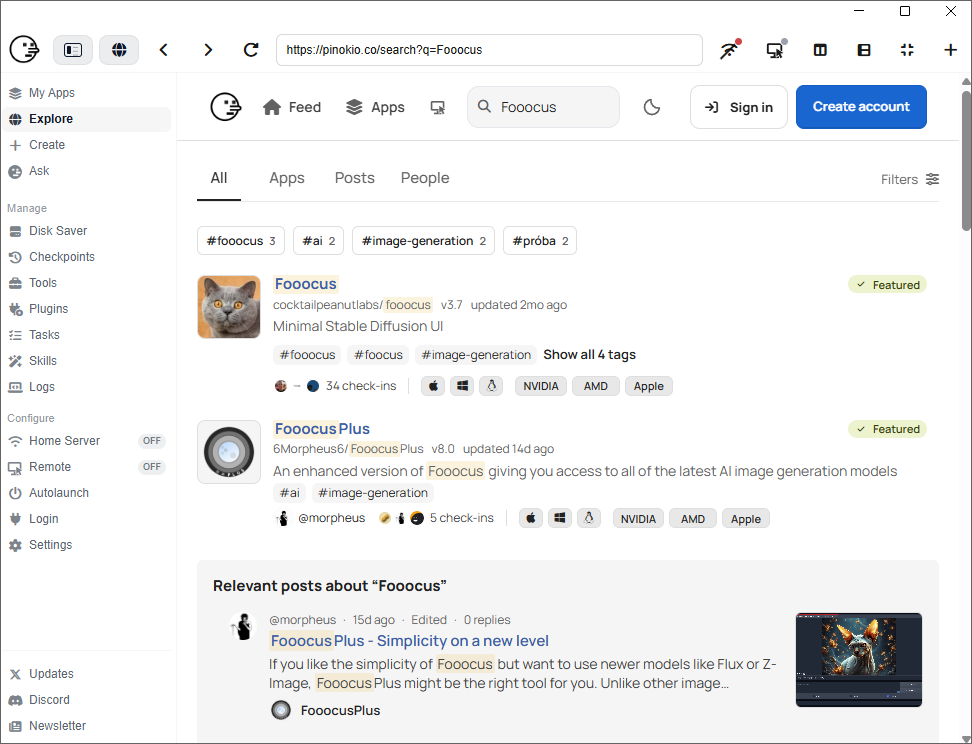
The top result is for Fooocus itself. By all means, you can install this version later, if you want. But stick with the second item for now, FooocusPlus. Click its link and then the install button on the next page:
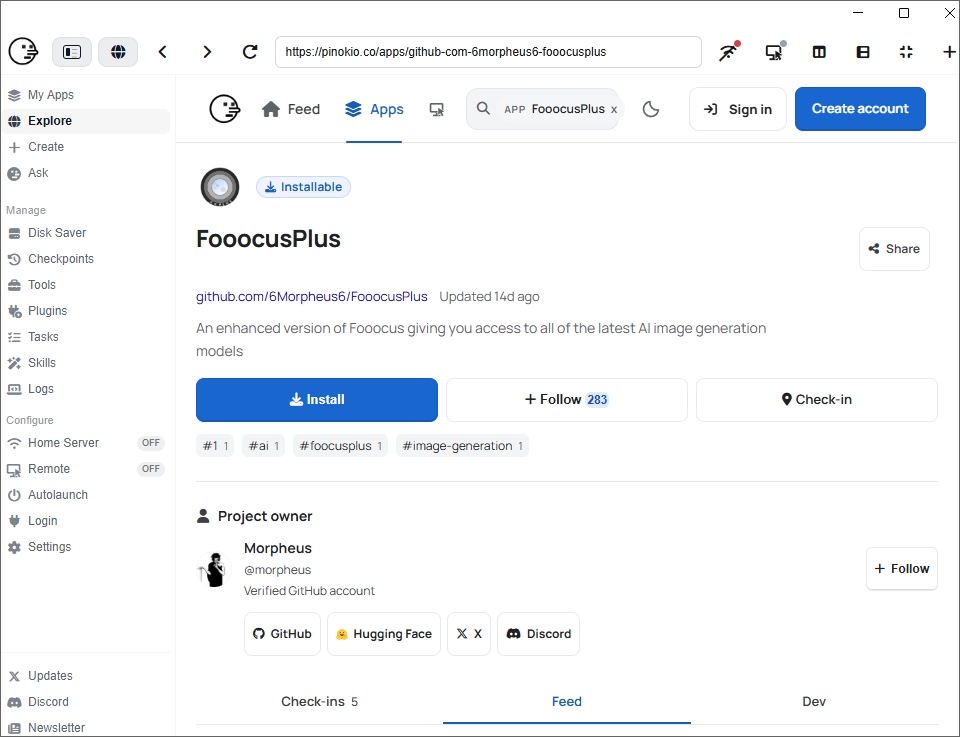
It will take some time to install. Once it does, Pinokio will set up a local web server for you to help run the app. Click the URL link for the local address Pinokio gives you. Ours was http://127.0.0.1:42003. Yours will likely have a different port number on the end in place of 42003.

When you click the link, FooocusPlus will launch, displaying an AI-generated image when it does so: (Don't worry about any security warning you get when the page loads.)
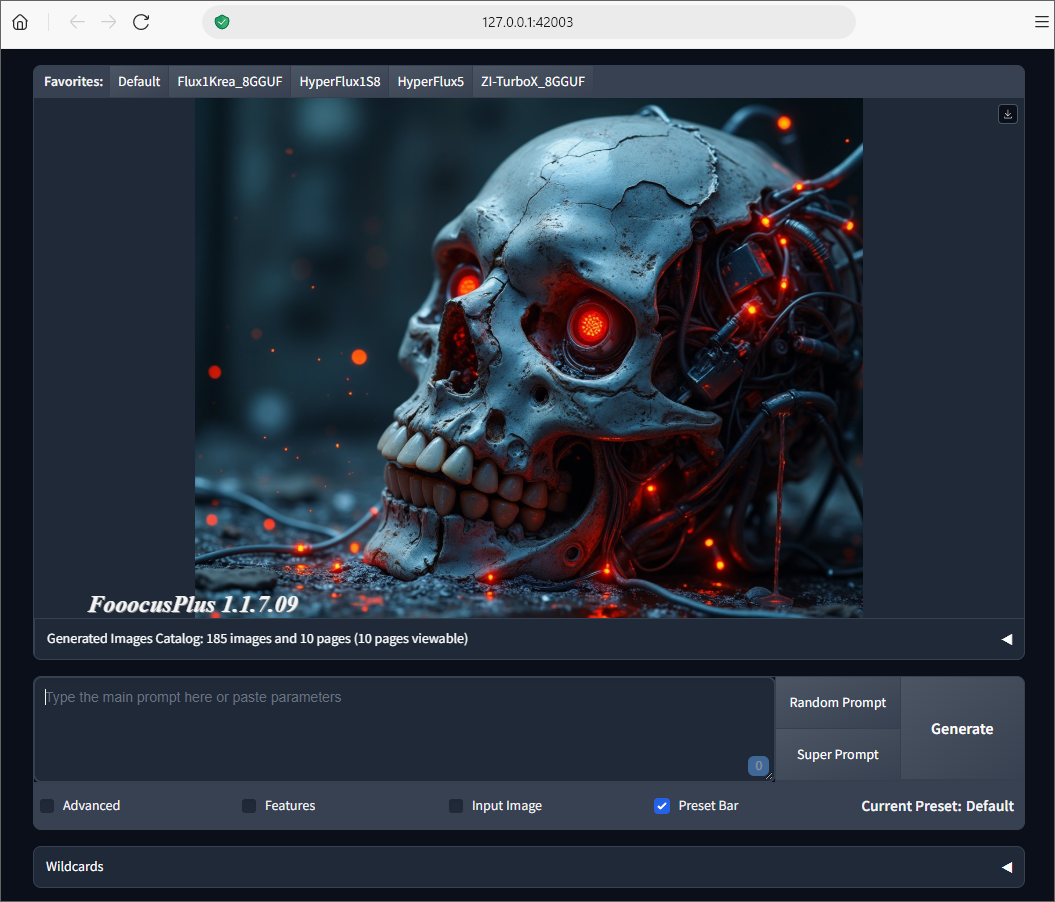
FooocusPlus comes preloaded with a Stable Diffusion model called ElsewhereXL_V10. This is the Default model you can see at the top.
As well as the Default model, you can select a favorite AI image generation model. At the time of writing, these are: FluxKrea_8GGUF, HyperFlux1S8, HyperFlux5, ZI-TurboX_8GGUF. These models don't come preinstalled with FooocusPlus. If you select one, the model will download once you generate an image. We'll stick with the default model, though, ElsewhereXL_V10.
FooocusPlus Settings
You could just go ahead and type a prompt in the prompt box then click the generate button. That would work, and we encourage you to try just that. But as this is a lesson on inpainting and outpainting, let's try that.
Check the Advanced option just below the prompt box. You should see a panel appear on the right:
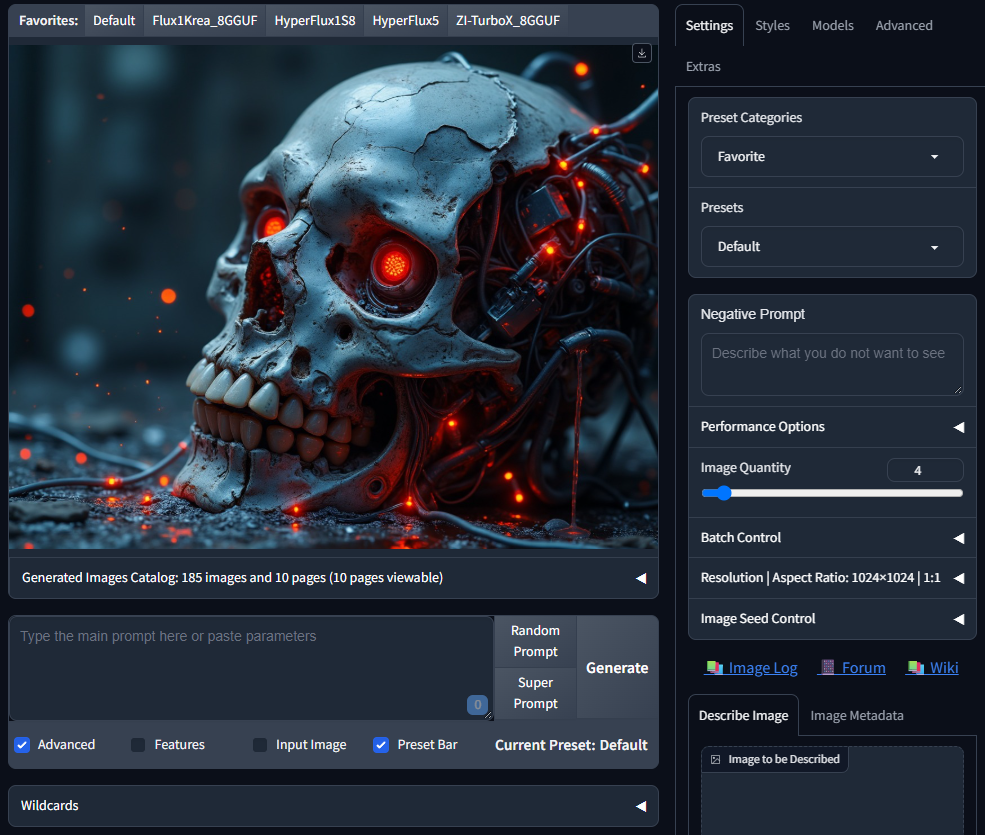
By default FooocusPlus will create 4 images when you click the Generate
button. You can change this with Image Quantity. Set this to 1.
We'll explore some of the other settings later. But notice there is a Resolution option, just under Image Quantity and Batch. We'll need this soon.
Go back to the main area. To the right of Advanced, there is an Input Image option. Check this box to see the following appear:
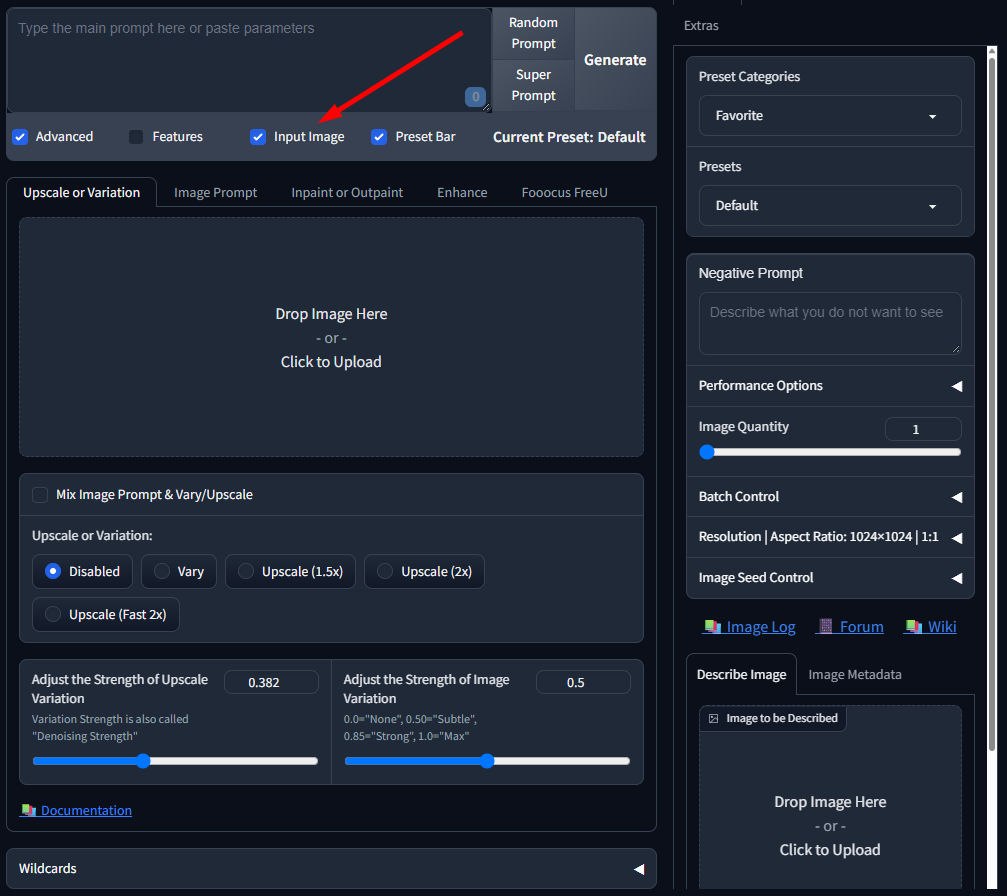
Notice at the top, just underneath Advanced and Input Image, there are some tabs for: Upscale or Variation, Image Prompt, Inpaint or Outpaint, Enhance, and Fooocus FreeU.
Select the one for Inpaint or Outpaint. You'll see this:

Now you need an image. Use ours at the top, Frankie, the Bride of Frankenstein. Scroll back up and save a copy to your own computer.
Once you have an image, click the main area where it says Drop Image Here or Click to Upload. Locate the image you downloaded above:
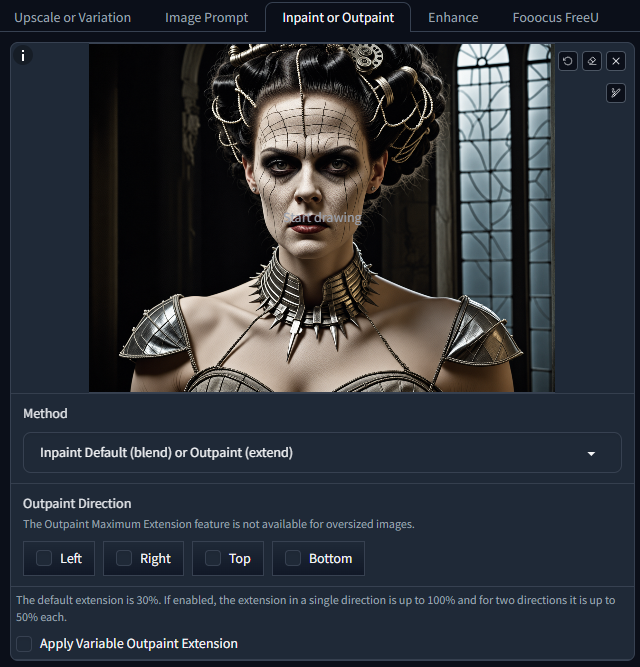
The image of Frankie is only head-and-shoulders. We'd like to extend it down. So select the Bottom option under Outpaint Direction.
You could try, in one pass, to give her a full body, with arms and legs. But this tends not to work out, and you end up with extra or missing limbs, and even objects you didn't ask for. Better is to do it in stages.
As it says in the image, the default extension is 30%. If you check the box below that, Apply Variable Outpaint Extension, you'll see a slider appear:
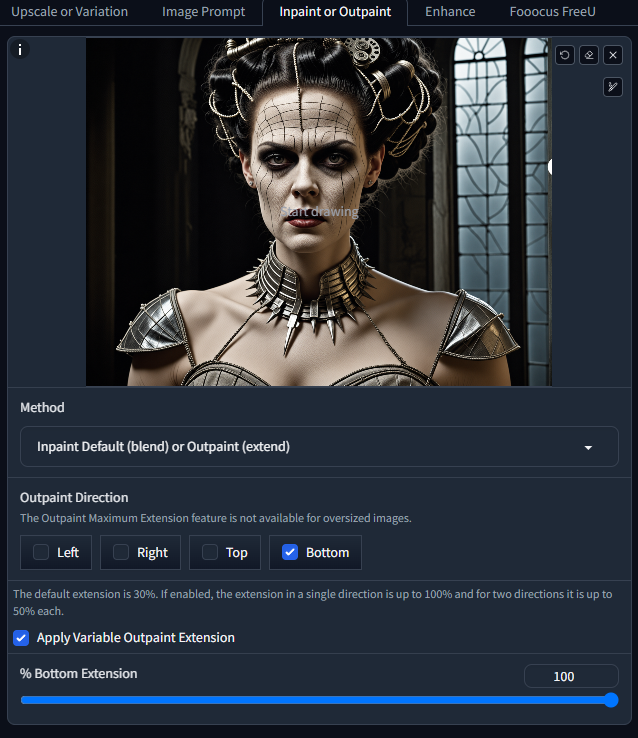
It's set to 100%, meaning FooocusPlus will try to outpaint to the bottom of your canvas, at whatever Resolution size you have. For example, the image of Frankie you downloaded above is 1024 wide by 769 high. If you changed the height to 2028 pixels, FooocusPlus would try to fill those missing pixels for the image height.
But deselect Apply Variable Outpaint Extension for the time being. Just have Bottom checked. In the Settings on the right, have a look at the Resolution options:
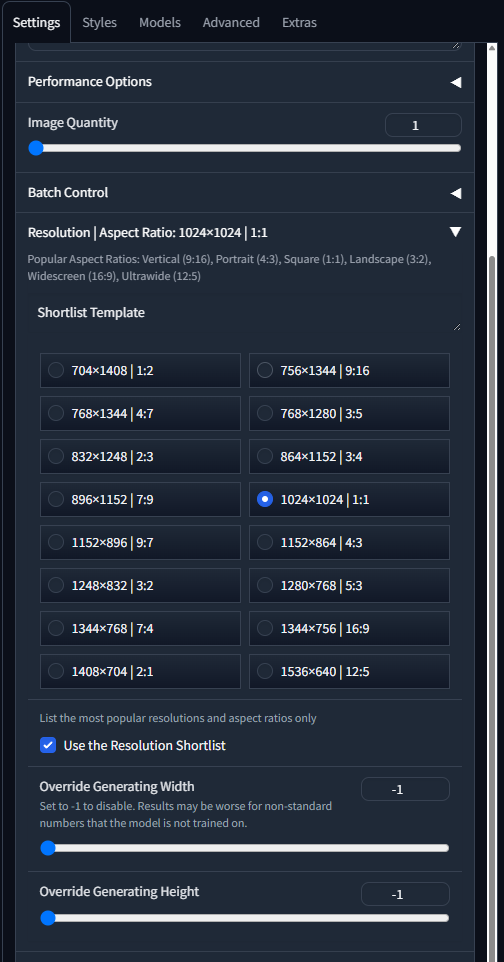
You can select one of the resolutions on the list. Or you can do a custom resolution. We'll Override Generating Height, which has a default of -1, meaning this option is switched off. Type 1000 in here:
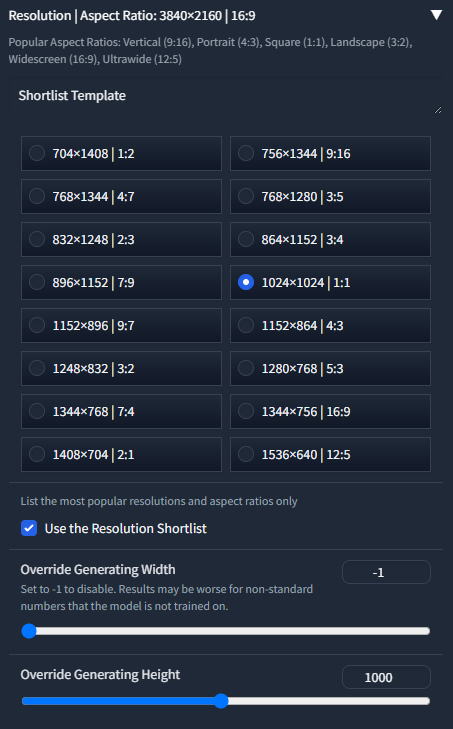
In other words, we want a new image that is 1024 pixels wide by 1000 pixels high.
Now you need a prompt. Type the following into the prompt box:
Medium shot, waist-up view of a woman as the Bride of Frankenstein, wearing a stark, plain white bridal dress made of simple fabric. She is wearing a large silver spiked collar around her neck. Dark gothic atmosphere, high contrast, cinematic lighting, photorealistic, highly detailed textures.
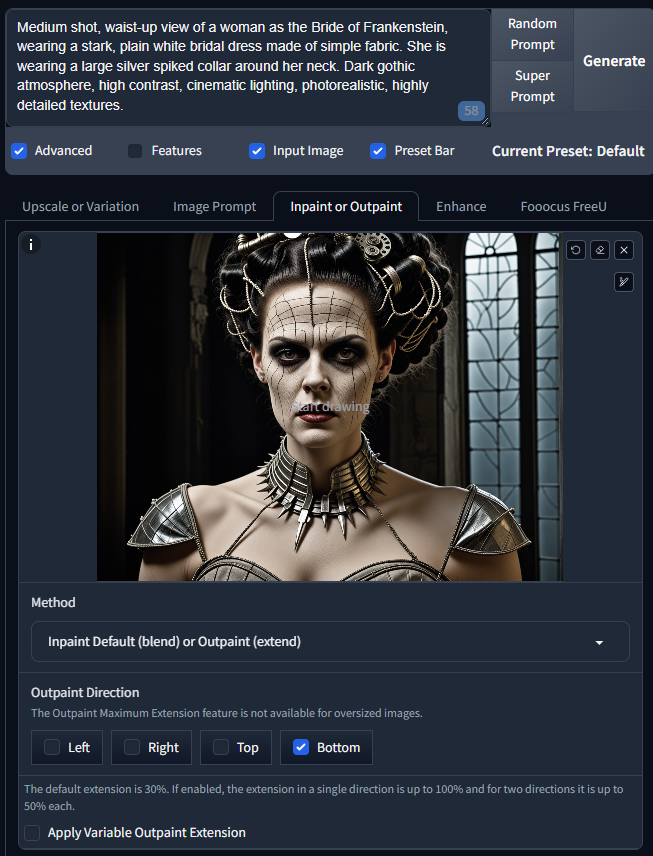
Now click the Generate button.
You won't get the same results as ours, but the AI model will try its best to outpaint the rest of your new canvas, downwards. Here's what we got:

It made a pretty good guess at what the rest of the dress should look like. But we didn't quite like the white shawl that seems to be around her arms. We clicked Generate again, changing nothing, to get this:

You can change the canvas size again and keep the prompt the same. For
the Frankie image below, we extended the canvas height to 1500 pixels.
Now check the slider for Apply Variable Outpaint Extension:
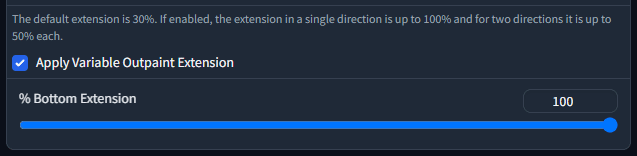
Click Generate to get a new version. Here's ours:
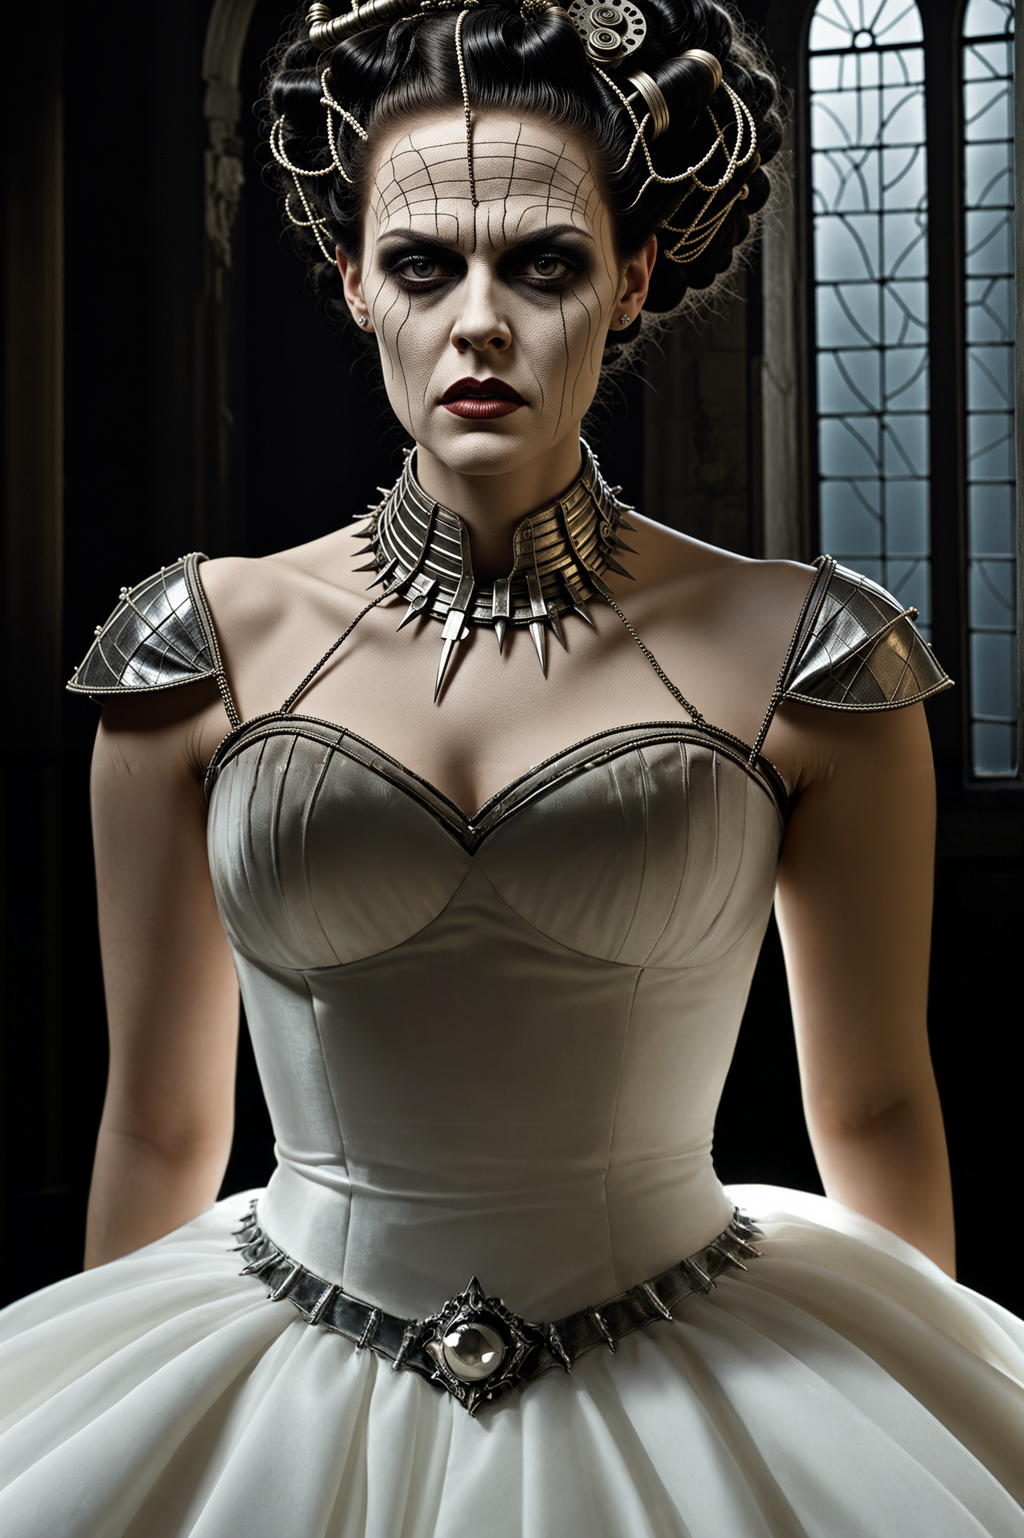
Keep playing around until you get an image you like.
Save your Images
Your images are saved in an Image Catalog. Usually at this location on a Windows machine:
C:\Users\USER_NAME\api\FooocusPlus.git\UserDir\Outputs
There will be a folder in the date format, one for each day you used FooocusPlus to generate an image. (For example, 2026-11-07.)
If you want to save an image from FooocusPlus, look out for the download icon top right of the generated image:

To see more images from your gallery, expand the item under the image, where it says Generated Image Catalog. Then select a folder name.

When you select a folder name, you'll see thumbnails at the bottom showing images from the selected gallery.
Inpainting
For Inpainting, let's give Frankie a red dress. Make sure your Inpaint or Outpaint tab has the image you want to change. To change to one of your new images, click the X in the top right of the tab:
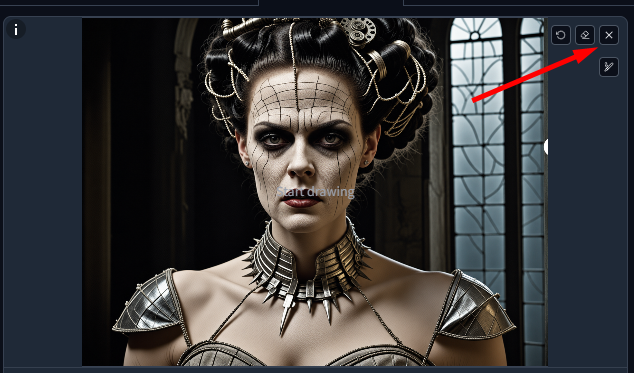
If you don't have a suitable image, use ours here:
Note the other icons: Undo, Erase, Adjust Brush Size. They are useful when inpainting.
Now load a new image. We're going to draw over the top of our image so learning the following keyboard shortcuts will help:
F - Full Screen
M - Move Canvas
R - Reset Zoom
Ctrl + Z Undo last action
CTRL + Wheel Adjust brush size
SHIFT + Wheel Zoom canvas
Notice that as soon as you hover your mouse over your image, your mouse icon will change shape. This is because it becomes a brush. Click the icon to adjust the brush size. Or hold down the Ctrl key and use your mouse wheel. What we're going to do is to paint over the area that we want the AI model to change. In this case, we just want to paint over the dress. (If, instead, you wanted to give her a pair of sunglasses, you'd just paint over her eyes.)
Use the shortcuts above to paint over Frankie's dress. (It's a very fiddly process in FooocusPlus.) You don't have to be exact. Just something like ours will do:
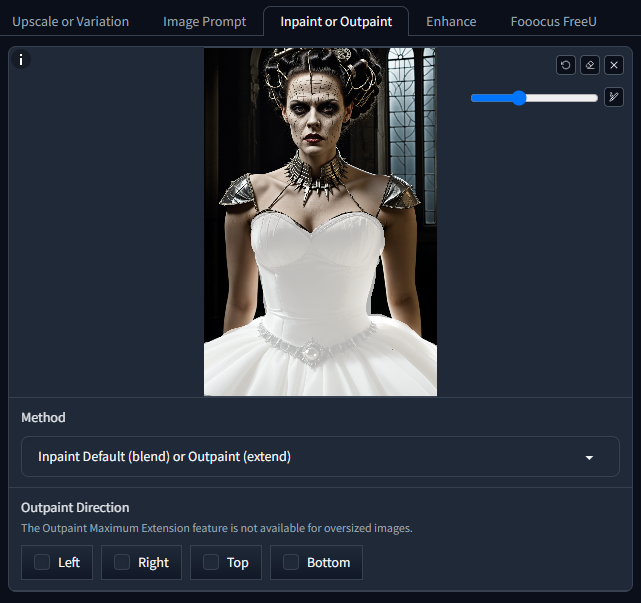
And make sure to deselect Bottom.
Once you have painted over an area of your image, you can type a new prompt. The model will then restrict itself to the area you painted and won't touch anything else.
You can add something simple for the prompt:
Medium shot, waist-up view, of a woman wearing a red dress made of simple fabric. She is wearing a large silver spiked collar around her neck. Dark gothic atmosphere, high contrast, cinematic lighting, photorealistic, highly detailed textures.
Now click Generate.
Here's ours:
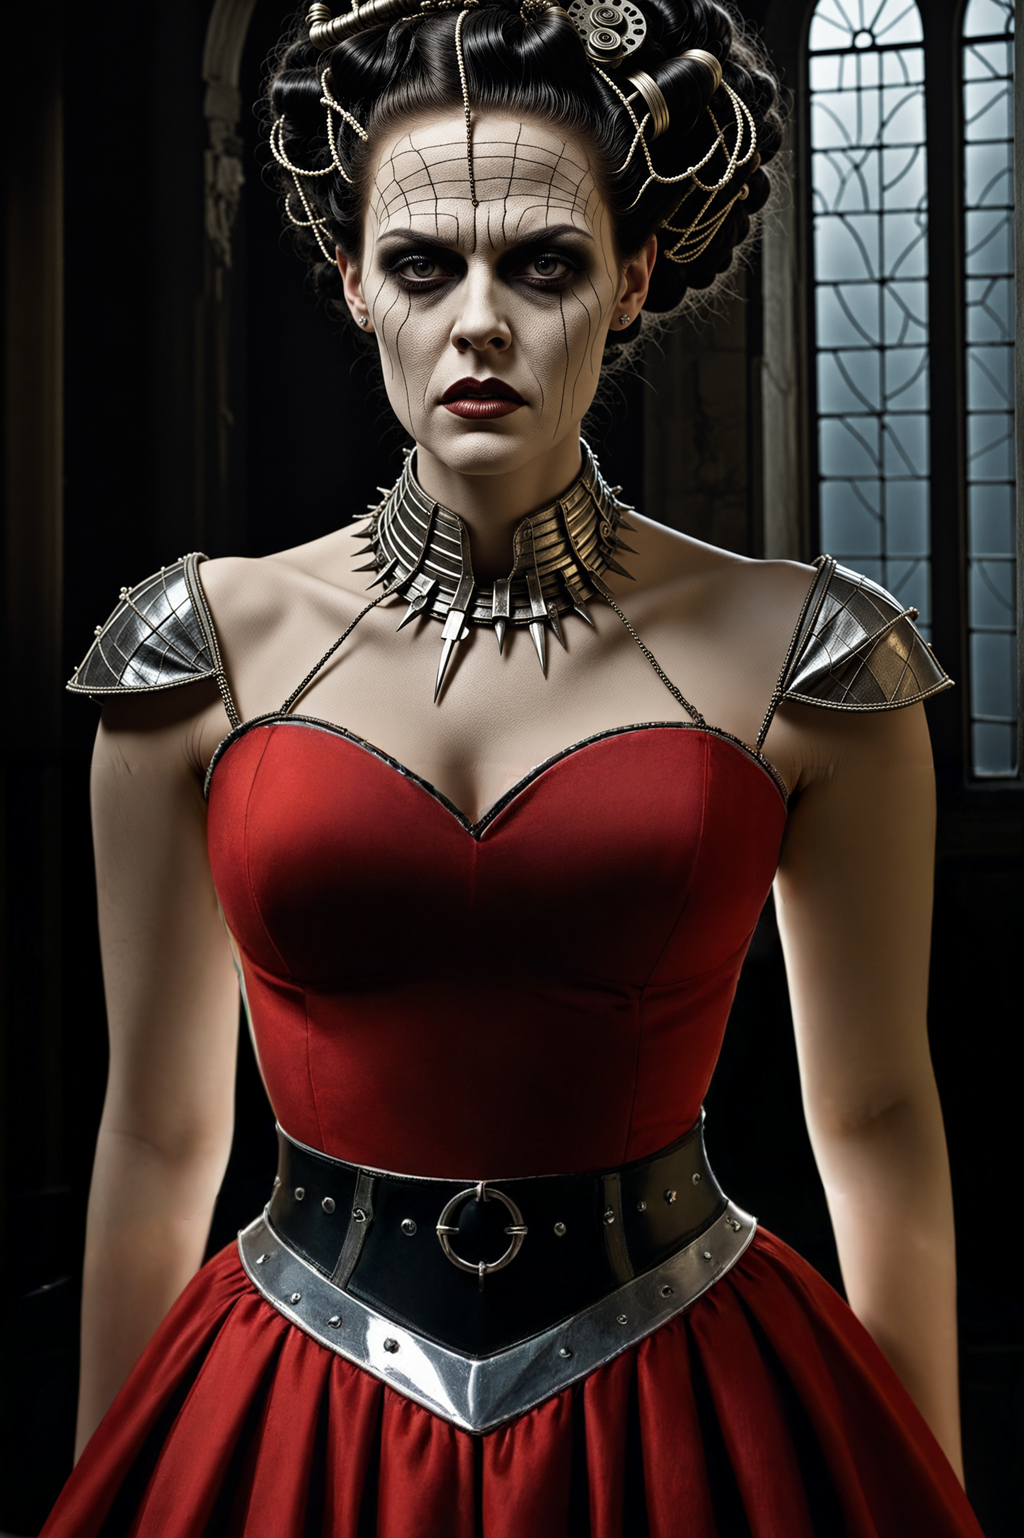
Notice that only the dress was changed. Those silver shoulder caps are still there. That's because we didn't paint them in, just the dress. And she has a new belt. It's new because we painted over the old belt.
One other thing to notice, before we leave the subject of in/outpainting. There is a dropdown list with the heading Method. Click the dropdown to see the other options:
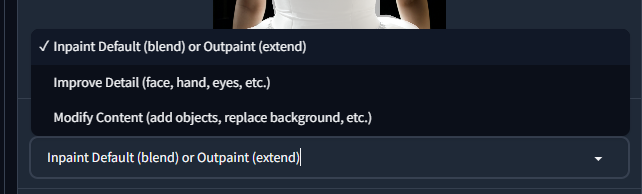
As an example, if you wanted to stick a parrot on her shoulder, you'd select the third option Modify Content (add objects, replace background, etc). Then paint a parrot-shaped object on her shoulder.
One last thing before we go.
Here's an exercise to try, so you can get some practice with outpainting.
Exercise
The image is a little narrow and you'd like to extend the areas to the
left and right of Frankie. Select Left and Right under Outpaint Direction.
Keep the image unmasked, describe the wider scene in your prompt, and
generate one or more versions.
This exercise is especially useful if you want to extend a square image and change it a 16:9 aspect ratio. You can then use the 16:9 image for videos, like we did for the goblin image in a previous lesson on talking avatars: Goblin. The goblin image about halfway down is an outpainting. It was origianlly an image with a square 1:1 aspect ratio.
A fun way to get some practice with in/out painting is by using your own image. Take a front-facing image of yourself. Try a head-and-shoulders shot. Then use outpainting to give yourself a new body. Use inpainting to give yourself some new clothes, a new hairstyle. Even a parrot on your shoulder!
(One issue you'll have with photos taken on a modern device is they tend to be too big, in terms of their resolution. For example, even on an iPhone 14, default sizes can be 3024 x 4032. At this width and height, they may be unusable for outpainting, which typically increases height and width. So you may need to resize them. You can do this from FooocusPlus. Toggle Features to on. Then expand the Transformations section. Set a new height and width for your image.)
Speaking of replacing background, in the next lesson, you'll learn how to do just that.
Remove a Background from an Image using AI -->