Home and Learn: Intermediate Programming
Setting up a Drawing Pen

Stick Figure App - Coding Prep Work
In the previous lesson, we loaded our combo box with system colors. In the lesson, we'll need a pen to draw with. We'll also get those color buttons working in the Colors Group Box.
At the top of your code, but inside of your Public Class Form1, add this global variable in VB .Net:
Dim drawingPen As Pen
And this in C#:
Pen drawingPen;
We need to create an object from the Pen. We can do this in the Form Load event.
At the top of your Form Load event, add this line in VB Net:
drawingPen = New Pen(Color.Black)
And this one in C#:
drawingPen = new Pen(Color.Black);
This sets up a new Pen object called drawingPen. We've given it a default color of black.
We can set some other values for the pen. Set the dash style to solid with this line in VB:
drawingPen.DashStyle = Drawing2D.DashStyle.Solid
And this one in C#:
drawingPen.DashStyle = System.Drawing.Drawing2D.DashStyle.Solid;
If you don't want the System.Drawing.Drawing2D at the start in C#, add another using statement to the top of your code:
using System.Drawing.Drawing2D;
The line in your Form Load event would then just be:
drawingPen.DashStyle = DashStyle.Solid;
You can do the same in VB Net. Add an Imports line to the top of your code, above the Public Class line:
Imports System.Drawing.Drawing2D
Your line of code in the form Load event would then be just this:
drawingPen.DashStyle = DashStyle.Solid
Pretty much the same as the one for C#, except without the semicolon on the end. A lot of the time, there really isn't that much difference between the two languages!
You can set a width for your Pen, as well. The width is how thick your line is going to be. We can get this from the TrackBar we set up, the one inside of the Brush Size Group Box. Add this line (again, semicolon on the end in C#):
drawingPen.Width = TrackBrushSize.Value
Now jump back to the SelectedIndexChanged event of your Combo Box. Add this line (with the semicolon on the end in C#):
drawingPen.Color = Color.FromName(cmbColors.SelectedItem.ToString())
This sets our Pen to the same color as the one chosen from the dropdown list.
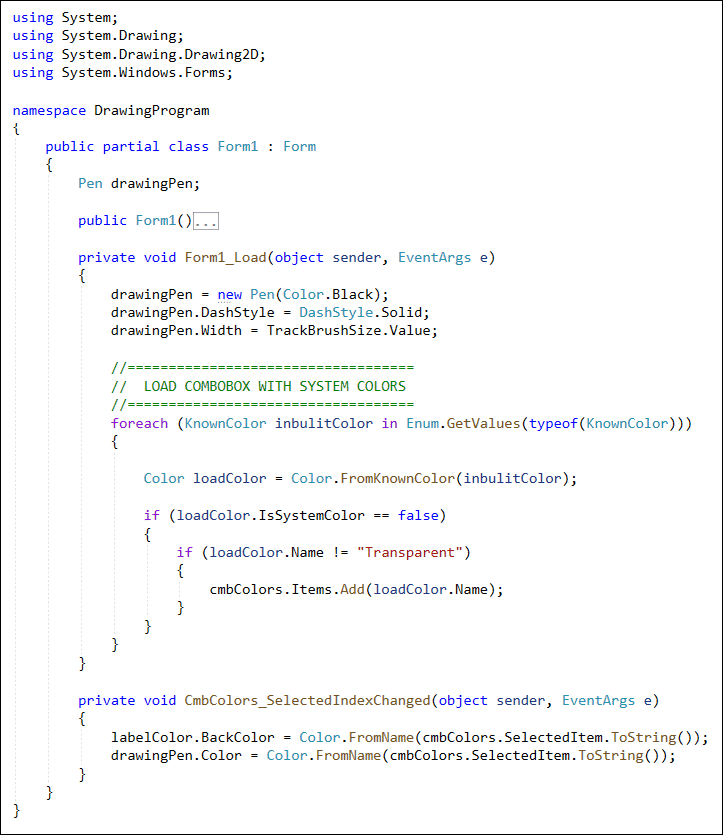
Your code should look like this so far in VB .Net:

And like this in C# .NET:
Let's do the color dialog box now.
Color Dialog Box
In the Toolbox on the left of Visual Studio, locate the Dialogs section. From the Dialogs section, double-click the ColorDialog item to add one to your code. It will appear at the bottom of the main coding window.
Make sure your color dialog control is selected. In the properties area on the right, locate the Name property and change it from the default colorDialog1 to ColorDB. (Make sure you're not still looking at the events. If you are, you'll only see HelpRequest. Click back on the A-Z button instead of the lightning bolt.)
Now double-click your Custom Color button, the one that we called BtnCustomColor. In the code stub that appears, type the following if statement in VB Net:
If ColorDB.ShowDialog() <> DialogResult.Cancel Then
End If
And this one in C#:
if (ColorDB.ShowDialog() != DialogResult.Cancel)
{
}
You've done dialog boxes before. We're just showing the color dialog box and checking if the cancel button is not clicked.
As the code for the if statement, add this line (again, you need a semicolon on the end in C#):
labelColor.BackColor = ColorDB.Color
To get the color that was chosen from a color dialog box, you only need ColorDB.Color. This can then be assigned to the BackColor of the label.
We can also set the Pen color. Add this line to your if statement (add the semicolon on the end in C#):
drawingPen.Color = ColorDB.Color
The code for your custom colors button should look like this in VB Net:
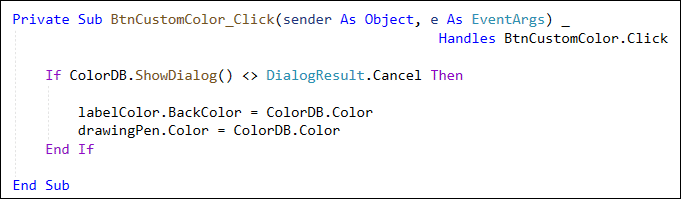
And this in C#:

Try it out. Run your program and click your Custom Colors button. You should see the color dialog box appear. Select a color and click OK. The label should change to the same color you have chosen. (Your Pen will have the same color, as well. You'll see the effect this has when we do the coding for the stick figures.)

Let's get the rest of those color buttons done. The code for them is quite easy.
The Color Buttons
Double click your blue button, which we called BtnBlue. In the code stub, add the following (with semicolons on the end in C#)
labelColor.BackColor = Color.Blue
drawingPen.Color = Color.Blue
This time, the BackColor of the label, and the Color properties of the Pen and Brush, are all set to Color.Blue.
Now do the same for the other color buttons: double-click to create a code stub, copy and paste the two lines from the blue button, and then change the color on the end from Blue to another color.
Once you've done that, you're done with the colors. Try it out. Run your program. Click one of your color buttons and it will set the background color for the label.
One more thing we could do is to set the width of the Pen. We used this in the Form Load event:
drawingPen.Width = TrackBrushSize.Value
When designing the form, though, we set the TrackBar to a default value of 5. We can change the value from the Scroll event of TrackBars.
Go back to design view. Click on your TrackBar to select it. It should have the Name TrackBrushSize. In the properties area, click on the lightning bolt to see a list of events for the TrackBar. Locate the Scroll event and double-click to create a code stub. We only need one line of code. This one (with a semicolon on the end in C#):
drawingPen.Width = TrackBrushSize.Value
Now, every time you move the slider on the TrackBar it will set the Width for the drawingPen.
Here's what your TrackBar code should look like in VB:

And here it is in C#:

Now that we have the colors, a Pen, and a Brush set up, we can start setting up the code to draw things. We'll need to get the mouse X and Y coordinates, and we'll need a few boolean flags. We'll start all that in the next lesson.
