Home and Learn: AI Beginners Course
Create Uncensored Videos for Free on your own computer with Wan2GP
Created:
In the previous lesson, we left you with something of a cliffhanger - do you now have everything you need to create videos, all uncensored and for free?
Actually, no. You're still about an hour away! Let's finish up and create our first video.
The Wan2GP Video Interface
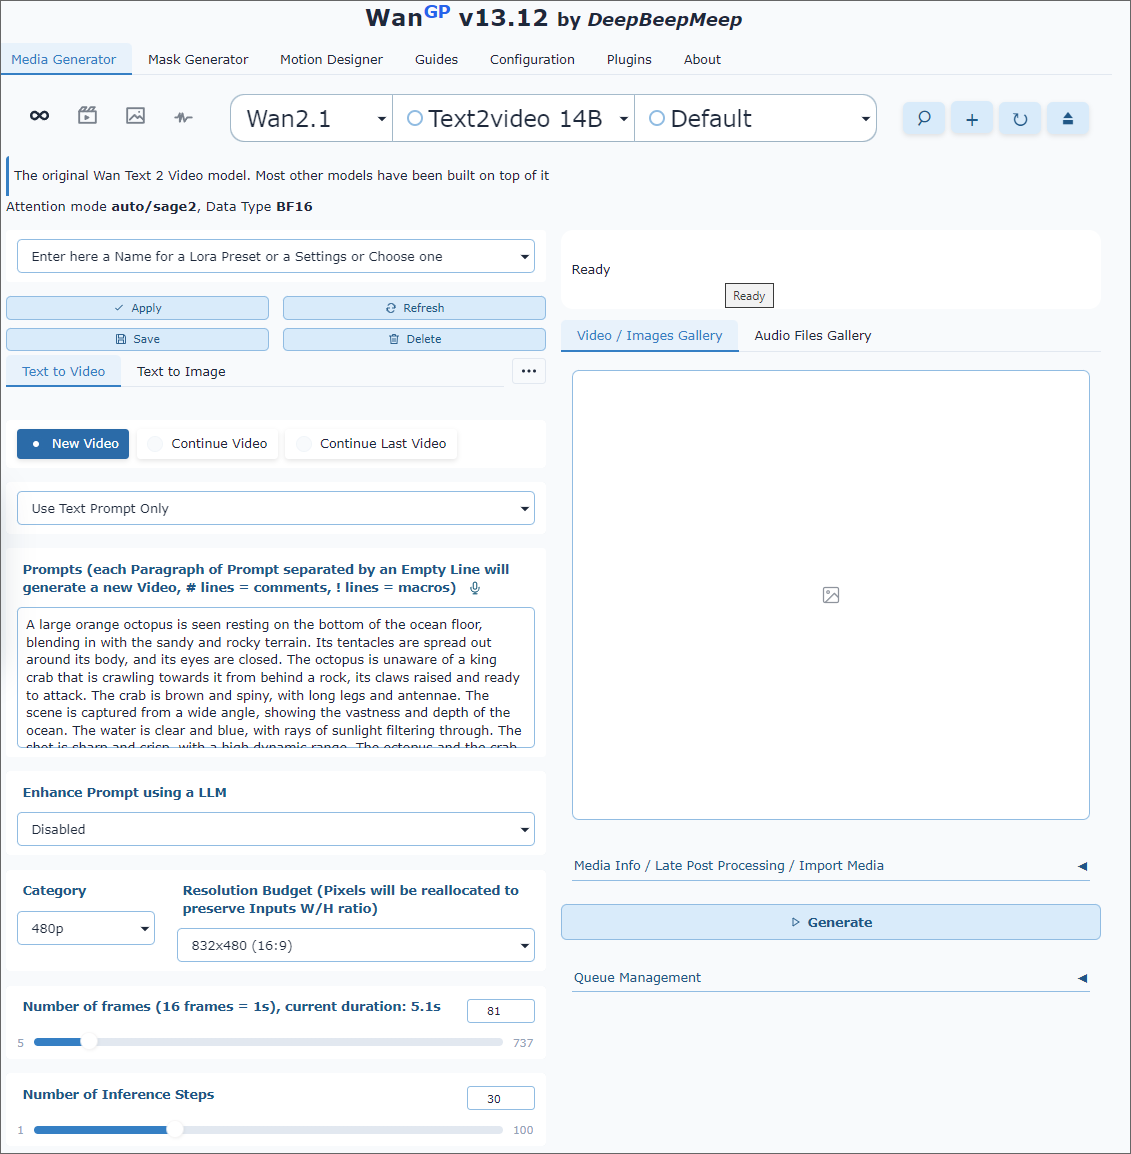
Here's the top half of the Wan2GP screen you should be looking at from our previous lesson:
Scroll down to see more (you may not see all the settings shown below):
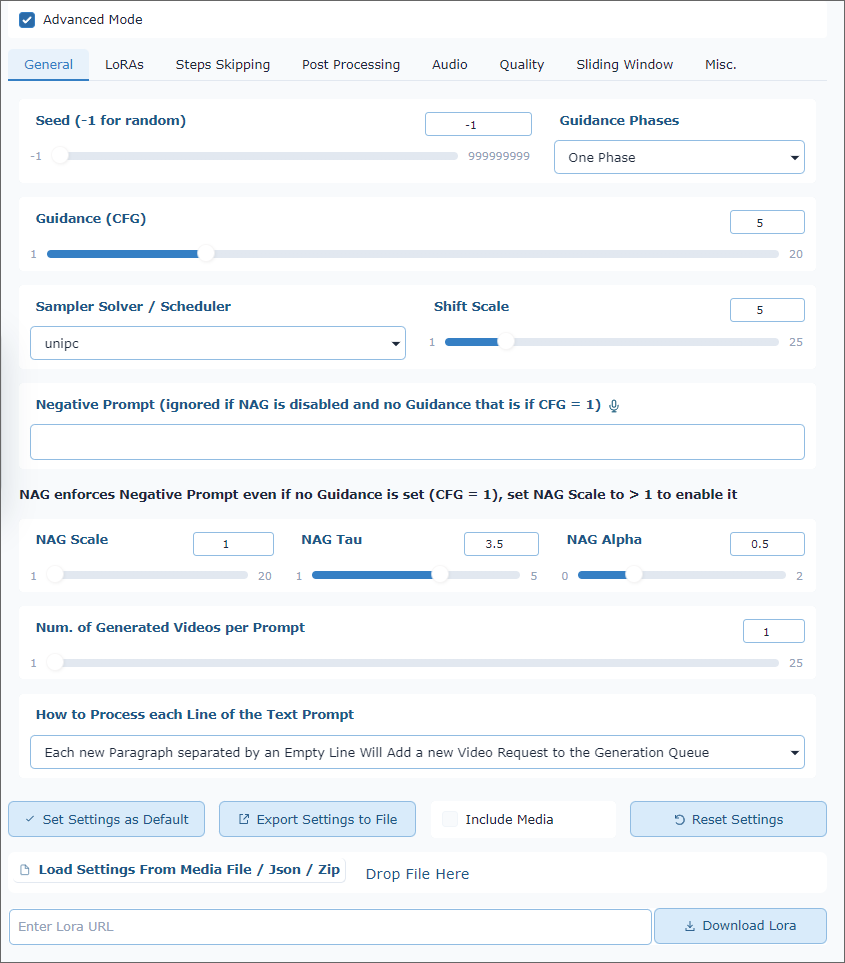
It's a little intimidating. We'll go over the various settings shortly. For now, notice the text in the prompt box:
"A large orange octopus is seen resting on the bottom of the ocean floor, blending in with the sandy and rocky terrain. Its tentacles are spread out around its body, and its eyes are closed. The octopus is unaware of a king crab that is crawling towards it from behind a rock, its claws raised and ready to attack. The crab is brown and spiny, with long legs and antennae. The scene is captured from a wide angle, showing the vastness and depth of the ocean. The water is clear and blue, with rays of sunlight filtering through. The shot is sharp and crisp, with a high dynamic range. The octopus and the crab are in focus, while the background is slightly blurred, creating a depth of field effect."
This is the famous octopus and crab thriller! It's the default prompt. Leave it as it is. Click the Generate button on the right to create the video. You'll see this:
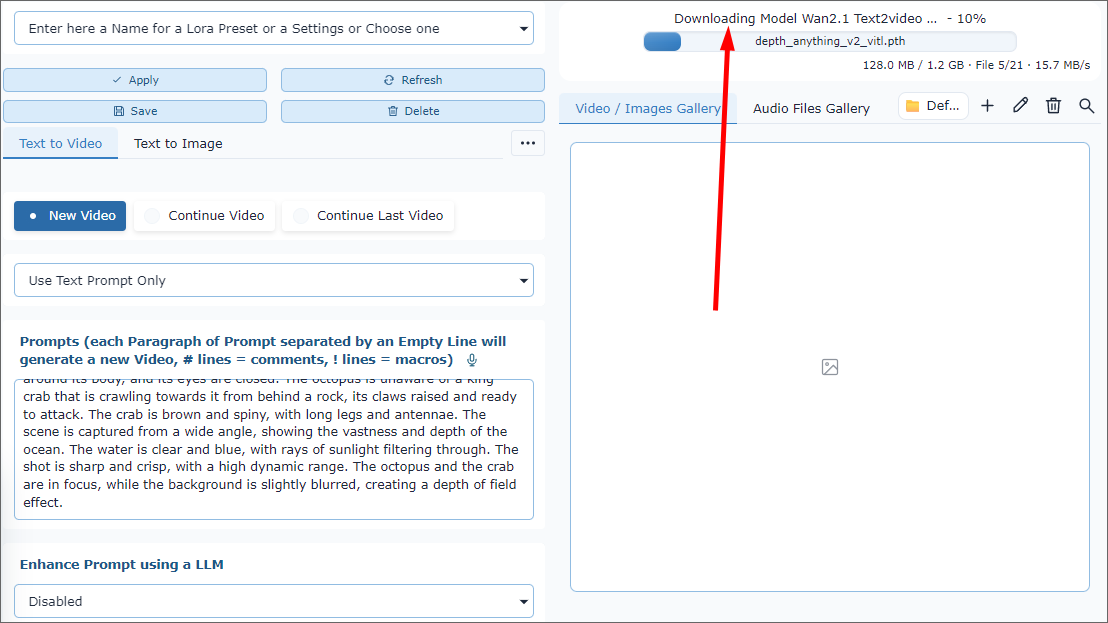
The Wan2GP AI model we're going to be using didn't actually install during the previous download and install process. It was just all the prep files that got installed. When you click the generate button for the first time, the AI model itself gets downloaded. You'll have to be patient for a while longer. The model we're downloading is about 14 gigabytes, so it can take some time. But you only need to do it once. Subsequent clicks of the Generate button will get right on with your video creation and the process will be faster.
When the model and its dependencies are finally downloaded, you'll see the progress bar change. A few options may flash by, but you should see a Denoising item appear instead of Downloading Model. The denoising can take a while. But it does mean that your video is now being created. After Denoising, you'll see a VAE Decoding process.
A fuller process when your videos are being created might be:
Encoding Prompt - often flashes past quickly. Wan2GP turns your words into numerical instructions using two text encoders. These instructions guide the video's subject, style, action, and camera direction.
Latent noise - Wan2GP starts with random, compressed video noise, not visible pixels. The seed controls that starting noise, which is why keeping a seed lets you reproduce a result.
Denoising - the main creative stage. Across a number of steps, the model changes the noisy compressed video into something that increasingly matches the prompt. This is where appearance, composition, movement, and motion coherence are formed. The default for Wan2GP is 30 steps and the default number of frame is 81 (16 frames = 1 second).
VAE Decoding - VAE means Variational Autoencoder. It converts the finished compressed latent video into ordinary RGB frames that you can see. It is not inventing the scene afresh; it is unpacking the model's compressed result. On the 8 GB card that we used, Wan2GP breaks this into small tiles to fit memory, so this can take noticeable time.
Saving / encoding the video - the frames are written to an MP4 at 24 frames per second. This is normally brief, though it can take longer for larger clips.
Eventually, though, when Wan is done its thing, you'll get a video. At last! Here is ours:
Denoising
Most of the time taken when creating videos is given over to denoising. Denoising can be slow, as this is the main video creation process. Total generation time for us, on a machine with 8GB of VRAM, was 52 minutes 43 seconds. But this time included the time it took to download the model. For a second run, we left the prompt the same except we changed orange octopus to green octopus. The total generation time for the second run was 38m 55s. Still a long time for a five-second video. So why so slow? What's going on?
The reason it's so slow can be seen at the top of the screen:

We are using Wan2.1 and the Text2Video 14B model, which is the default. It is that 14B that is causing the issue - it's too big a model to squeeze into an RTX 4060 card with 8 GB VRAM, which is what we used, and is typical of the type of card that a lot of users have. So Wan2GP uses its low-VRAM system to shuttle model data between system RAM and the GPU during denoising.
One solution to speed up the process is to use the lighter 1.3B version. Try it yourself. When a video is not being generated, click the dropdown box for Text2Video 14B. From the options that appear, select Text2Video 1.3B. When you next generate a video, this lighter model will start to download. Once it has finished, generate a new octopus video. You should find that it is considerably faster (just over 9 minutes for us):
Although we used the same number of steps in the video above, kept the frame rate the same, the resolution at 480p, the 1.3B model was about 5.7 times faster, saving 43 minutes 26 seconds per clip - an 82% reduction in total time.
The 1.3B model is the sensible default for experimenting, if you have limited VRAM. Reserve 14B for a carefully planned 'quality-first' attempt, especially once you have settled on a prompt.
Incidentally, other options on the list above are Alpha 14B, Chrono Edit 14B, Ditto:
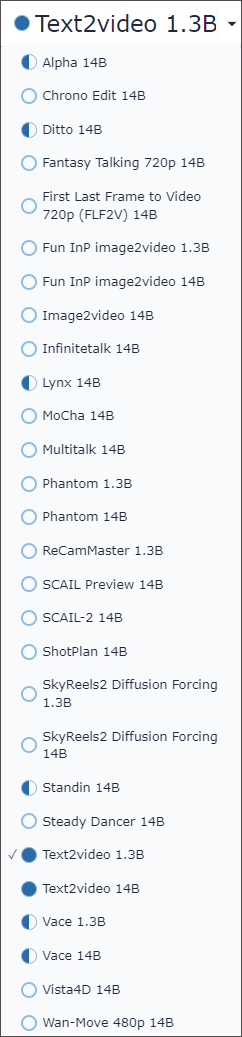
These are variants of Wan2.1. They are not all alternative 'quality levels' of the same generator. Wan2GP is a launcher for many specialist models and variants, so the dropdown mixes different purposes. Here are a few examples:
| Option | What it is for |
|---|---|
| Wan2.1 Text2Video 14B | General video made from a written prompt. Best quality of the two standard T2V choices, but extremely slow on your 8 GB GPU. |
| Wan2.1 Text2Video 1.3B | The smaller, much more practical general text-to-video model. Good choice for learning, testing prompts, and shorter waits. |
| Alpha 14B | A specialist Wan variant that produces video with a transparent/partly transparent background - useful for compositing a character, smoke, glow, etc. over other footage. It is not a general replacement for normal T2V. |
| Chrono Edit 14B | An instruction-based editor. Supply an existing image/video and tell it what to change, such as "make the car red; preserve everything else." |
| Ditto 14B | Another instruction-based video editor: provide source footage, then apply a whole-clip change such as "turn this into black-and-white film while retaining the motion." |
| Image2Video 14B | Starts from an image, preserving its character and composition better than text alone, then animates it. |
| VACE | Video editing/control toolbox: inpainting, replacing objects, extending video, pose/depth/motion control and similar tasks. |
| Lightning / FastWan / Self-Forcing / quantised variants | Speed- or memory-focused versions of a base model, often using fewer steps or a different weight format. Faster, but quality and compatibility can vary. |
If you look at the dropdowns again, you'll see there is one for the AI
model Wan2.1. Click the dropdown to see other AI models you can
use for free:

Not all of the items on the list are video models. And selecting an option is a bit hit-and-miss, as there is no guarantee it will work on your computer.
Now let's go through some of the settings you can tweak for Wan2.1.
Wan2.1 Video Settings
If you have a look below the prompt box, you'll see lots of settings you can play around with. Some of these settings are quite enigmatic:
Let's go through them.
| Setting | What it does | Beginner advice |
|---|---|---|
| Enhance Prompt using a LLM | Sends your prompt to a larger language model (LLM), which rewrites or expands it before Wan generates the video. It may turn "an octopus on the sea floor" into a much longer, cinematic description. | Leave it disabled at first. It does not make Wan itself more powerful, and it makes it harder to learn which part of the result came from your prompt. Turn it on later if you want help expanding short ideas. |
| Category: 480p | Sets the approximate pixel budget - in plain English, the overall amount of visual detail Wan must generate. Higher categories such as 720p or 1080p mean more pixels, more VRAM/RAM pressure, and much longer generation times. | 480p is the right starting point for an 8 GB GPU. Treat higher categories as quality-first experiments, not a free upgrade. |
| Resolution Budget: 832 x 480 (16:9) | Chooses the canvas shape: here, widescreen 16:9. Wan2GP keeps roughly the 480p pixel budget, then allocates those pixels to the chosen shape. With an input image, it can adjust the output dimensions to preserve the image's proportions rather than stretching it. | Use 832 x 480 for ordinary landscape/widescreen clips. Choose a portrait-shaped option for phone/social video, or square for a square input. Keep the same category while comparing shapes. |
| Number of frames: 81 | The number of still images Wan must create and join into the video. More frames mean a longer clip and more denoising work. For your Wan2.1 setup, 81 frames produced roughly five seconds of video. | 81 is a good final-test length. For quick experiments, use 49 frames; it is shorter and should be noticeably quicker. |
| Number of Inference Steps: 30 | The number of times Wan refines noisy video data into the finished clip. More steps generally give it more opportunity to improve details and consistency - but every extra step is a major time cost. | 30 is quality-first, especially on your PC. Try 20 for routine experiments and 15 for fast previews. Keep the prompt, seed, frames, and resolution fixed when comparing. |
For a relatively low VRAM graphics card like our RTX 4060, a practical progression would be:
Preview - see what your idea looks like:
Category: 480p
Resolution Budget: 832×480
Number of frames: 49 frames
Inference Steps: 15 steps
Better test - longer video:
Category: 480p
Resolution Budget: 832×480
Number of frames: 81 frames
Inference Steps: 20 steps
Final quality attempt:
Category: 480p
Resolution Budget: 832×480
Number of frames: 81 frames
Inference Steps: 30 steps
One important caveat: the time savings are not perfectly proportional, because Wan2GP has to manage a 14B model around limited VRAM. But reducing frames or steps is still the safest, clearest way to make it faster.
Advanced Mode Settings - General tab
Below the settings just outlined, there are some Advanced Mode Settings, on the general tab. Let's go through these, as well:
| Setting | What it does | Beginner advice |
|---|---|---|
| Seed (-1 = random) | The seed is the starting pattern of visual noise from which the video is formed. The same seed, prompt, model, and settings should give a closely repeatable result. -1 tells Wan2GP to choose a new random seed each time. | Use -1 while exploring. When you get an interesting result, copy its recorded seed before changing one setting - then you can make a fair comparison. |
| Guidance / CFG: 5 | CFG means Classifier-Free Guidance. It controls how firmly Wan follows your written prompt. Higher guidance generally means "follow my words more strictly"; lower guidance gives the model more freedom. | Keep 5. Very high values can make a video look forced, harsh, or less natural; very low values can make it ignore important prompt details. |
| Guidance phases: 1 | Splits the denoising process into up to three sections, each of which can use a different guidance value. With one phase, the CFG value of 5 applies throughout all 30 denoising steps. | Keep one phase. Multiple phases are an expert tool, mainly useful with certain accelerated models or carefully planned LoRA workflows. |
| Sampler Solver / Scheduler: unipc | This is the mathematical route Wan uses to move from random noise to the final video across the chosen inference steps. It is not an "art style" setting. Different solvers can give subtly different results and may suit particular model variants. | Leave it on the model's recommended default, unipc. Change it only if a model's own notes specifically recommend another solver. |
| Shift Scale: 5 | A technical flow-matching setting used by Wan's sampling process. It changes how the model travels through the denoising process, rather than directly setting sharpness, realism, or motion. | Leave it at the value supplied by the selected model - here, 5. It is not a useful first experiment because a change can alter results without an obvious, predictable benefit. |
| Negative Prompt | A list of things you want Wan to avoid. For example, "blur, text, watermark." It works alongside CFG, comparing what you want with what you do not want. | Start with it blank. Add only a short, specific term after seeing a recurring problem. It is ignored when CFG is 1, because there is then no guidance comparison. |
| Number of Generated Videos per Prompt: 1 | Tells Wan2GP how many separate attempts to make from one prompt. Each gets its own random seed when Seed is -1. | Keep it at 1. Two videos means approximately twice the waiting time and storage use. Generate one, assess it, then change one thing. |
Video Seeds
You can see the seed used to generate your video by expanding the area on the right, where it says, Media Info / Late Post Processing / Import Media:
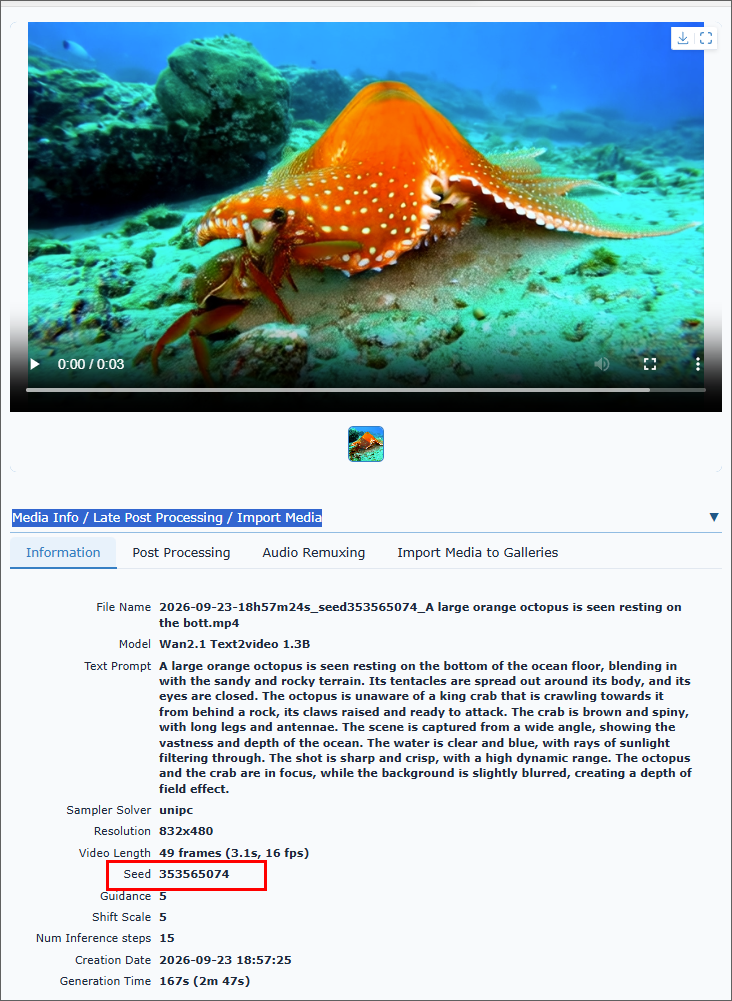
The seed is highlighted, in the image above. Copy and paste the long number into the seed box in place of the negative 1:

Now, if you keep all the other settings exactly the same, you should get the same, or a very similar, video you did before.
This can be used in your favour. Just tweak a single thing about your prompt, the colour of the octopus, for example. Generate the video again and see what happens. You should get a close variant of your previous video.
By reusing your seeds, and just tweaking other settings, you can get a better sense of just what these settings do.
But a good beginner workflow is:
1. Start with the defaults: Seed -1, CFG
5, one guidance phase, unipc, Shift Scale 5, blank negative prompt, one
video.
2. When a result is promising, keep its seed.
3. Change only one setting - such as 30 to 20 inference steps - and compare.
4. Use a negative prompt only to address a repeating fault, rather than
treating it as a compulsory second prompt.
The most important distinction is that seed helps reproducibility, CFG helps prompt adherence, and steps affect the amount of refinement/time. The solver, shift scale and phased guidance are model-tuning controls: valuable later, but poor places for beginners to start experimenting.
Wan2GP defines its seed, inference, solver, flow-shift and phased-guidance controls this way and exposes separate CFG values for phases two and three only when multiple guidance phases are selected.
WAN Prompts
Wan2.1 tends to respond well to concise, natural-language descriptions with clear action and camera movement. It works best when you describe one coherent shot rather than a long sequence of unrelated events. For example, this prompt:
A woman in a red coat walks through a snowy forest at dusk. The camera slowly tracks backward as snow falls around her. Cinematic lighting, realistic motion, shallow depth of field.
Or this:
A woman in a red coat walks slowly through a snowy pine forest at dusk. The camera tracks backward smoothly, keeping her centered in frame. Snow falls gently, her coat moves slightly in the wind, cinematic natural lighting, realistic motion.
Here are some tips for building your Wan2.1 prompts:
| Prompt | Guidance |
|---|---|
| Subject | State it clearly and simply |
| Action | Use a specific, simple action |
| Camera | Explicitly name movement such as 'pan', 'tracking shot', or 'zoom' |
| Style | Add a few relevant style terms |
| Motion | Keep it short and physically plausible |
| Prompt length | Usually concise to medium |
Avoid relying heavily on:
- Long lists of adjectives
- Contradictory instructions
- Multiple simultaneous actions
- Abstract wording such as 'make it epic'
- Image-generation tags that the model may not have been trained to interpret
- Very precise timing, unless your workflow explicitly supports it
And don't forget to check out our reference guide to the types of camera shots that you see most often in videos. That way, you can add them to your prompts with a bit more expertise. Here's the guide:
And we'll leave it at that for the Wan2.1 AI model. In the next lesson, we'll install another free AI video model using Pinokio. We'll also create videos using an image. (You can do this with Wan by selecting Image2Video 14B or Fun InP Image2Video 1.3B from the dropdown at the top.)
MORE SOON