Home and Learn: Intermediate Programming
Image Detection

Image Information: For C# and VB NET Students
In the previous lesson, you opened an image and displayed it in the picture box on your Windows Form. In this lesson, you'll learn how to get the image type.
We'll add two new variables to the code we wrote previously. The first will be an Image, which we'll get from the file name of the OpenFileDialog. Add these two lines in C#:
Image img = Image.FromFile(ofd.FileName);
string imageType = "";
And these two in VB Net:
Dim img As Image = Image.FromFile(ofd.FileName)
Dim imageType As String = ""
The img variable uses the FromFile Function/method of the Image Class. In between the round brackets of FromFile you type a file name and path to your image. The imageType variable is just an empty string for now.
We can now write code for which image type was selected: JPEG, GIF, TIFF, or PNG. We'll do this with some if … else if statements. Add these in C#:
if (ImageFormat.Jpeg.Equals(img.RawFormat))
{
imageType = "JPEG Image";
}
else if (ImageFormat.Gif.Equals(img.RawFormat))
{
imageType = "GIF Image";
}
else if (ImageFormat.Tiff.Equals(img.RawFormat))
{
imageType = "TIFF Image";
}
else if (ImageFormat.Png.Equals(img.RawFormat))
{
imageType = "PNG Image";
}
And these in VB Net:
If ImageFormat.Jpeg.Equals(img.RawFormat) Then
imageType = "JPEG Image"
ElseIf ImageFormat.Gif.Equals(img.RawFormat) Then
imageType = "GIF Image"
ElseIf ImageFormat.Tiff.Equals(img.RawFormat) Then
imageType = "Tiff Image"
ElseIf ImageFormat.Png.Equals(img.RawFormat) Then
imageType = "PNG Image"
End If
To get the image type, we're using:
ImageFormat.Jpeg.Equals(img.RawFormat)
In between the round brackets of Equals, you add the image you're trying to test, which is inside of img for us. After a dot, type RawFormat. This will get the format for the image. We're checking to see if it equals JPEG, in the line above. We have one else if for each image type.
By the time the if … else if statement has finished, we'll
have the file type in the string variable we've called imageType.
We can add this to the text box later.
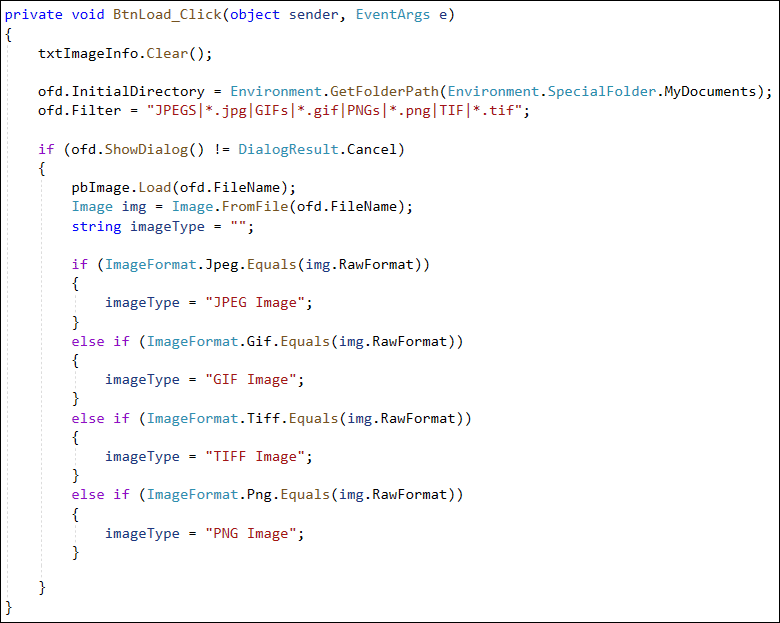
Your button code should look like this in C# (your imageType lines might be greyed out or underlined):
And here's your code, VB Net students:

In the next lesson, we'll get the information about an image's width, its height, its resolution, and its pixel depth. We'll then dispaly all the information we've gathered so far in our text box. This is quite easy!

Back to the Intermediate Programming Contents Page