Home and Learn: Intermediate Programming
Git Commit Changes

Stick Figure App - Version Control
The first bit of coding we're going to do is to load the system colours into our combo box. We'll do that when the form loads. So double-click a blank area of your form, somewhere you don't have a control. This will create a code stub for the Form Load event.
Don't worry about the code, for now. But have a look at the bottom of Visual Studio, in the blue bar. The number to the right of the pencil icon has changed from a 0 to a 3: (It might be a different number in other versions of Visual Studio)
![]()
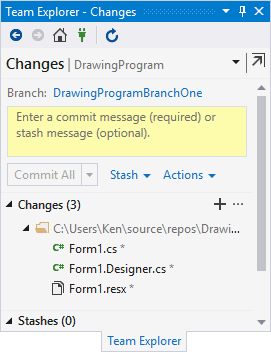
The number indicates how many changes have been made by creating the form load event.
Click on the pencil icon and the 3 and have a look at your Team Explorer again:
The process to save your changes is a little bit convoluted. The idea is you move your changes to a staging area and then commit the staged work.
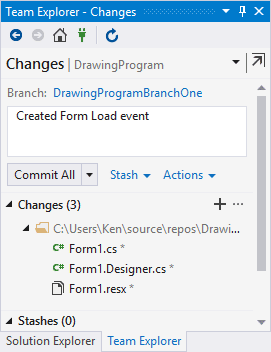
First, click inside the yellow text area and type a commit message. This can be anything you like. But type, Created Form Load event:
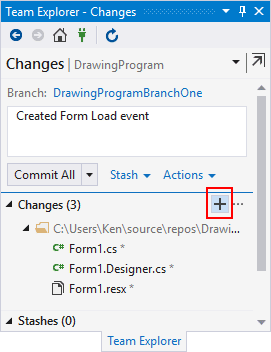
Now click the little plus button, which is the Stage All button:
You'll be prompted to save your changes. Click Save (this just saves the project. It doesn't commit your changes).
The button just below the message text area will then say Commit Staged:
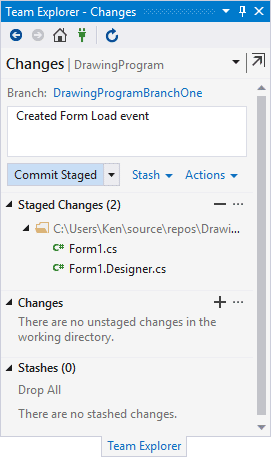
Click on Commit Staged to save your changes. Your Team Explorer tab will then look like this:

At the bottom of Visual Studio, in the blue bar, the number to the right of the pencil icon will be back to 0.
Now let's make another change and you'll see how to display a history of your changes.
Viewing Change History in Git and Visual Studio
In the yellow "Enter a Comment" area of the Change screen, type a comment, something like Load Combo Box with Colors. The pencil icon at the botton will change from a 0 to a 1. In the Team Explorer, repeat the process to commit your changes: click the plus symbol to stage the changes, click the Commit Staged button.
Now click the name of your branch in the blue bar at the bottom of Visual Studio. You'll see this menu popup again:
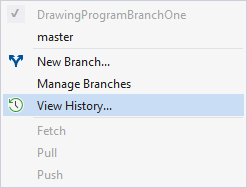
This time, click on View History. You'll see a new window appear to the left of your coding window:
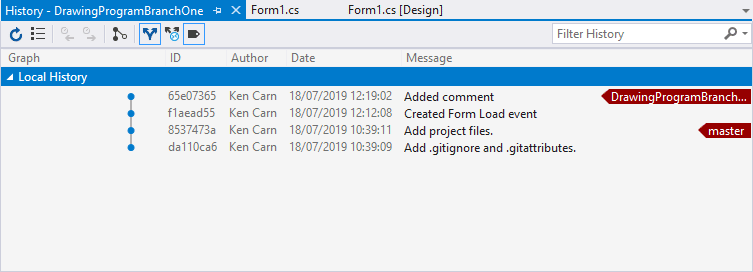
You can see an arrow pointing to the master version, and an arrow pointing to the last change you made. The comments you added for the change are displayed under Message column. Click on the "Created Form Load event" entry. Now right-click to see the following popup:
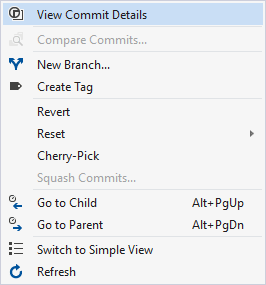
Select View Commit Details. Now have a look at the Team Explorer again. You can view any file under the Changes list. Right click on Form1 to see a menu appear:
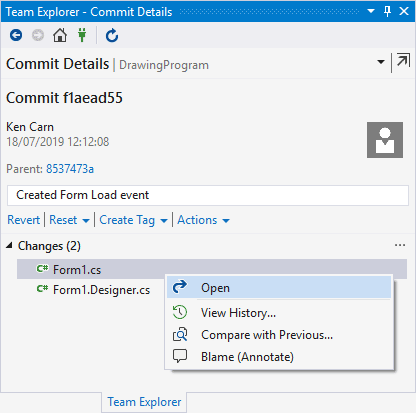
Click on Open and a new coding tab will appear to the right of the main coding window. The code in the window is the code from before we added a comment to the Form Load event. If you wanted to, you could click the Revert link in the image above. You will lose all the changes you've made after that, so it's a bit of a last resort.
Viewing your history is a good way to bring up previous version of your code. You can even copy and paste from the new window to your main coding window.
We'll leave Version Control there. We've covered the basics but it's well worth exploring further, especially creating a repo where you can push and pull to a service like Git Hub. In the next lesson, we'll start the coding. From now on, though, save your changes whenever you want, or create new branches whenever you feel the need.
