Home and Learn: Intermediate Programming
Git Version Control, Branches

Stick Figure App - Version Control
A Branch, sometimes called a Fork, is the equivalent of copying and pasting your entire project. You'll then have two versions you can work on, an original version, called the master, and a copy. You can create as many branches as you want. If you had your project stored in a repository (a repo) other people could download a copy of it. They would then be working on their own branch.
Because you've just spent a lot of time designing your form in the previous lessons, it would be a good idea to create a branch from it. If anything goes wrong, you can always call up the original version (the master) and create another branch from it. Or you might just want to go in a different direction with the completed form, by adding new features, for example.
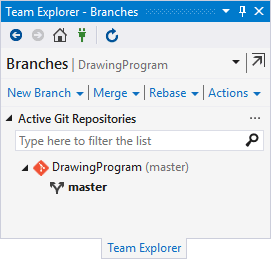
Click on the Branches item in the Team Explorer. You'll see this:
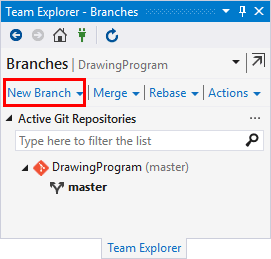
Click on New Branch:
When you click on New Branch, you'll be prompted to enter a name for it:
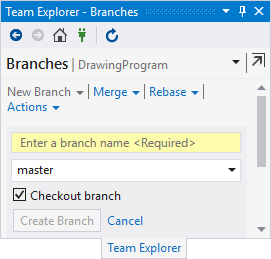
Click inside the yellow text box and enter a name. Call it DrawingProgramBranchOne:
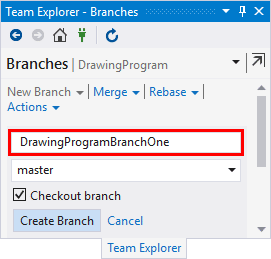
When you've entered the name, make sure there is a tick in the Checkout branch box. (Checking out means you're now working on this branch.) Then click the Create Branch button in the bottom left of the Team Explorer. The tab will then change to this:
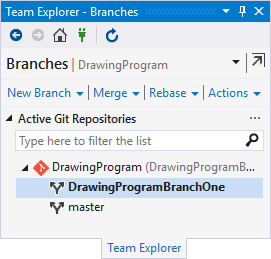
The highlighted branch is the one you're working on.
Now have a look at the bottom of Visual Studio again. In the bottom right, on the blue bar, you'll see the name of the branch you currently have checked out:
![]()
The two arrows going left and right indicate a branch. DrawingProgramBranchOne is the branch we have checked out. The single arrow on the far left pointing up is where you can upload (push) your changes to an online repo. We haven't got an online repo, so we'll leave pushing alone. The 0 to the right of the little pencil indicates the changes you have made to this branch. We haven't made any changes yet, which is why it's a zero.
But click on DrawingProgramBranchOne and you'll see a menu appear. This one:
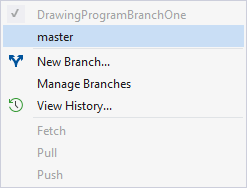
Rather confusingly, the highlighted item is not the branch you're working on. The branch you're working on is the one at the top. It's greyed out and has a check mark to the left of it. If you wanted to switch back to the original version of your program, you'd click on master. If you quickly want to switch between branches, this is the place to do it.
OK, let's make some changes to our program and see what happens. We'll do that in the next lesson when you'll learn about committing changes.
