Home and Learn: Android Course
Android Toggle Buttons
In the previous lessons, we added RadioButtons and CheckBoxes to a layout, and wrote the code to get them working. Another widget you can add to your apps is the Toggle button. This lets you have an on/off state. What we'll do is to add one to our layout for Terms and Conditions. If the Toggle button is off then the user doesn't agree with the Terms and Conditions. If the button is on, then they do agree with them. Let's see how they work. We'll also explore listeners.
We've started a new projects for this, with Empty Views Activity selected in the dialog box. When the project is loaded, move the default TextView up a bit. With the TextView selected, change the id in the Attributes area on the right of Android Studio. Change it to displayArea. Change the text on the TextView to Display Area.
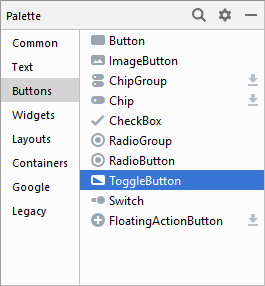
Now let's add a Toggle Button. The ToggleButton is in the Buttons category:
Drag one on to your layout, just below your Text View. Add a constraint to the bottom of the TextView:

With the toggle button selected, have a look at the ID property on the right. It has a default ID of toggleButton. Change this to termsToggle:

Android Event Listeners
Now open up your MainActivity.java file.
Previously, we set up methods to handle our button presses. We then pointed to the methods using the Attributes area. Another way to handle button presses and clicks is to set up something called a Listener. As the name suggests, these Listeners listen out for any button presses or clicks. They then call a method that activates your code. When you set up a Listener, you don't need to use the Attributes area to point to a method. A Listener is always alert and ready for action!
Listeners are usually set up in the onCreate method of your app. This way, they are initialised when the app starts up. This contrasts with the methods we set up before, where the method has to be initialised and called when a button is pressed or clicked.
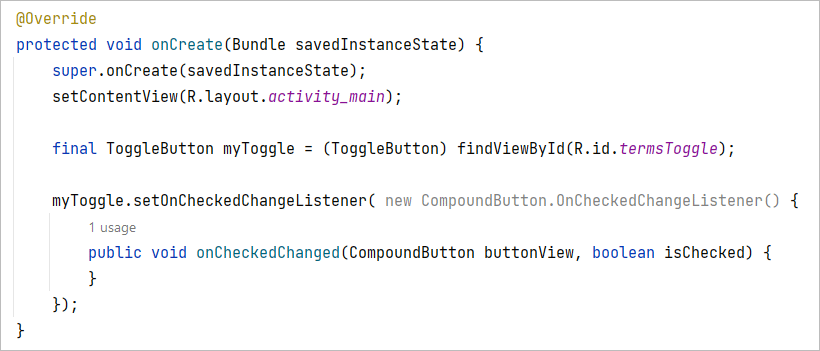
In the onCreate method of your code, then, add the following line:
final ToggleButton myToggle = (ToggleButton) findViewById(R.id.termsToggle);
(If you get any red text, press ALT + Enter to add the android library for a ToggleButton. Or simply type import android.widget.ToggleButtton; to the top of your code.)
The line of code just sets up a ToggleButton with the variable name of myToggle. We use findViewById to reference the toggle button on the layout.
To set up the listener, you start with this rather complicated code:
myToggle.setOnCheckedChangeListener( new CompoundButton.OnCheckedChangeListener() {
});
Note where all the curly brackets and round brackets are. It's very easy to get these wrong! At the end, you need a curly bracket, a round bracket, and a semicolon.
You're not done setting up the listener yet, though. Add this method inside of the listener. It should get rid of any red lines you have:
public void onCheckedChanged(CompoundButton buttonView, boolean isChecked) {
}
The whole thing should look like this:
If you're missing any import statements at the top for this project, you should have these (the ones in bold are new for this tutorial):
androidx.appcompat.app.AppCompatActivit
import android.os.Bundle;
import android.widget.CompoundButton;
import android.widget.ToggleButton;
The actual code for the listener is fairly simply. It's this:
TextView myText = (TextView) findViewById(R.id.displayArea);
if (isChecked) {
myText.setText("I agree with the Terms and Conditions");
} else {
myText.setText("I do NOT agree with the Terms and Conditions");
}
Again, we get a reference to our TextView called displayArea. Then we have an IF statement. The IF statement examines a boolean variable called isChecked. If this is true then we set some text; if it's false then we set some other text. But where is this Boolean variable isChecked coming from? Well, have a look at the method inside of the listener:
public void onCheckedChanged(CompoundButton buttonView, boolean isChecked) {
The onCheckedChanged method accepts a Boolean variable as one of its parameters. It's this Boolean variable, isChecked, that is used in our code.
Add the if statement to your own code and your onCreate method will look like this (the highlighted text is because we didn't set up a string resource, but simply entered text directly):

Test out your app. When you run it on the Emulator or a real phone hit your toggle button. You should see this:

Hit the toggle button again and you'll see this:
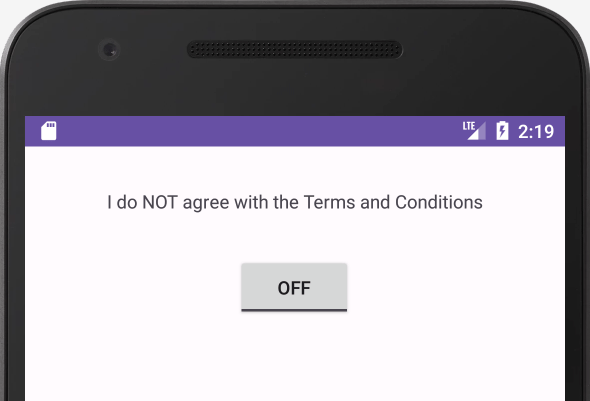
So we're toggling from ON to OFF, with a different message being displayed, depending on which state the toggle button is in.
That text on the toggle button that says ON and OFF can be changed to something of your choosing. Stop the app from running. In Android Studio, click back on the activity_main.xml file. Make sure you are in Design view and not Text view for the layout. With your toggle button selected, look at the properties area on the right. Locate the textOff and textOn properties:

Change these to anything you like (again, we're entering direct text rather than setting up a string resource):

Run your app again and test out your new values.
You can even set these values with code, if you want to. Like this:
final ToggleButton myToggle = (ToggleButton) findViewById(R.id.termsToggle);
myToggle.setTextOn("AGREE");
myToggle.setTextOff("DISAGREE");
The two method to use are setTextOn and setTextOff.
ToggleButton styles
If you don't like the style of your toggle button, you can choose one of the other presets quite easily. In Design Layout view, click on your toggle button to select it. In the Attributes area on the right, locate the style attribute and click the button to the right of the textbox:

Clicking the button brings up the Resources dialogue box. Type toggle in the search box at the top to see the following styles you can apply:

Select one of the styles under the Android heading. In the image below, we've gone for Widget.Button.Toggle:

When the app is run, the toggle button will look like this in the ON state:
![]()
Try some of the other styles, though, to see what they look like.
In the next lesson, you'll learn about the Android SeekBar. A SeekBar is one of those sliders you use to change the brightness or volume on your phone/tablet.
< Checkboxes Code| Android SeekBar >
Back to the Android Contents Page