Home and Learn: Android Course
Android Intents
An Intent is an object that acts as a sort of middleman between your code and an Activity screen. In your code, you create a new Intent object and tell it which class the Intent refers to. You can then launch an Activity by calling a method, with the name of your Intent between the method's round brackets.
To see how all this works, go back to your MainActivity.java code. Add the following line between the curly brackets of your displaySecondActivity method:
Intent myIntent = new Intent( this, SecondActivity.class);
When you add the line, you'll get some red highlights:

Press ALT + Enter to add the Intent library as an import. (Or just type import android.content.Intent at the top of the coding window, with all the other import lines.) The red text should disappear for the Intent, but not for SecondActivity:

The reason that SecondActivity is still red is because this is the name of a Java class file, and we haven't yet created this file. We'll do so shortly.
To create an Intent, though, you start with the name Intent. You then need a variable name. We've called ours myIntent, but you can change this to almost anything you like. After an equal sign, you type the new keyword to tell Android that you want to create a new object. After a space, we then have the following (later versions of Android Studio may have packageContext before the keyword this):
Intent( this, SecondActivity.class );
This is a constructor for the Intent class. In between the round brackets of Intent, you first need something called a context (we'll explore contexts later in the course). You can use the keyword this as the context, which signifies the current Activity in this app. After a comma, you then type the name of a Java class. We have a Java class called SecondActivity, which we'll create now.
To create the SecondActivity class, and an XML Layout file to go with it, click the File menu at the top of Android Studio. From the File menu, select New > Activity > Empty Views Activity:

You can also right-click on your app folder in the explorer area on the left of Android Studio. From the menu that appears, select New > Activity > Empty Views Activity:

When you click on Empty Views Activity, you'll see this screen appear:
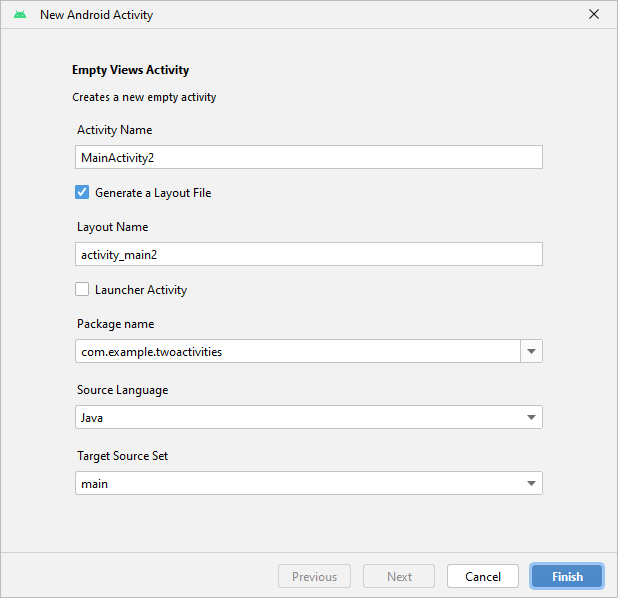
You're doing two things here: one is creating a Java class file, the other is creating an XML layout file to go with the Java file. Make sure that Generate Layout File is selected. For the Activity Name at the top, type SecondActivity. Launcher Activity should be unselected, and you want Java as the language. Target Source Set should be main:

Click the Finish button when your screen looks like our above (except for the package name). Android studio will display your new Java file:

Notice that the red errors are all gone. They are gone because you have just added a java file called SecondActivity, which is what we specified earlier.
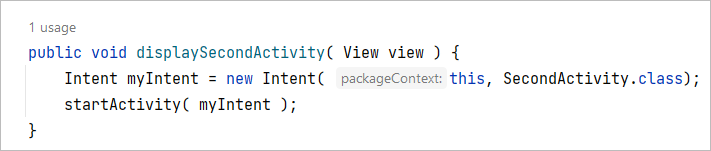
Now click back on MainActivity.java file. In the MainActivity file, we can add a line that starts the new Activity. Add the following line below your Intent one:
startActivity( myIntent );
Your displaySecondActivity method should now look like this:
You could run your app at this stage, but let's have a look at the new files that we created.
Have a look at the explorer area on the left. You should now see two Java files in the Java folder:

You should also see two XML files in the res > layout folder:

If you need to reopen a file in the coding window, you can come here, to the explorer window, and double click a file.
Now have a look at the code for SecondActivity.java file:

You can see it's almost the same as the MainActivity.java file when we first created the project. The only difference is the resource between the round brackets of setContentView:
setContentView( R.layout.activity_second );
The XML layout file associated with this content view is activity_second, which is in the layout folder of R (the resource folder).
When we click our button on the first activity, it will call the displaySecondActivity method. This method creates an Intent, which is then used in startActivity. Because we pointed to the SecondActivity java file in our intent, it's this java file that will get launched. This second activity has its own onCreate method, which will get called automatically when SecondActivity is loaded. The onCreate method of SecondActivity will use the activity_second layout file as its Content View.
Now click on the activity_second XML file in the editor. Make sure you still have AutoConnect turned on. Drag a TextView control from the palette onto your blank activity. Your screen will look like this:

If you get a warning about Missing Constraints, click the Infer Contraints wand icon in the toolbar just above the white layout. You did this in the previous lesson.
Again, just as in previous lessons, add a new string resource to change the text on the TextView. For the Resource name, type second_activity_label. For the Resource value, type Second Activity:

Click OK and your activity will look like this:

Now run your app by clicking Run > Run App from the menu at the top of Android Studio, or by clicking the green arrow on the toolbar. When it loads, you should see this on your phone or emulator:

Click or press the button to see the second activity launch:

To get back to your first page, click the white back arrow at the bottom of the screen.
However, there is problem: there is no way to get back to the first activity from the second one. Let's fix that.
Close down the running app by clicking the red stop square in Android Studio:
![]()
While we're discussing activities and intents, what we'll do now is to send some information from the first activity to the second activity. This information will be displayed in the Text View on the second activity.
< Android Button Clicks| Send Data to an Intent >
Back to the Android Contents Page