Home and Learn: Android Course
Android List App Project
This is a tricky lesson! What we're going to do is to build an app that uses a list of items. Tap an item on the list and you'll go to a new Activity. You'd think Android would make this easy, since apps with lists of items are very popular. But they haven't. In fact, quite the opposite! There's a lot of intermediate to advanced Java code needed. To save you some pain, we've got a couple of Java files for you to download. Once you have the files, it should be pretty straightforward.
With those warnings out of the way, let's get started:
Project Setup
The app we're going to design looks like this:

Tap an item on the list and you'll launch an activity with a bigger version of the flag. But you can design this second activity any way you want. More information about the country and its flag, for example. But we'll keep it simple.
Create a new Empty Views Activity project for this. Call it anything you like, but make sure that the language is Java. Click Finish to create the project. (If you get any errors creating the project, see this page: setup errors.) Delete the default Hello World TextView, as we won't need it.
The RecyclerView in Android
The RecyclerView is a better, more modern version of the legacy widget ListView. They are easy enough to add to an Activity, but making them work is quite the journey!
In your activity_main.xml file, locate the RecyclerView, which is under the Common category and the Containers category:

Drag one onto your white activity and add it should look like this:

As usual, add some constraints to the widget:

In the ID box at the top of the Attributes panel on the left of Android Studie, enter rvFlags as the id. We'll need this id later. We've set most of the constraints to a value of 32, except for the bottom one, which is set to 1. The layout_width and layout_height are both set to a value of 0dp.
That's it for the activity_main.xml file. But notice that the RecyclerView is a list of items. The idea is that you replace each item on the list with a custom row. Our custom row will be a flag image and two TextView widgets. This:

In the RecyclerView, each of the items, (item 0, item 1, item 2, etc.) will be replaced by one of those views in the image above.
The next step, then is to design the View with the Image and the TextViews.
Create an Android Layout File
In the Project Explorer area on the left of Android Studio, right-click the res > layout folder. From the menu that appears, select New > Layout Resource File.

From the dialogue box that appears, type recycler_rows as the file name. For the root element, change it from the default constraint layout to this:
androidx.appcompat.widget.LinearLayoutCompat
Here's your dialog box:

Click OK to create the Activity.
With your new recycler_view_row.xml file displayed, locate the Attributes panel on the right of Android studio. Set the following:
layout_width: match_parent
layout_height: wrap_content
orientation: horizontal
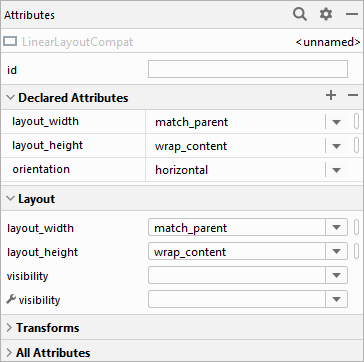
For the last one, orientation, you'll have to expand the All Attributes section and scroll right down.
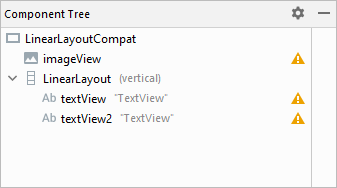
Now drag an ImageView widget onto the linear layout. When the dialog box appears, just select a default image:

Also in the Palette, drag another linear layout onto the Component Tree, just under the ImageView. Make sure it's the vertical linear layout.
Onto this new layout, drag a two TextView widgets. Here's what your Component Tree should look like (don't worry about the yellow warning triangles):
And here's the activity:

It looks a bit squashed, so let's set a few attributes.
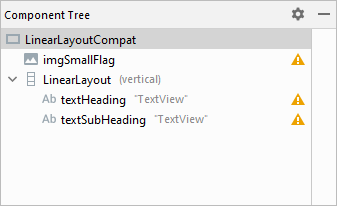
In the Component Tree, select the ImageView. Set the following attributes:
id: imgSmallFlag
layout_width: wrap_content
layout_height: 50dp
paddingEnd: 30dp

Now select the first TextView widget in the Component Tree. Set the id attribute to textHeading. For the second TextView, set the id to textSubHeading. Here's what your Component Tree should look like now:
And here's the activity:

OK, that's the rows for each item done. Now let's get it working. We'll do that in the next lesson.
< Android Seekbar Code | Custom Adapter >
Back to the Android Contents Page