Home and Learn: Android Course
Custom Adapter - Android RecyclerView
In the previous lesson, we added a RecyclerView to our Android activity. We also created a new activity for the rows in the RecyclerView. Our goal is to build a list style app like this:

When you click an item on the list, you go to a new page (activity).
To get this working, we have some files for you to download. Two of the files are Java code, while the rest are flag images. The file is a ZIP file:
When you download and extract the contents of the above ZIP file, you'll see a folder full of flag images, along with a two text files. Double click the file called MyRecyclerViewAdapter.txt to open it up.
Now go back to Android Studio. Right click the app > java > com.example ... folder (the first one). From the menu, select New > Java Class:

In the dialog box, enter the name MyRecyclerViewAdapter:
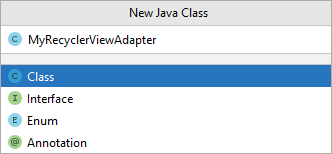
Double click Class to create a new java class, which should look something like this:
package com.example.recyclerviewflags;
public class MyRecyclerViewAdapter {
}
Now delete everything except for the first line, which is your package name. Go back to that MyRecyclerViewAdapter.txt text file you just opened. Select the entire contents. Copy and paste them into your new class file. (It's complicated code, but we've added a few comments to help you understand it.)
You'll get a few lines with red text. That's because we need to paste some more code across to a new Java file.
Amongst the files you downloaded, double click the one called RowItem.txt.
In Android Studio, create another Java class file. For the name, type RowItem. Again, delete everything except your package name line at the top. Go back to the RowItem text file. Select all the contents. Copy and paste them over to your new RowItem class. Hopefully, all the red underlines and red text should disappear. Your Project Files area on the left of Android studio should look like this:

Now go to your MainActivity.java file. Just under the line setContentView, enter the following two lines:
RecyclerView recyclerView = findViewById(R.id.rvFlags);
recyclerView.setLayoutManager(new LinearLayoutManager(this));
If you get red flagged for anything, click inside the RecyclerView. Hit ALT + ENTER on your keyboard. Click inside LinearLayoutManager and again hit ALT + ENTER on your keyboard. If that doesn't work for you, just copy and paste these two lines with the othe rimport lines at the top of your code:
import androidx.recyclerview.widget.LinearLayoutManager;
import androidx.recyclerview.widget.RecyclerView;
Here's what the code should look like:

Now add a new line, just under the two you've added. Add this:
fillArrayList();
You'll get flagged in red text for this. That's because it's the name of a method and we haven't created this method yet. To create the method, click inside the red text. Press ALT + ENTER on your keyboard. From the menu that appears, select Create method fillArrayList in MainActivity:

We'll come back to this method.
Just a few more lines to add. At the top of the class, just under public class but above the onCreate method, add these two lines.
MyRecyclerViewAdapter adapter;
ArrayList<RowItem> myRowItems = new ArrayList<RowItem>();
You might get red-flagged for ArrayList. If so, click inside ArrayList. Press ALT + ENTER on your keyboard to add the import line (import java.util.ArrayList;).
Nearly there.
Just under fillArrayList in the onCreate method, add these two lines:
adapter = new MyRecyclerViewAdapter(this, myRowItems);
recyclerView.setAdapter(adapter);
Here's what your code should look like:

What we're doing here is first getting a reference to out RecyclerView on the activity, the one with the id rvFlags. We then create an adapter from that class we created, MyRecyclerViewAdapter. We need to pass it an ArrayList. This is the one called myRowItems. Each item in the Array List will be created from that other class we set up, RowItem.
Now to add something to the fillArrayList method.
First, we need some flags.
Go back to that ZIP file you downloaded. Move inside the flags folder. Select all the flags. Press CTRL + C on your keyboard to copy them. Go back to Android studio. In the project files area on the left, click on the res > drawable folder. With the drawable folder highlighted, press CTRL + V to paste the flags over (click OK on any dialog boxes that appear). You should have this:

To add items to the ArrayList, copy and paste these lines in your fillArrayList method:
RowItem row_one = new RowItem();
row_one.setHeading("France");
row_one.setSubHeading("Flag of France");
row_one.setSmallImageName( R.drawable.small_france);
row_one.setBigImageName( R.drawable.big_france );
myRowItems.add(row_one);
RowItem row_two = new RowItem();
row_two.setHeading("Germany");
row_two.setSubHeading("Flag of Germany");
row_two.setSmallImageName( R.drawable.small_germany);
row_two.setBigImageName( R.drawable.big_germany );
myRowItems.add(row_two);
RowItem row_three = new RowItem();
row_three.setHeading("Italy");
row_three.setSubHeading("Flag of Italy");
row_three.setSmallImageName( R.drawable.small_italy);
row_three.setBigImageName( R.drawable.big_italy );
myRowItems.add(row_three);
RowItem row_four = new RowItem();
row_four.setHeading("Romania");
row_four.setSubHeading("Flag of Romania");
row_four.setSmallImageName( R.drawable.small_romania);
row_four.setBigImageName( R.drawable.big_romania );
myRowItems.add(row_four);
RowItem row_five = new RowItem();
row_five.setHeading("Sweden");
row_five.setSubHeading("Flag of Sweden");
row_five.setSmallImageName( R.drawable.small_sweden);
row_five.setBigImageName( R.drawable.big_sweden );
myRowItems.add(row_five);
Your method should look like this:

We're adding five new rows to the ArrayList. Each row has a Heading, a SubHeading, a SmallImageName and a BigImageName. These will be used to fill the ImageView and TextViews we added to that XML layout.
At last, after all that hard work, it's time to try it out. Run your app. You should (eventually) see the flags appear:
If you see the flags - congratulations, because that was a bit of a slog! The only problem is, nothing happens when you click a flag. What it should do is to launch some new activity, with the big version of the flag displayed. Handling click events for your row items is another difficulty of these type of apps. We'll tackle that in the next lesson below.
< Android List App | Detect Clicks >
Back to the Android Contents Page