Home and Learn: Microsoft Access Course
Access Report, Page Headers
In the previous lesson, we formatted the Report Header. In this lesson, we'll take a look at the Page Header. The Page Header, remember, is the one that appears on every page of your report. The Report Header just appears on the first page.
Adjust the Height of the Page Header
Click on Page Header to highlight it. It should turn black:

There are two ways you can adjust the height of the Page Header in Access. The fiddly way is to move your mouse to the bottom of the Page Header until you see your mouse pointer change to something like this:
![]()
Hold you left mouse button down when your mouse pointer changes shape. Keep it held down and drag down to a new height:

The less fiddly way to adjust the height of the Page Header is through the Property Sheet. Have a look at the Property Sheet on the right. There's a property called Height you can change:

Delete the current numbers for height and type some new one. If you type 1.5 cm and press enter, Access insists on entering the very precise 1.501 instead.
But whichever way you choose to adjust the height of the Page Header, it should look like this in Layout View:
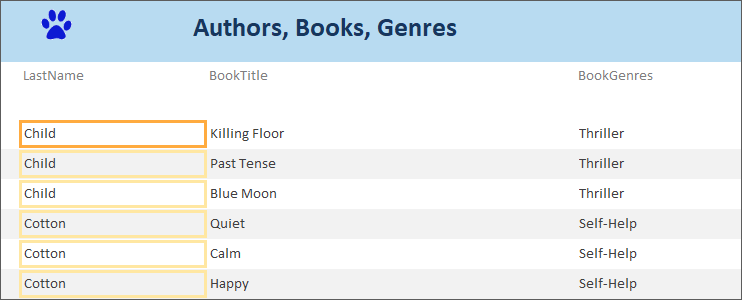
Notice that the labels are still stuck at the top. We'd like them moving down a bit. To do that, switch to Deign View, if you're not already in it. (You can move labels in Layout View, as well.) Click on the LastName label. It should turn orange. Now move your mouse onto the label. When the mouse pointer turns into the four arrows, hold you left mouse button down. Keep it held down and drag your label down a bit:

Let go of your left mouse button when the label is in a suitable position. Now move the other two labels down in the same way. If you get it right, your labels will look like this in Layout View:
The headers look a lot better, now that they're not squashed to the bottom of the Report Header. We can make them stand out a bit, though, by formatting the text.
Click on the LastName label to highlight it. We don't have a space between Last and Name. To change the text, either click on the text so that it goes white. Then type some new text:

Or look for the Caption property in the Property Sheet on the right. Type your new text:
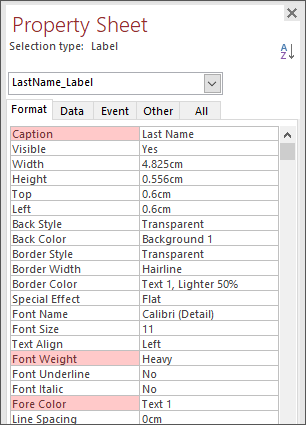
You can also change the Font Weight and For Color properties, while you have the label selected.
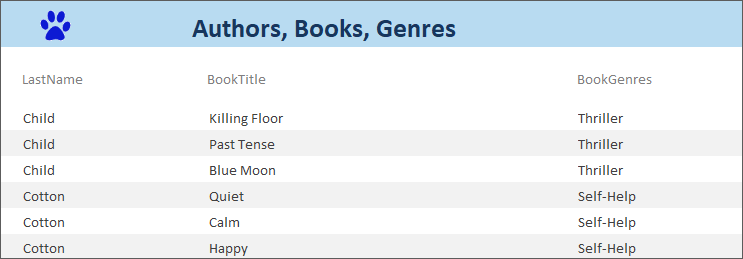
Now change the text of the other two labels, just like you did for the first one: add some space and some formatting. Your labels will then look something like this:

You may not like the grey color for the alternate lines. Let's see how to change them.
The Details Section
Click on the Detail heading so that it turns black:

Again, you can change the height of the detail section, just like you did for the Page Header section.
But locate the two properties Back Color and Alternate Back Color in the Property Sheet on the right:
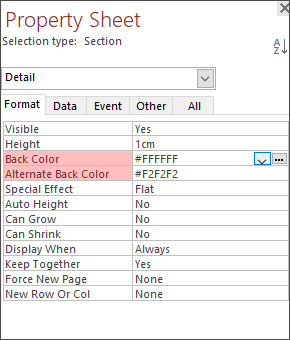
The #FFFFFF means white. You can either keep the white or change it to anything you like. The #F2F2F2 is the grey color. Again, change this to anything you like:
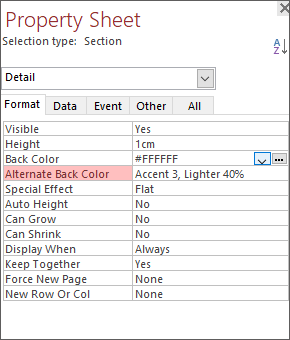
In the image above, we've went with Accent 3, Lighter 40%. When viewed in Report View, or Report now looks like this:

Notice that we've also changed the logo image to a pen rather than the paw. If you want to change your own image, click on your logo in Design View. It should be selected with an orange border. Now look at the Property Sheet on the right. Locate the Picture property:
![]()
Click the little button with the 3 dots in it. This brings up an Insert Picture dialog box where you can select a new image.
But, I think you'll agree, the newly formatted report looks a lot better than the default, which was this:
The new one looks a lot better!
In the next lesson below, we'll move on and look at how to import an Excel spreasheet to use as an Access database.
<-- Previous Lesson: Report Page Header | Next Lesson: Import Excel Spreadsheet -->
<--Back to the Microsoft ACCESS Contents Page