Home and Learn: Microsoft Access Course
Microsoft Access, Import a CSV File
In the previous lesson, you learned how to import an Excel file and turn it into and Access database table. In this lesson, you'll do the same with a CSV file.
What are CSV Files?
CSV stands for Comma Separated Values. It's a type of text file and is very popular. They look like this:

Notice that each line in the CSV file has commas. The comma is used to separate each piece of information. The second line, for example , is this:
1,Red,10,04/04/2022,07/04/2022,07756878
There are five commas on the line, meaning six pieces of information:
1,
Red,
10,
04/04/2022,
07/04/2022,
07756878
Each piece of information will be stored in a separate field in our Access table.
Notice, too, that the first line in the CSV file is a series of headings:
ProductID, WidgetColorSales, UnitsSold, OrderDate, ShipDate, Phone
We can use these headings as field (column) names. Be aware, however, that CSV files often don't contain headings on the first line. Access can still import the file, but you'll have to come up with your own column names.
So, download this CSV file (right-click, Save As):
Save the file to your own computer and let's make a start importing it as an Access database table.
Just like for an Excel file, click on External Data at the top of Access. Click on New Data Source again. this time, select From File > Text from the menu:

Just like before, you'll get the Import Wizard popping up. The first page is the same as before - browse for the file on your computer. Make sure to select the option Import the source data into a new table in the current database. Click OK. This time, you'll see a different screen than the one for Excel files. You'll see this:

The Access wizard states that our data seems to be in a 'Delimited' form. A delimiter is the character you use to separate each piece of information in your CSV rows. We used a comma, but you don't have to. Often, a press of the tab key on a keyboard is used as a separator (delimiter).
But Access has guessed right, here, and the first option is selected for us: Delimited - Characters such as comma or tab separate each field.
Click Next on the Wizard to see this new screen:

At the top, you can select your delimiter. If it's not a comma, choose one of the other options: tab, semicolon, space, other.
Ours is a comma, so make sure that option is selected.
We want to use the first row in our CSV file as headings. Fortunately, there is an option box we can check. Put a check in the box, First row Contains Field Names. Your dialog box will then change to this:

Once you check the box, Access turns your first row into headings. The second row in our CSV file is now the first row in the Access table.
Click Next to see this screen:

Except for the Indexed value, this is the same as before. Set the ProductID column to these Field Options:
Field Name: ProductID
Data Type: Integer
Indexed: Yes (Duplicates OK)
Do not import: unchecked
(Duplicates are OK for the Indexed field because it's a foreign key rather than a primary key. We'll add the primary key soon.)
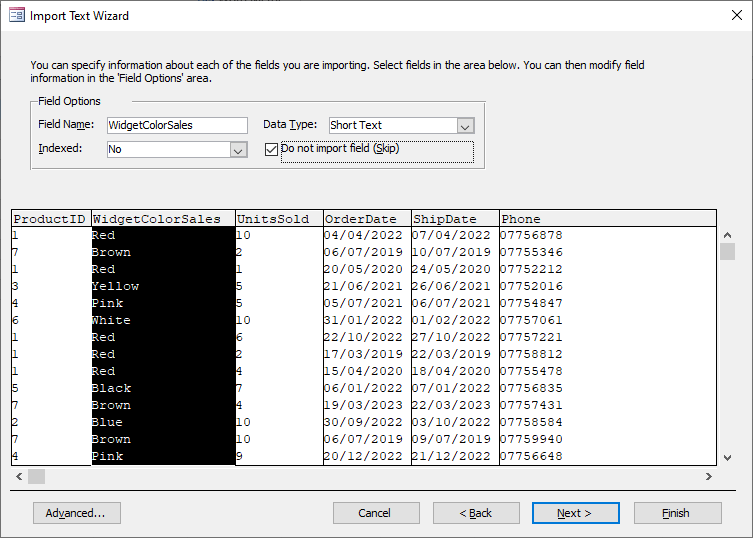
Now select the WidgetColorSales column.
The values in this column are just the color of the widget. We have this exact same information in the Widgets table. We're going to be linking the two tables, so the WidgetColorSales column is not needed here - it's just a repeat that will increase the size of your database unnecessarily. So, with the WidgetColorSales selected, check the box, Do not import field (Skip):
For the UnitsSold column, set then to these values:
Field Name: UnitsSold
Data Type: Integer
Indexed: No
Do not import: unchecked
We have two date columns next, OrderDate and ShipDate. For both of these columns, set the filed options to these:
Field Name: OrderDate
Data Type: Date With Time
Indexed: No
Do not import: unchecked
Field Name: ShipDate
Data Type: Date With Time
Indexed: No
Do not import: unchecked
For the final column, Phone, set the field options to these:
Field Name: Phone
Data Type: Short Text
Indexed: No
Do not import: unchecked
Make sure to set the Data Type to Short Text. If it's left on Long Integer, Access will chop the zero from the start of the phone number (they are not real phone numbers, by the way).
With the field options all set, click Next.
Just like before, the next screen is where you set a Primary Key:

Notice that Access has added a new column for us called ID. It has sequential numbers in it. Our CSV file doesn't have a column that we can use as a Primary Key, so it's fine that Access has added one for us.
Click Next. In the Import to Table textbox on the next screen, change the name of the table to WidgetsSalesData. Then click Finish. You'll then see an option to save the import. Just click Close here. Access will then turn your CSV file into a table. You should see a new item added to the All Access Objects area. Double click the new item to open up the table:
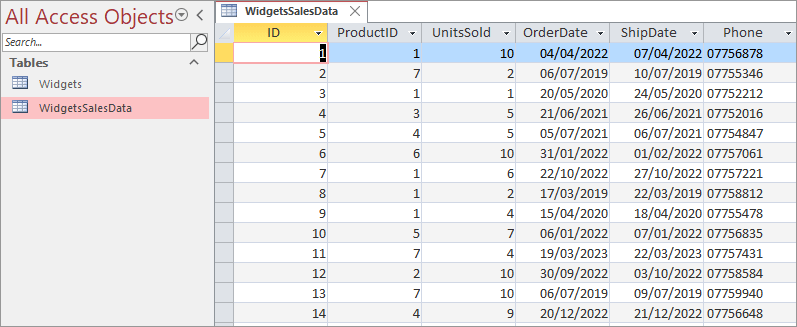
So we have two tables, both imported from files, an Excel file and a CSV file. Notice that the widget colors column has not been imported, just like we specified.
Let's now create the relationship between the two tables. We'll do that in the next lesson below.
<-- Previous Lesson: Import Excel Spreadsheet | Next Lesson: Link the two Tables -->
<--Back to the Microsoft ACCESS Contents Page