Home and Learn: Microsoft Access Course
Microsoft Access Field Fomatting
You can set up some formatting for the fields in your Access tables. You can do things like have the field all in uppercase characters, all lowercase, add some space, or add any characters you want. Let's see how it works.
If you haven't been following along, you can dowload the Access database here (Right-click > Save As):
Access Database After Setting up a Relationship
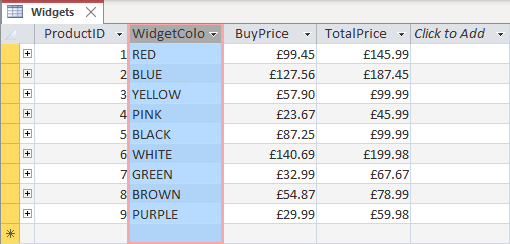
First, you need to be in Design View for this. Make sure your Widgets table is open. Click on the Table Design ribbon at the top of Access, locate the Views panel on the left, and then click View > Design View:

Or you can simply click the icon in the bottom right:
![]()
In Design View, you have fields at the top:

And Field Properties at the bottom:

It's these field properties at the bottom we're going to change. Let's start with Format.
Select the WidgetColor field at the top (just click inside of WidgetColor). The properties at the bottom should change to this:
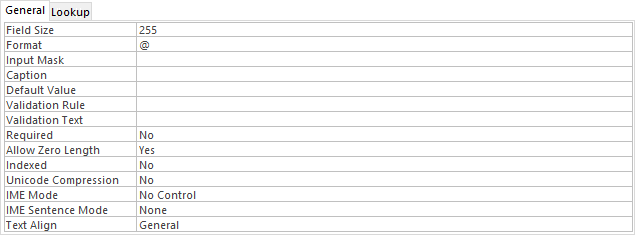
Field Size is the first item, and it has a value of 255. This is how many characters can go into the field before Access complains. If you're sure you won't ever need this many characters, you can change it to a smaller size. This can help you cut down on the size of your database. Leave it on 255, though.
The one we're interested in here is the Format property. It has an @ sign in it. A single @ sign means that characters can be displayed in your field.
You can force those characters to be displayed in all uppercase, if you want. Simply type a > sign before the @:
>@
Try it out. Type the > sign before @. Press Enter on your keyboard.
Now go back to Datasheet View. You'll get a popup box asking if you want
to save the changes. Click Yes and you should find that the characters
in the WidgetColor field are all uppercase:
Go back to Design View. Now change the > symbol into a <:
<@
Go back to Datasheet View and all the characters in the WidgetColor field will be in lowercase characters:

We'll do some more formatting when we change the phone number field soon.
One important point to bear in mind is that changing the format doesn't change to underlying data. So, although you could have the field in all uppercase letters, behind the scenes, Access keeps your original data intact - the formatting is just for show. If you were to export the database back to Excel, the uppercase formatting would disappear, and you'd be left with text how it was originally entered.
Back in Design View, change the Format property back to a single @ symbol.
Currency Formatting
If you click into the BuyPrice row instead of the WidgetColor row, the properties will change to this:

Click the arrow to the right of the Currency item to reveal a dropdown box:

When you set a database field to currency, Access uses the regional settings from your computer. So, if you're in the UK, you'll see the pounds Sterling symbol used (£).
Add Dashes to Access Fields
If you want to add things like dashes to phone numbers and social security numbers, you can do so in the format area. For example, our phone numbers are displayed like this:
0751122
We could display them like this, to make them easier to read:
075-1122
Close down Widgets and open up WidgetSalesData. In Design View, click inside the Phone area at the top:

In the Format area at the bottom, enter the following:
@@@-@@@@

You need one @ symbol for every character in your string. We have 7 characters in our phone string, so that's 7 @ symbols. Then you type a dash (or any other symbol) where you want your formatting to appear.
When you switch back to Datasheet View, you should see this for the Phone number field:

Again, it's important to bear in mind that Access doesn't change the underlying phone number when you format it, just the way it's displayed. And, when entering a new phone number, you don't need to type the dash as Access will add it for you.
Now let's look at this Validation Rules for the dates. We don't want the Ship Date to be earlier than the Order Date. So how can we enforce this? Find out in the next lesson below.
<-- Previous Lesson: Relationships | Next Lesson: Validation Rules -->
<--Back to the Microsoft ACCESS Contents Page