Home and Learn: Games Programming Course
Unity Terrains
In this series of lessons, you'll learn how to create terrains in Unity, things like hills, mountains, grasses, trees, flowers, skyboxes, and water. We'll use an easy way to create a complex terrain using the Stamp Terrain in Unity and heightmaps. And there's no coding required, so you can relax!
Heightmaps
A heightmap is a two-tone image showing areas of dark and light. They look like this:
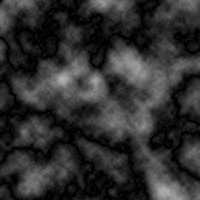

The lighter the area the higher the terrain. You can download the images above or get heightmaps by doing an image search using your favourite search engine. Or you can generate them yourself using image editing software like the free Gimp or with Photoshop. Create a square image of about 200 x 200. Go to your Filters and look for the Render filters. You want the one for Difference Clouds. Once you get a suitable black and white image, it's a good idea to adjust the brightness and contrast (In Gimp, it's on the Colors menu). Turn the brightness down and the contrast up. Then save your image as a JPEG.
So, either download the heightmaps above, do an image internet search, or create your own. We're going to assume you're using ours above, though. So, once downloaded and on your own computer, drag and drop the image files into the Assets folder in Unity. (It's best to create a new folder, Textures, for this, so you know where they are.)
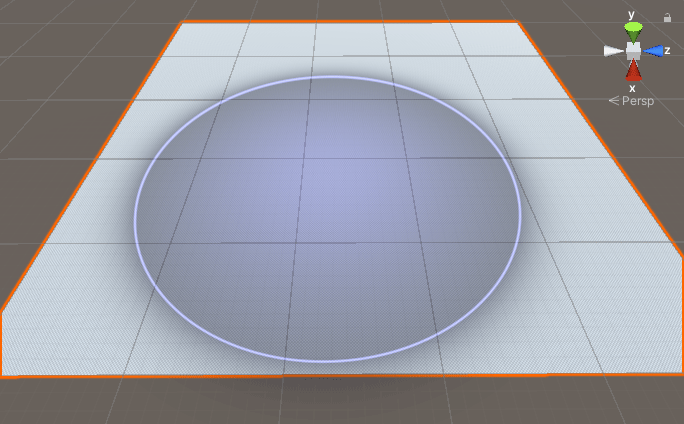
To create a Terrain, go to Game Object > 3D Object > Terrain. You'll see a large flat Plane appear in your Scene. Zoom out a lot so you can see the whole thing. You should be looking at something like this:

If all you want is a flat, grey terrain - you're done!
You probably don't want a flat terrain, though. So, with your terrain selected in the Hierarchy, have a look at the Inspector on the right:

Notice the five icons at the top of the terrain section:
![]()
In later versions of Unity, the icons will look like this:
![]()
You can ignore the first one, as we won't be using it. But click the Terrain Settings icon on the right. You'll see a long list of items you can tweak. The ones we're interested in are near the bottom (we've contracted a few categories):

The default size for your terrain is 1000 by 1000. This is a bit big for our purposes, so change these values to 500 by 500.
Now click the icon for Paint Terrain (the second icon from the left). You'll then see this:

The dropdown box under the 5 icons is important. By default, Paint Texture is selected. But click the dropdown to see the other options. These in earlier Unity versions:

And these in later versions of Unity:

The idea is that you select a brush and then paint in your terrain, sculpting things like hills and mountains as you go. For example, select a brush and then move your mouse over your terrain. You'll see something like this:
Increase or decrease the brush size by moving the Brush Size slider. You can change the Opacity by moving the Opacity slider. Higher numbers will strengthen the effect.
Nothing will happen if you hold your left mouse button down, however. Click the menu again and change it from Paint Texture to Raise or Lower Terrain. Now left click on your terrain in the Scene. Keep clicking to raise the terrain:

Reduce the brush size. Now hold down a SHIFT key on your keyboard. Click again to lower the terrain:
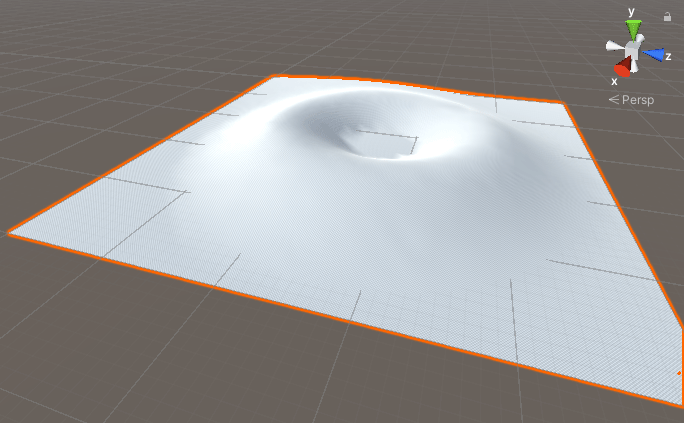
Now we have a volcano!
So, you could create your terrain that way, by changing brush size, opacity, and sculpting your terrain. It will take you a long time to get really good at creating terrains.
Or you could do it the easy way and use a heightmap.
Unity Stamp Terrain
Select your terrain in the Hierarchy. Now press the delete key on your keyboard to get rid of it. Click Game Object > 3D Object > Terrain to create a fresh, flat terrain. In the Inspector on the right, you'll need to change the height and width again. (You could leave it on 1000 for each, if you don't care.)
Now select Stamp Terrain from the dropdown list, instead of Paint Texture. The options will change to this:

Notice the two items highlighted in the image above. One is the Stamp Height, and the other is the New Brush button. If your Stamp Height is really low, move the slider to increase the value, otherwise your terrain will end up fairly flat. Now click the New Brush button. You'll see this dialog box appear:

You should see the two heightmaps on the list, the ones you downloaded at the top of this lesson. Double click one: (Double-clicking will select and item and close the dialog box down.)
The Inspector will then look like this:

Increase your brush size to 600 or so. And change the Opacity to 33. Now move your mouse over your terrain in the Scene:
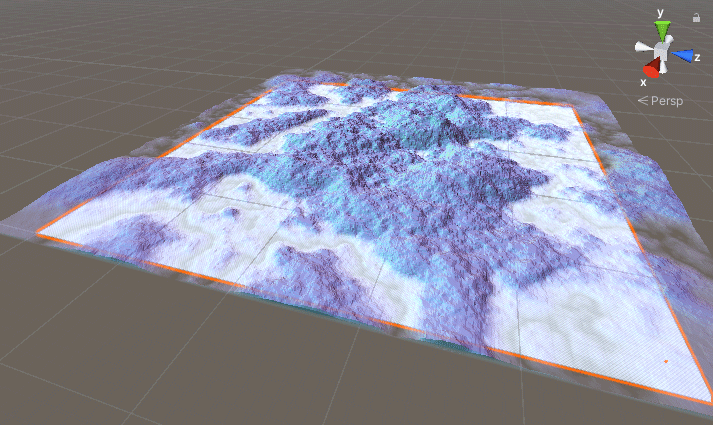
Click with your left mouse button to stamp your terrain. (You only need to click once.) You should end up with something like this:
A nice little terrain without too much effort! Now let's paint some textures on it to bring it to life.
Add a Texture to a Unity Terrain
You can download a nice texture here, for dirt and pine needles:
Seamless Dirt (right click, Save As)
Once you've downloaded the textures, drag and drop them into the Project area of Unity, hopefully in that Textures folder you created.
With your Terrain selected in the Hierarchy, click the Paint Terrain icon in the Inspector:
![]()
![]()
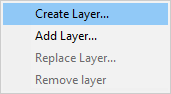
Then select the Paint Texture item in the dropdown, instead of Stamp Terrain. Click the Edit Terrain Layers button, as indicated by the red arrow in the image below

When you click the Edit Terrain Layers button, you should see a menu appear. Click the Create Layer item:
You should then see this dialog box:

Double-click the texture you downloaded, which should be on the list. When you do, the dialog box will close, and the Inspector will look like this:

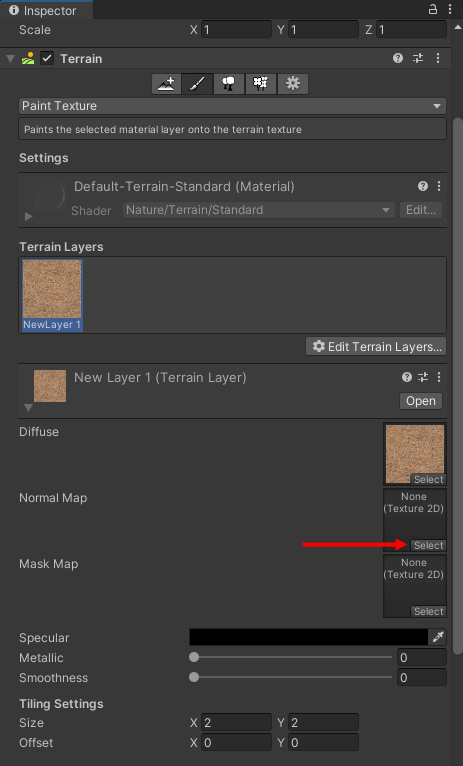
Now click on the texture that has appeared under the Terrain Layers heading. You should see an area where you can add your normal map:
Don't drag and drop your normal map onto the None Texture 2D slot just yet. Instead, select your Normal image in the Project area at the bottom of Unity. In the inspector on the right, change the Texture Type at the top to Normal:

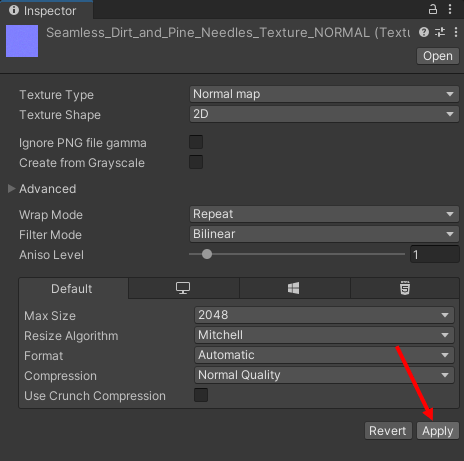
Click the Apply button at the bottom.
Now click on your Terrain again in the Hierarchy. Drag and drop that Normal map onto the None Texture 2D slot:

Before playing around with the settings indicated by the red arrows above, zoom right in on your terrain in Scene view. If you get close up, you should be able to see the pine needles quite well: (The whole of your terrain will have the texture applied to all of it. We'll fix that soon.)

To get that, we changed the Normal Scale to 7, the Metallic to 0.5 and the smoothness to 0.3.
To see what it looks like, you can add a first person controller and walk around your new terrain. We imported a first person controller in a previous lesson. To get it into this project, click Window at the top of Unity. From the Window menu, select Package Manager. Locate your Mini first person controller from the list and click the Import button. (If you didn't download it earlier, click the previous lesson link.)
Once the controller has been imported, drag and drop it into your scene. Play your game and walk around. (You'll hear footsteps, though, which is not terribly great on pine needles. To get rid of the footsteps, you'll need to expand the First Person item in the Hierarchy. Then select the audio item. In the Inspector on the right, set the Step Audio to None.)
In the next lesson, we'll start bringing the terrain to life as we add some rock, grass and trees.