Home and Learn: Games Programming Course
Unity Car Code
In the previous lesson, you created four wheel colliders and added tyres to these colliders. In this lesson, we'll get the wheels to move. The code for all this can be quite difficult, so don't despair if you find the going a little bit tough - it's normal!
In the Hierarchy, select your CAR-ROOT object. In the Inspector on the right, click the Add Component button. In the search box, type New, and select New Script from the list. Call your new script CarControl:

In the Project area of Unity, click on the Assets folder to see your new script. Then double-click it to open it up in your coding editor.
The first thing we're going to do is add another class on top of the CarControl class. So, add this class just below the three using statements:
[System.Serializable]
public class WheelElements {
public WheelCollider leftWheel;
public WheelCollider rightWheel;
public bool addWheelTorque;
public bool shouldSteer;
}
In the CarControl class, just inside the first curly bracket, add this line:
public List<WheelElements> wheelData;
The code in your editor should look like this:

To see what this WheelElements class does, save your code and go back to Unity. Make sure your CAR-ROOT is selected in the Hierarchy. Now look at the Inspector on the right. You should see this:

The WheelElements class at the top of our code had this added to the top:
[System.Serializable]
The System part is an instruction to Unity to add something to the Inspector. That something is a list, which is the part highlighted in the image above. It came from this part of the code:
public List<WheelElements> wheelData;
We want to set up a List of items. The type of items we specified is WheelElements. The wheelData variable name is so that we can access each item on the list. If you need a refresher on C# lists, see here on our site:
A list is empty, by default. So you need to add items to it. In the Inspector, click the Plus button, as highlighted in the image below:

When you click the Plus button, you should see this (click the little arrow to expand the list):

Element 0 has been added. Notice that the four variables we set up inside of the WheelElements class are there:

The Left and Right Wheel items both say None (Wheel Collider). It's waiting for you to add a Wheel collider here. So, click the tiny circle to the right of left Wheel:

You should then see a dialog box appear. This one:

Double-click your FrontLeft Wheel Collider item from this list. This will select the item and close the dialog box down. Now do the same for the Right Wheel - add the FrontRight item from the dialog box. Element 0 will then look like this:

For the front wheels, we want to add wheel torque and they should steer. So check both of those boxes:

Now click the plus button again to add a new element. Go through the same process to add wheel colliders. But this time, select RearLeft and RearRight from the dialog box. Unless you actually want four wheel drive and four wheel steering, leave the Torque and Steer boxes unchecked:

In case you're unsure as to what we did here, here's a little table:

The table shows that we have added two Elements to our wheelData list. This list:
public List<WheelElements> wheelData;
This then allows us to say things like:
wheelData.leftWheel
wheelData.rightWheel
wheelData.addWheelTorque
wheelData.shouldSteer
OK, with that tricky business in mind, let's do some more coding.
In your coding editor, delete the Start and Update for now. We'll add them back in later.
Just below your public List line, add these two variables:
public float maxTorque;
public float maxSteerAngle = 30;
The maxTorque variable will be used to add power (speed) to the wheels. The maxSteerAngle is how far the wheels will turn. You can change this, if you like. But 45 is the recommended upper limit. We've set ours to 30.
Now add this inbuilt method to your CarControl class:
private void FixedUpdate()
{
}
TIP: An easy way to add the method is to type void and a space. You'll see a popup menu with FixedUpdate on it. Press the TAB key on your keyboard with FixedUpdate selected. Visual Studio will complete the rest of the method for you.
FixedUpdate and Update are both built into Unity. Previously, we've just used Update. The difference between the two is that you should use FixedUpdate when you're dealing with Physics objects like Rigid Bodies. This is because, as its name suggest, the FixedUpdate method runs at a fixed rate. If you didn't use FixedUpdate on your Physics objects then, when the frame rate dips, your game objects would behave in strange ways. If you're not using Physics in your game, then just use Update.
Anyway, your code should look like this:

So, what do we put in our FixedUpdate method? Well, the first thing we can do is to get the user input. Add these two lines to your FixedUpdate method:
float speed = Input.GetAxis("Vertical")
* maxTorque;
float steer = Input.GetAxis("Horizontal") * maxSteerAngle;
The Input.GetAxis("Vertical") part maps to the W and S keys on your keyboard. Pressing the W key will move you forward and pressing the S key will move you back. If you don't want to use W and S keys then you can use the UP and DOWN arrow keys on your keyboard instead.
The Input.GetAxis("Horizontal") part maps to the A and D keys on your keyboard. Pressing the A key will turn the wheels left and pressing the D key will turn the wheels right. If you don't want to use the A and D keys then you can use the LEFT and RIGHT arrow keys on your keyboard instead.
But both of these values are stored in variables, one called speed and one called steer. Notice that the Vertical keys are multiplied by our maxTorque variable. The Horizontal is multiplied by our maxSteerAngle variable.
Now comes the tricky part!
Because we set up a list, we can use a foreach loop to cycle through our wheel colliders. Add this foreach loop to your code:
foreach (WheelElements element in wheelData) {
}
(If you're puzzled about foreach loops, we have a lesson on them here on our site: foreach loops in C#.)
WheelElements is the type of variable we need. The wheelData part is the whole of our list (all the items in it). The element variable is a single item in the list.
Next, add this if statement:
if (element.shouldSteer == true) {
element.leftWheel.steerAngle = steer;
element.rightWheel.steerAngle = steer;
}
The if statement tests if that shouldSteer Boolean variable we set up is true (did you check the box in the Inspector?). If it is, these lines get executed:
element.leftWheel.steerAngle = steer;
element.rightWheel.steerAngle = steer;
The variables leftWheel and rightWheel are Wheel Colliders, remember. Wheel Colliders have lots of properties and methods available to them. One of these is steerAngle. We're getting our steerAngle from the steer variable (the Horizontal input).
Now we do something similar for the Vertical input. So, add this if statement to your code:
if (element.addWheelTorque == true) {
element.leftWheel.motorTorque = speed;
element.rightWheel.motorTorque = speed;
}
The if statement checks if addWheelTorque is true. (Again, did you check the box in the Inspector?) If it is, we execute these two lines:
element.leftWheel.motorTorque = speed;
element.rightWheel.motorTorque = speed;
Wheel Colliders also have a motorTorque property. We're setting this with our speed variable.
Your code should look like this:

Coding for the Tyres
Now, if you left it like that, the Wheel Colliders would just fly off and leave the tyres behind. So we need to write code to take the tyres with us.
Add these two lines inside of your foreach loop, just before the final curly bracket:
DoTyres(element.leftWheel);
DoTyres(element.rightWheel);
You'll get red underlined for DoTyres. That's because it's a method we haven't written yet. But in between round brackets, we're going to pass over the left wheel collider and the right wheel collider. In the method itself, we can match up the colliders with the tyres.
So, just after the final curly bracket of the FixedUpdate method, add the DoTyres method. This one:
void DoTyres(WheelCollider collider) {
if (collider.transform.childCount == 0) {
return;
}
Transform tyre = collider.transform.GetChild(0);
Vector3 position;
Quaternion rotation;
collider.GetWorldPose(out position, out rotation);
tyre.transform.position = position;
tyre.transform.rotation = rotation;
}
Your code should look like this:

Let's see what's going on.
The first few lines of the DoTyres method are for an if statement. This one:
if (collider.transform.childCount == 0) {
return;
}
This asks, Do we have any colliders at all? If not, then return. (The return keyword lets you bail out of a method or loop.)
The next line is this:
Transform tyre = collider.transform.GetChild(0);
We're setting up a Transform called tyre (a Transform gets you those Position, Rotation and Scale values from the Inspector). The collider variable refers to the Wheel Collider. The GetChild(0) at the end refers to the child object from the Hierarchy. So, for example, we set up a Wheel Collider and called it FrontLeft. We added a tyre game object as a child of FrontLeft. GetChild(0) will get this tyre game object that's sitting underneath FrontLeft.
Next comes these three lines:
Vector3 position;
Quaternion rotation;
collider.GetWorldPose(out position, out rotation);
A Quaternion is an inbuilt class that deals with rotation values. GetWorldPose is an inbuilt method that gets the world space of the wheel collider (where it is, and its rotation, amongst other things). The out means output. We're storing the output in our two variables, position and rotation.
Finally, we have these two lines:
tyre.transform.position = position;
tyre.transform.rotation = rotation;
These two lines just apply the position and the rotation of the wheel colliders to the tyre objects. In other words, all this just to get the Wheel Colliders to match up with the tyres!
That's enough code, for the moment. Save your hard work and go back to Unity.
If you have a look at the Inspector, you'll see those two new variables you set up, maxTorque and maxSteerAngle:

Type a value for Max Torque. We went for 400. The higher the number, the more power you add to the wheels.
Before we can try it out, we'll need to adjust the box collider we added. So, expand the Box Collider section of CAR-ROOT. Enter these values for the Center:
X: -0.9
Y: 1
Z: -1.2
And these for the Size:
X: 1.5
Y: 1
Z: 2.5

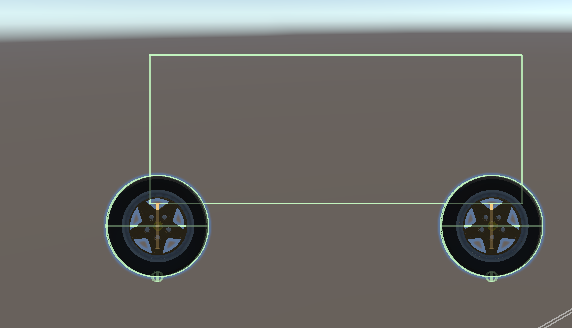
If your box collider looks wrong, adjust the values so that it looks something like this in Scene view:

After you drag and drop the main camera onto CAR-ROOT, change the X, Y and Z positions of the camera in the Inspector so that you get a good view of the tyres. (We went for 0.9 for the X, 3 for Y, and -9 for the Z value.)
Now add some cubes to your scene. If you don't, you'll have no perspective with the tyres sitting on that plane: it will look as though you're not getting anywhere. But something like this will do:

One more thing we need to do. In Unity 6 and higher, the default Input system is the Input System Package. But we've used Input.GetAxis in our code, which is part of the old system. To change the default, click Edit from the menus at the top of Unity. From the Edit menu, select Player on the left. From the Player options, scroll down and change Active Input Handling to Both:

You might be asked to restart your project, once you select Both.
Biut time to try it out and see where we are. Play your game. Press the W key on your keyboard to go forward. Press A and D to steer.
You may notice a problem when you try to drive and steer, as in the video below:
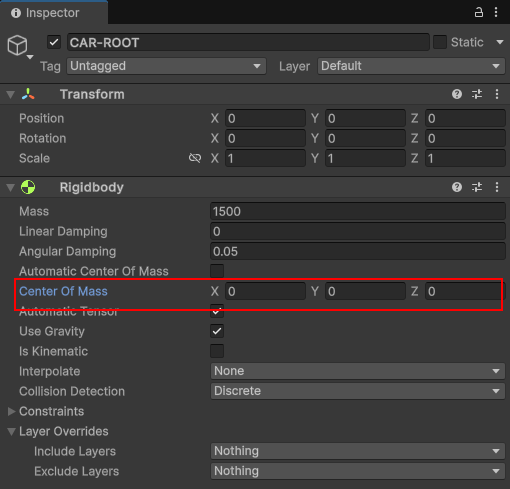
Center of Mass
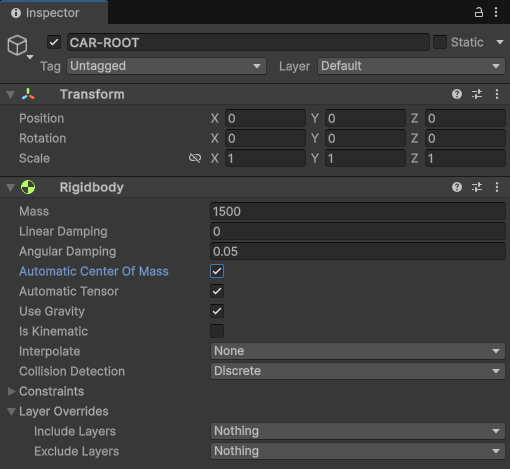
The problem occurs because of the centre of mass for the Rigidbody.
Go back to the Hierarchy. Click on the CAR-ROOT to select it. Now look at the Inspector and the Center of Mass. Notice that the box for the Automatic Center of Mass is checked:
We need to set our own values here because, clearly, the automatic setting is not working for us. Uncheck the box and you'll see some values you can set to override the automatic setting:
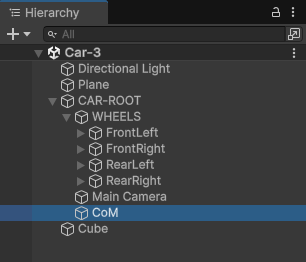
Finding the correct values can can be tricky, however. To find the values, you can add an empty game object and move it around. Then copy the values. So, in the Hierarchy on the left of Unity, right-click on CAR-ROOT. From the menu, select Create Empty. Rename your empty game object and call it CoM:
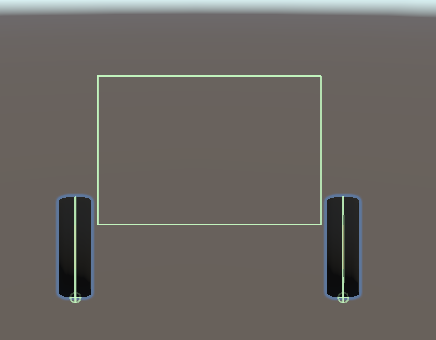
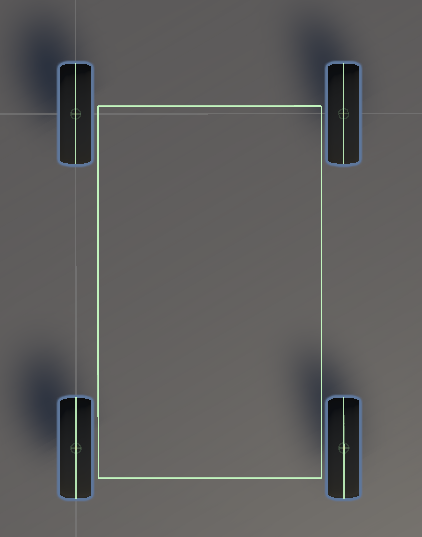
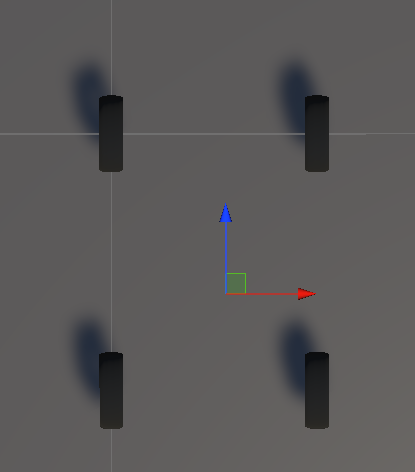
In Scene view, drag the red, blue and green arrows around until you find the center of the rigidbody. Here's the top down view:
And here's the side view:
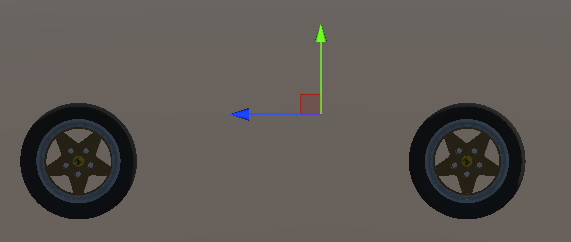
Once you have the empty game object positioned how you want it, look at the Inspector on the right. Note the Position values for the X, Y, and Z:

Now go back to the rigidbody on CAR-ROOT. Enter the same values as in your CoM empty game object:

Try it out again. Play your game and drive the car. You should have no wobble this time (if you do, play around with the CoM values):
Nice! Now we have some tyres that rotate and drive forward, we can add a body to our car. We'll do that in the next lesson below