Home and Learn: Intermediate Programming
Load Sytem Fonts, Font Size

Stick Figure App - Custom Font Dialog Box
Before we get to loading the sytem fonts, we need to set up a few variables in the main form. When you select a font and font attributes on the second form, they will be handed over to the first form.
You saw in a previous lesson that to get values from a second form, you can set up public variables in the first form. The variables are Shared ones in VB Net and static ones in C#. The values you want to grab from the second form can then be handed to these shared or static public variables. Let's see how it works.
In your first form, Form1, add these to the top of your code with all your other global variables:
VB Net:
Public Shared theText As String
Public Shared theFont As Font
Public Shared theFontColor As Color
C#:
public static string theText;
public static Font theFont;
public static Color theFontColor;
In Design View, locate your second form, the FormText one. Click on the Form to select it. In the properties area on the right, click the lightning bolt to see a list of Events. Locate the FormLoad Event and double-click it to create a code stub. What we'll do is to load all the system fonts into the combo box when the form loads.
Loading System Fonts
Getting a list of system fonts is a lot easier in VB Net than it is in C#. We'll do the VB version first. You can scroll down to your section, if you're programming in C#.
VB Net Code
In VB Net, add the following Using statement to the very top of your code, above the Public Class part:
Imports System.Windows.Media
Without this line, we'd get errors when accessing the system font families.
Inside of the Public Class, add these near the top of your code:
Dim fontFamily As String
Dim style As FontStyle
Dim fontColor As System.Drawing.Color
Dim isFontColorSet As Boolean
These are global variables that we'll need elsewhere.
To get the system fonts, add this For Each loop to your FormText load event:
For Each font As FontFamily In Fonts.SystemFontFamilies
CmbFontFamily.Items.Add(font)
Next
So we have a variable called font. This is of type FontFamily. We're looping round each font in the Fonts.SystemFontFamilies collection. Inside the loop, we add each font found to the Combo Box.
Just below your For Each loop, add these two lines:
isFontColorSet = False
fontSize = 14
The first line sets the Boolean isFontColorSet to False. The second line sets a default font size.
Your code should look like this:

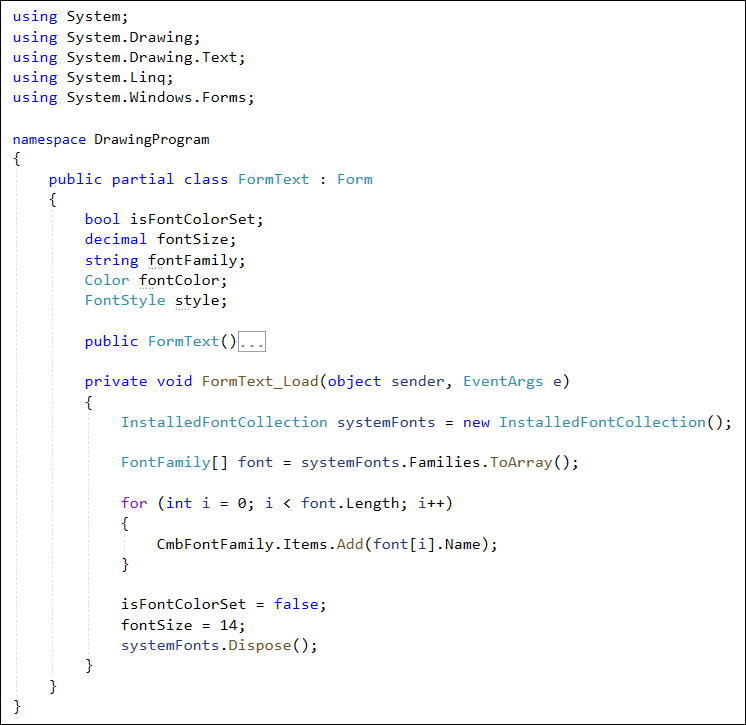
C# System Font Code
Add the following using statements to the top of your code:
using System;
using System.Drawing;
using System.Drawing.Text;
using System.Linq;
using System.Windows.Forms;
Inside of the public partial class, add these as global variables:
bool isFontColorSet;
decimal fontSize;
string fontFamily;
Color fontColor;
FontStyle style;
Now to the code that loads the system fonts. This is a little bit trickier than for VB Net. First, you have to create a new object from the Installed Font Collection. This is in the System.Drawing.Text namespace. Add this line to your form load event:
InstalledFontCollection systemFonts = new InstalledFontCollection();
Next, set up a FontFamily array:
FontFamily[] fonts = systemFonts.Families.ToArray();
Now you can loop through all the fonts in the FontFamily array that we've called fonts:
for (int i = 0; i < fonts.Length; i++)
{
CmbFontFamily.Items.Add(fonts[i].Name);
}
Outside of the loop, as the final three lines, add these lines:
isFontColorSet = false;
fontSize = 14;
systemFonts.Dispose();
The first line sets isFontColorSet to false. The second line sets a default font size. The third line disposes of the systemFonts object.
Your code should look like this:
VB Net and C#
Start your program. Right-click to bring up the second form. Click
your combo box to see the system fonts. (Note, if the items are too
big for the combo box in C#, lower the font size of the combo box from
12 to 10.) Close down the forms and return to Design View.
Font Size
We need to create two events now. A ValueChanged Event for the NumericUpDown control and a SelectedIndexChanged Event for the Combo Box.
In Design View, click on your NumericUpDown control to select it. In the properties area, locate the ValueChanged Event. Double click to create a code stub. Enter the following line of code (semicolon on the end in C#):
fontSize = SpinFontSize.Value
The Value property in the line above is a decimal. You can see this by holding your mouse over the word Value. A code tip will appear. This one from VB:

That's why the variable fontSize was set up as decimal - to match the value in the NumericUpDown property.
Now create an Event for your Combo Box. The Event you need to double click with the Combo Box selected is SelectedIndexChanged. Add this line of code (semicolon on the end in C#):
fontFamily = CmbFontFamily.Text
Your two events should look like this in VB Net:

And this in C#:

Let's do the Color button.
The Font Color Button
You've just done one of these in an early part of this walkthrough. But add a new ColorDialog control to your second form. Because it's part of a different form, and therefore part of a different Class, you can give it the same name as the previous one. Call it ColorDB.
Double click your color button to create a code stub. Enter the following code in VB Net:
If ColorDB.ShowDialog() <> DialogResult.Cancel Then
fontColor = ColorDB.Color
LabelColor.BackColor = ColorDB.Color
isFontColorSet = True
End If
And here's the code in C#:
if (ColorDB.ShowDialog() != DialogResult.Cancel)
{
fontColor = ColorDB.Color;
LabelColor.BackColor = ColorDB.Color;
isFontColorSet = true;
}
We're setting a value for the fontColor variable we set up at the top of the code. Its value will be whatever color was selected from the color dialog box. We then set the label color to the same one chosen from the dialog box. The final line of code from the if statement sets the isFontColorSet Boolean to true.
Your color button code should look like this in VB Net:

And this in C#:

Only the OK and Cancel buttons left to do. We'll do them in the next lesson.
