Home and Learn: C# NET Course
Sql Server Express And C# .Net
In this section, you'll learn how to create a database with SQL Server Express. You can do all this within the Visual C# .NET software. Once you have a database, you'll learn how to pull records from it, and display them on a Windows Form. You will also learn how to navigate through the records in your database, and how to add new records.
How to Create a SQL Server Express Database
Start a new project, and call it anything you like as we're only using this project to create a database. But do remember where on your hard drive you saved this project to, usually in your Documents folders, under Visual Studio, then Projects. When a database is created, it will be saved in the project folder. You'll need to browse to this folder to add the database as resource when we create a new project.
From the menu at the top, click on Project > Add New Item.
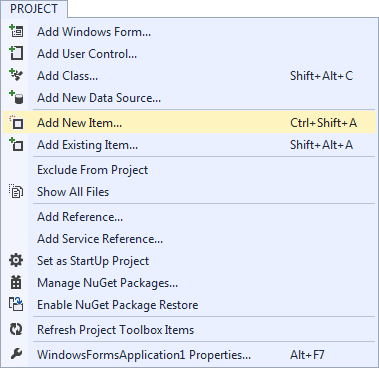
From the Add New Item dialogue box, look for the Service-based database item, as in the image below:

In the Name box at the bottom, type Employees.mdf. Then click the Add button.
If you're prompted to Install Missing Packages, download the extra files.
If you have Visual Studio Community 2015 to 2019, you'll go straight back to your Form, and it will look like nothing has happened.
In all versions, it might look as though nothing has happened, when you are returned to your form. But have a look at the Solution Explorer at the top right of your screen. You should see your database there:

When you save your project, the database will get saved along with all the solution files.
In the next part, you'll learn how to add a table to the database.
<-- copy a file | create tables in the database -->
back to the c# net contents page