Home and Learn: AI Beginners Course
Create Images from Prompt Templates in InvokeAI
Created:
In this lesson, you'll learn about prompt templates, what they are, how to use them, and how to create your own. Let's start with what they are
What is a Prompt template?
Invoke AI's built-in prompt templates are reusable pieces of prompting that you can apply to an image prompt. They are especially useful for saving a particular visual style, such as a photographic look, comic-book style, cinematic lighting, or watercolour appearance.
Think of a template as a saved starting recipe. Instead of repeatedly typing the same style instructions, you write the subject and let the template add the style-related wording.
For example, you might have this template:
highly detailed photo of {prompt}, natural lighting, shallow depth of field
If your prompt is:
a red fox sitting in a forest
Invoke combines them to produce something like:
highly detailed photo of a red fox sitting in a forest, natural lighting, shallow depth of field
The special part is {prompt}. It tells Invoke where your own prompt
should be inserted. If a template does not contain {prompt}, Invoke
adds the template text to the end of your prompt instead.
Templates can contain both:
-Positive prompt text: things you want included, such as "cinematic lighting" or "watercolour illustration."
-Negative prompt text: things you want discouraged, such as "blurry" or "distorted."
Invoke includes a collection of templates with the application. You can also create your own from scratch, or create one from an existing image. When creating one from an existing image, Invoke can use that image's stored positive and negative prompts as the template and use the image as its cover image.
Practical Work - Templates in Action
Let's see a template in action.
At the top of InvokeAI, just above the prompt box, click the dropdown where it says Choose Prompt Template:

Click the dropdown to reveal a list of inbuilt templates:
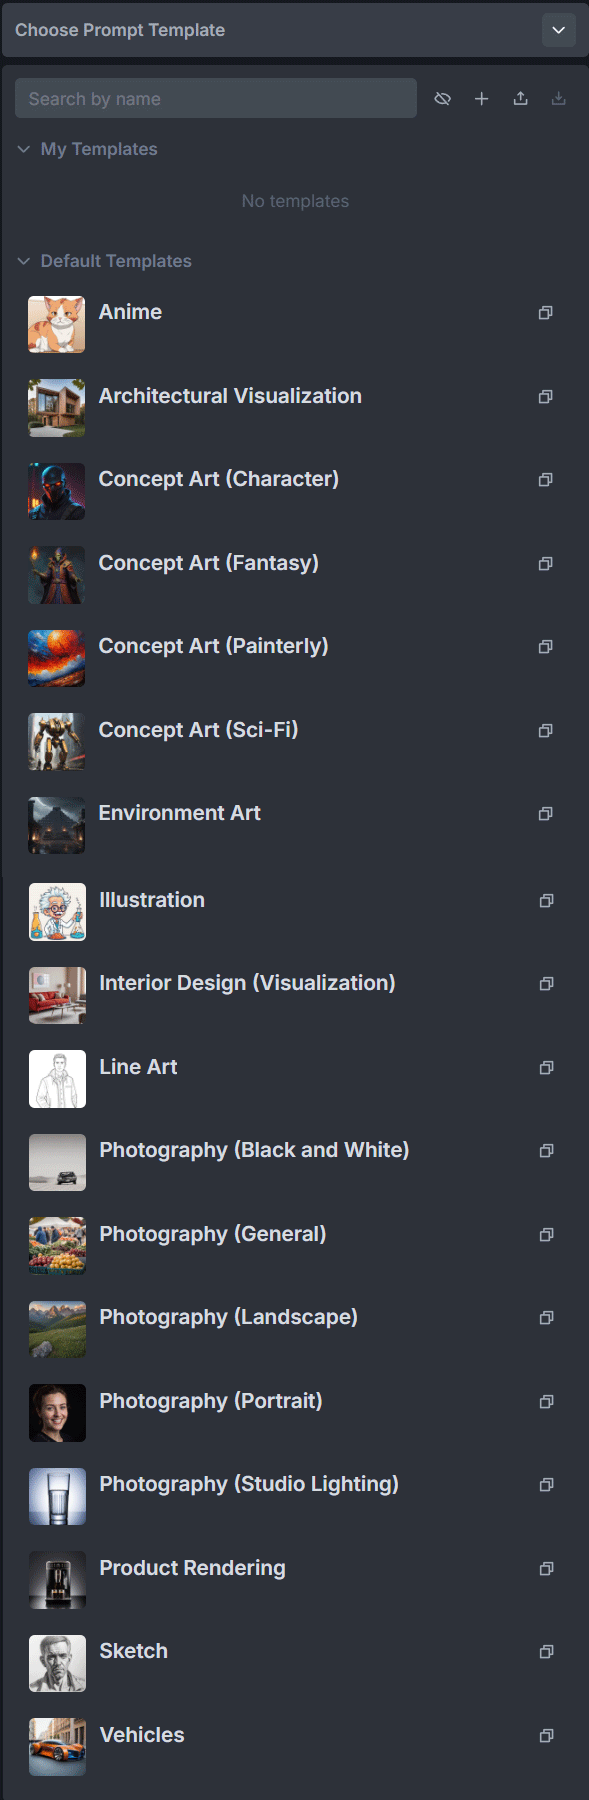
Right at the top, you can see you have no templates. We'll fix that soon.
But notice the right of each template on the list there is an icon of 2 pages. Click the icon and you'll see the prompts for the template:
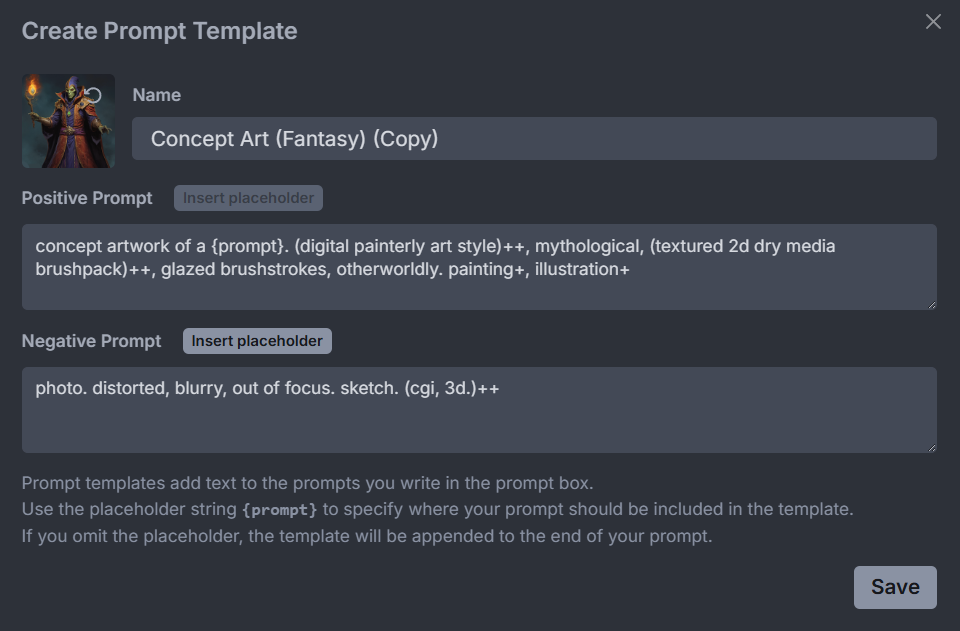
The prompt is:
concept artwork of a {prompt}. (digital painterly art style)++, mythological, (textured 2d dry media brushpack)++, glazed brushstrokes, otherworldly. painting+, illustration+
The curly brackets { } are where you want a prompt to appear. When typing your prompt after selecting this template, the {prompt} part would be replaced by whatever you typed into the prompt box.
For example, if you were to type just 'dark elf', the whole of your prompt would then be:
concept artwork of a dark elf. (digital painterly art style)++, mythological, (textured 2d dry media brushpack)++, glazed brushstrokes, otherworldly. painting+, illustration+
The negative prompt would stay the same:
photo. distorted, blurry, out of focus. sketch. (cgi, 3d.)++
The round brackets, incidentally, are for when you want to add emphasis to the words inside them.
(character concept art)++ means 'make character concept art more important'. The ++ is an extra weight boost in some prompting systems, so it is stronger than plain text.
Likewise, (cgi, 3d.)++ in a negative prompt means 'more strongly avoid CGI and 3D-looking results'.
Round brackets can also group a phrase together, so the model treats painterly, impasto, dry brush as one stylistic idea being emphasised.
Curly brackets do something different. {prompt} is usually a template placeholder. The software replaces it with the prompt you enter, rather than treating the word prompt as image instructions.
One caveat: bracket and ++ weighting syntax varies by tool and model. In an embedded template, it is safest to leave the punctuation as supplied unless you are deliberately testing its effect.
Back to the template list. Select the Product Rendering template. The template text is this:
{prompt} high quality product photography, 3d rendering with key lighting, shallow depth of field, simple plain background, studio lighting.
And the negative prompt is:
blurry, sketch, messy, dirty. unfinished.
When you select the template, it will appear above the prompt box:

Let's revisit our fragrance bottle again. Just enter that exact text into the prompt box:

For the model, select the same one we had before, DreamShaper 8. For the size, set it to 512 x 512. The seed can be set to Random. The Scheduler can be DPM++ 2M, the Steps 32 and the CFG 7.
Just before hitting the Invoke button at the top, notice the three icons to the right of the template. Click the eye icon:
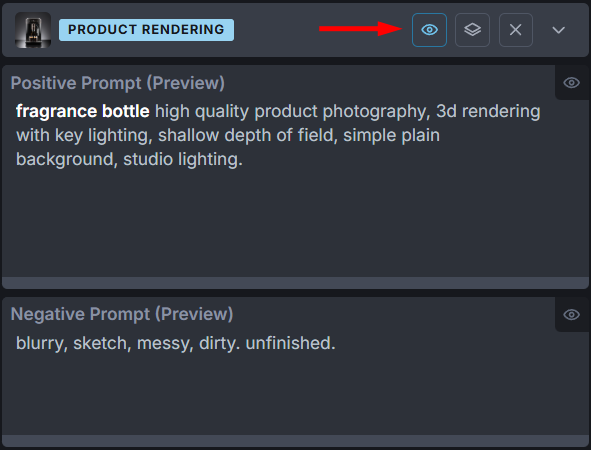
This is View Mode and you can toggle it on or off, either by clicking the eye again or just by clicking into the prompt box. It allows you to view the whole of your prompt before you Invoke a new image.
The second icon, the one in the middle, is 'Flatten selected template into current prompt'. Clicking this will insert the full template text into the two prompt boxes, adding your own text in place of the {prompt} part.
The third icon just gets rid of the current prompt template.
Now click the Invoke button to generate an image of a fragrance bottle. Here is ours:
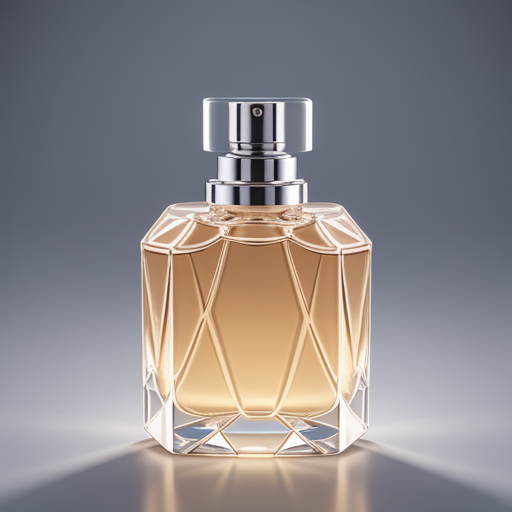
Not bad for typing just two words into a prompt box!
Reusing Templates
Try rendering some other products. For example, type magic potion into the prompt box. Here's what we got back:

The subjects can change, while the overall visual direction stays similar.
Templates can help you:
- Avoid retyping long style prompts.
- Try several styles on the same subject.
- Keep a series of images visually related.
- Learn how different prompt wording affects results.
- Separate the subject from the style instructions.
- Build a personal library of prompts that work well for a particular model.
Now let's create our own. We won't start from scratch but turn an image we like into a template.
Create your own Templates
We created a detailed prompt for a fantasy warrior. We liked the results so decided to turn it into a template for reuse. Here's the AI generated image:

And here are our prompts:
A grim fantasy warrior covered in dust and dried blood, battered plate armor, broken sword in hand, harsh shadows, storm clouds overhead, mud-soaked boots, gritty realism, raw emotion, cinematic close-up, hyper-detailed textures, dark medieval atmosphere
Negative Prompt:
cartoon, anime, stylized, smooth skin, plastic, blurry, extra limbs, deformed hands, low detail, oversaturated, soft lighting
If you want, you can import the image above into Invoke. (You don't need to.)
Right click the image and download a copy to your own computer. You can simply drag and drop the image into Invoke, in the Assets area at the bottom right of Invoke. Or you can click the Upload Media button:
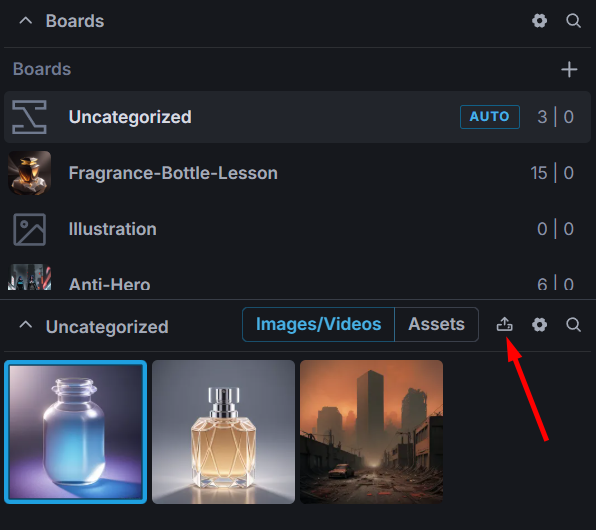
Clicking Upload Media brings up an Open File dialog box where you can select the image. It will then be imported into Invoke:
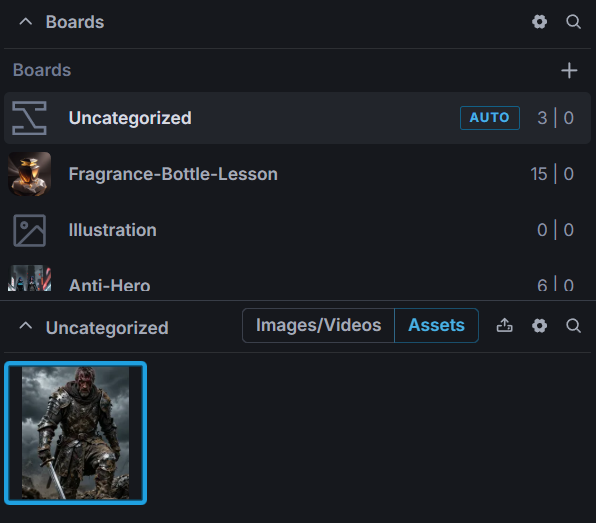
Notice that you are now in the Assets folder. To see all your images, click Images/Videos.
Back to our template
On the left of Invoke, click the Choose Prompt Template dropdown again. This time, click the plus symbol at the top. This is the button to Create Prompt Template:

You should see the Create Prompt Template dialog box appear:
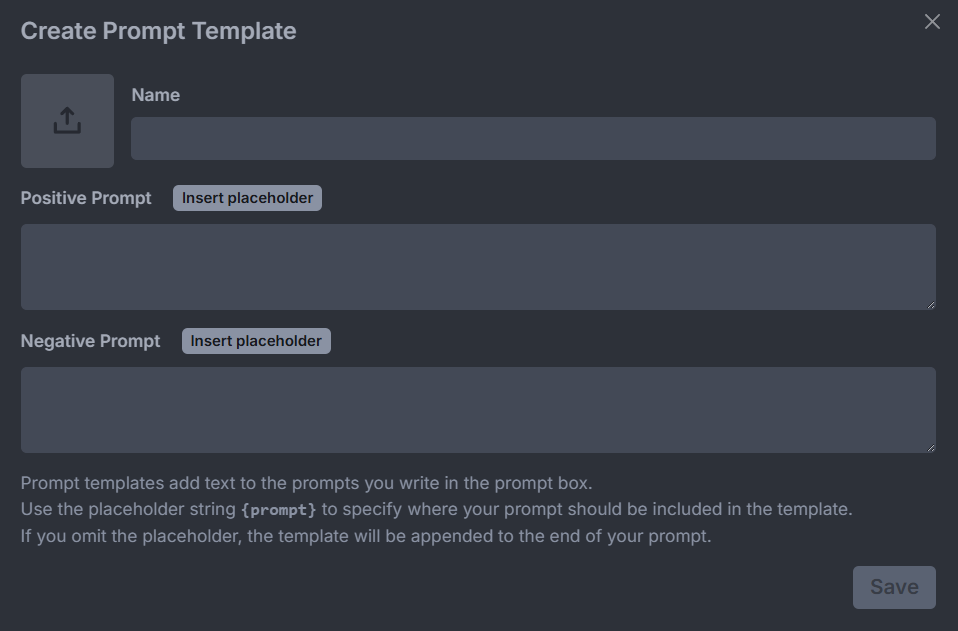
In the Positive Prompt box at the top, enter this:
A grim fantasy {prompt} covered in dust and dried blood, battered plate armor, broken sword in hand, harsh shadows, storm clouds overhead, mud-soaked boots, gritty realism, raw emotion, cinematic close-up, hyper-detailed textures, dark medieval atmosphere
In the Negative Prompt box, enter this:
cartoon, anime, stylized, smooth skin, plastic, blurry, extra limbs, deformed hands, low detail, oversaturated, soft lighting
Type a name for your template at the top. We called ours Fantasy Character.
Now click on the upload icon, to the left of Name. Locate your fantasy warrior again and use that image. Your dialog box will look like this:

Click Save and your template will be added at the top of the templates list:

Notice that there are three icons to the right of your template: the first two bring up the Create Prompt Template dialog box again. The third one is a trash can icon that allows you to delete your template.
Try it out. We used the Juggernaut XL v9 model with these settings:
Width: 1024
Height: 1024
Seed: Random
Scheduler: DPM++ 2M
Steps: 32
CFG Scale: 7
We typed dark elf into the prompt box. We got this:

And here is our goblin, which we got simply by typing the word goblin into the prompt box:

You can turn one of your own images into a prompt. Right click the image you want to use. From the menu that appears, select Use for Prompt Template:

You will then see the template dialog box appear again.
How to use Templates effectively
Don't put every possible idea into a template. If it contains portrait photography, fantasy concept art, neon lighting, watercolour texture, and film grain all at once, the instructions may conflict and produce unpredictable results.
A useful approach is to make separate templates for separate jobs:
- Portrait photography
- Landscape photography
- Fantasy concept art
- Children's-book illustration
- Product photography
- Anime-style character art
Use the template for the repeated visual treatment, and use your normal prompt for the specific subject, action, setting, and important details.
Invoke's general prompt guidance recommends describing the subject first, then adding style or medium, lighting or composition, and a few important details. Templates can hold the repeated style and lighting portions, while your individual prompt supplies the subject.
How to get better Template results
Keep the template relatively stable while you experiment with your subject. If you change the template, model, prompt, seed, and image settings at the same time, it becomes difficult to tell what caused the result to improve or worsen.
A good testing method is:
- Choose one subject prompt.
- Keep the model and seed the same.
- Try the subject without a template.
- Try it with one template.
- Try it with another template.
- Compare the results.
- Change only one part at a time
Using a fixed seed makes comparisons easier because the same basic random starting point is used. Invoke also recommends changing one thing at a time when refining prompts.
Check the result of a template on the model you are actually using. A prompt that works well with a photographic model may work poorly with an illustration model. Different models respond to different kinds of wording and may have their own preferred trigger words.
Dynamic prompting
You can add something called a dynamic prompt in InvokeAI.
Try this. Change your prompt to the following:
{young|old} dark elf
So, use a pair of curly brackets inside of the prompt box. Inside of the curly brackets, you need your different options separate by the vertical line character.
Enter 2 as the number of images you want. Now click the Invoke button. You should get an old dark elf:

and a young dark elf:
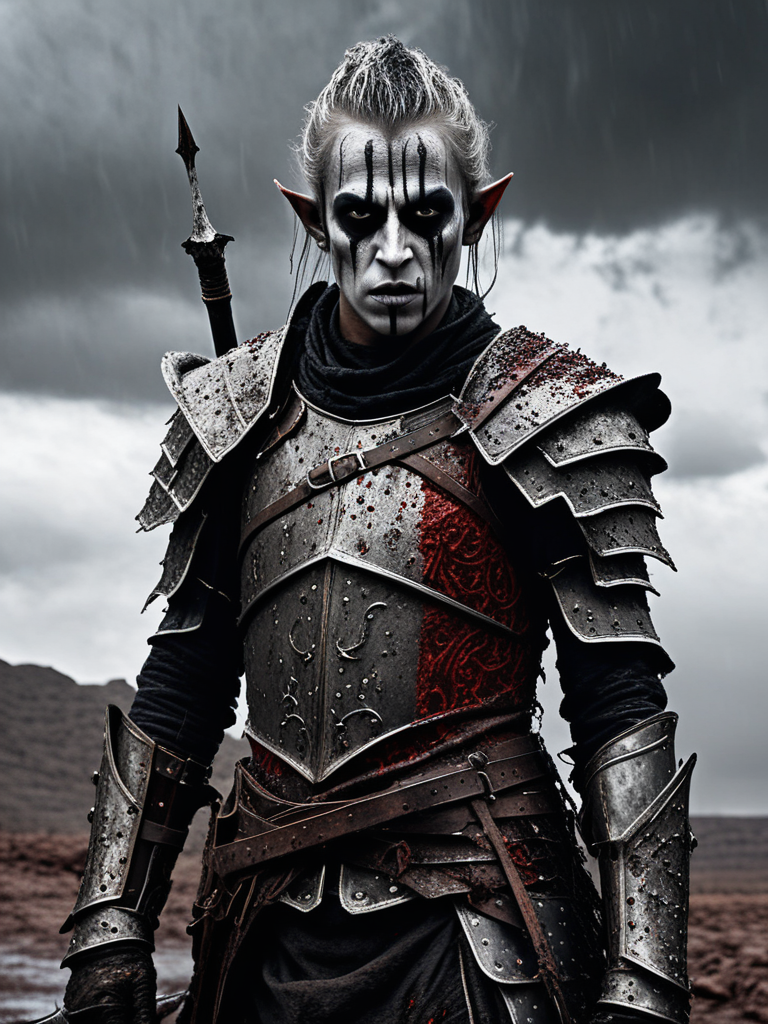
(If you don't get one or the other, just try again.)
A prompt template adds a reusable block of prompt text. A dynamic prompt creates variations by choosing between alternatives.
Dynamic prompting can produce several different subject variations. Invoke supports dynamic prompting inside templates, so you could combine a reusable style with controlled variations. That could generate multiple related images while keeping the overall style consistent.
Summing up
The main thing to remember is a template is not a magic quality button. It is a convenient, reusable set of instructions. A good template can improve consistency and save time, but it can also add unwanted style words or conflict with your subject. Preview the final prompt, keep templates focused, and test them with the model and type of image you intend to create.