Add Menus to your Windows Forms
If you have a later version of Visual Studio Community Edition, Microsoft have done away with the nice and easy method of adding menus to the top of window forms. Now, double-clicking MenuStrip under Menus & Toolbars in the Toolbox just adds a blank strip to the top of the form. So you need to add menu bar items manually. It's a bit of a pain! Anyway, off we go.
If you haven't already, expand the Menus & Toolbars item in the Toolbox. Double-click MenuStrip and you'll see a blank strip at the top of your form. The control itself will appear at the bottom of your design window.
Make sure you have the MenuStrip1 item selected at the bottom of Visual Studio. Now look at the Properties area on the right. Locate Items property and click the button to the right of Collection:

When you click the button, you'll see a dialog box appear. This is where you add the top level items for your menu, and any items on the menu.
Click the Add button at the top and a new item will appear in the text area on the left. By default, it will have the name and text ToolStripMenuItem1. You can change this to anything you like. To change it, locate the Name property and the Text property. In the image below, we've changed the Name of the property to menuFile. The Text Property, the one people will see, has been changed to &File:

The & symbol above is used for a menu shortcut. Because the & symbol is before the letter F, it means this letter will be used as a shortcut. The shortcuts are activated when the ALT key is pressed on the keyboard. They look like this:

When you press the letter F on your keyboard, the File menu will drop down. This is indicated on the menu with an underscore before the letter you want to use as a shortcut. They look like this:
To get items on the File menu, you need the DropDownItems property. Select this item on the right, and then click the button to the right of Collection. You'll see this:

Click the Add button at the top to add an item to your File menu. (Make sure the dropdown at the top days MenuItem.)
When you click Add, a new item will appear with the default Name ToolStripMenuItem1:

Change this Name in the Properties area to the right. Call it menuNew. Press the Enter key on your keyboard to confirm the change:

Now scroll up to the top and locate the Text item. Add a keyboard shortcut. Type &New:

You now have one item on your File menu called New.
In the same way, add two new items:
Name: menuOpen
Text: &Open
Name: menuSave
Text: &Save
Your dialog box will then look like this:

We'll add one more item to the File menu - an Exit option. But we'll have a separator bar between the Save item and the Exit item. To do this, click the dropdown box at the top, to the left of the Add button. From the list, select Separator:

Click the Add button to add a Separator to your menu:

There's no sense in renaming it, so just leave it on the default.
Now add one last menu item - the Exit item. First, make sure you switch the dropdown from Separator back to MenuItem. Now add an Exit option:
Name: menuExit
Text: E&xit
Note that we've typed the & symbol before the letter x, this time. But your File menu items should look like this:

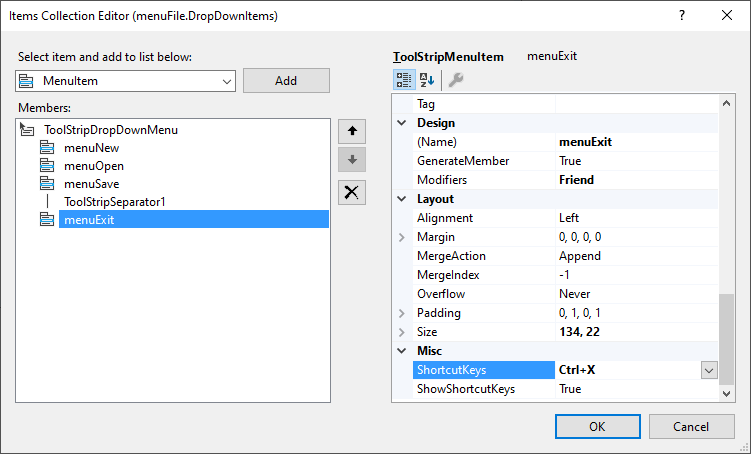
One more thing we can do, while we have this dialog box up and that's add key combination shortcut. We can have the Exit menu respond to the keyboard keys CTRL and X. (We'll write the actual code to do this soon.)
With the Exit menu item selected in the dialog box, scroll down to the bottom of the Properties area and locate the ShortcutKeys item:

Click the dropdown arrow to the right of None to see the following:

You can have the user hold down any combination of CTL, SHIFT and ALT. But check just the CTRL item. The Key dropdown then becomes available. Select the letter X from the list. Your Modifiers area will then look like this:

Click away and the ShortcutKeys property will show your choice:
Submenus
You can have submenus, by the way. A submenu looks like this:

You just add DropDownItems to DropDownItems. For example, click on your menuNew item. In the Properties area, select DropDownItems again. Click the button to the right of Collection to see a new dialog box. Click the Add button to add a new menu item. Rename it then change the Text property, just like you did before. In the image below, we've changed the Name to SubItemFolder and the Text to Folder:

Click OK on all the dialog boxes to get rid of them. Now run your program and see what your menu looks like. You should have this:

Try out your other keyboard shortcuts. Press the ALT key on your keyboard to see all the underlines we added. Press the letter F on your keyboard and the menu will drop down:
Nothing on the menu works, at the moment, as we haven't written any code for it. Let's get the the Exit menu working first. We'll do that in the next lesson.