Home and Learn: C# NET Course
Create A Database Table In Sql Server Express
When you click Add New Table, as you did in the previous section, you'll see this screen appear in the middle:
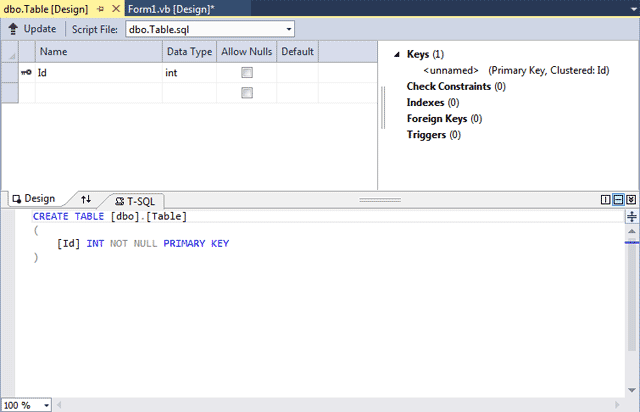
The first thing we can do is to give the table a name. In the bottom half of the screen above, delete the word Table between the square brackets. Type the name tbl_employees instead:
CREATE TABLE [dbo].[tbl_employees]
Now click the Update button, which is top left of the table designer:
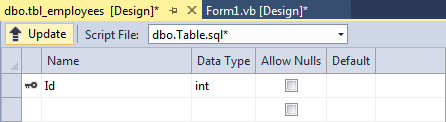
You should then see the following screen:
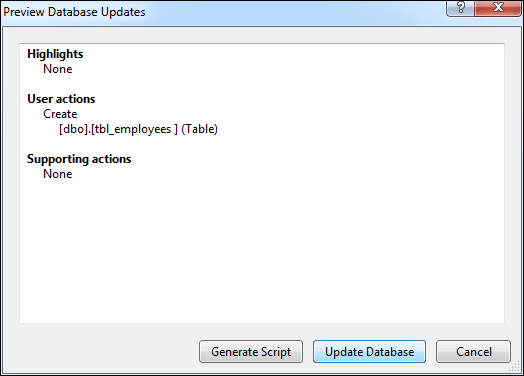
Click Update Database to return to the table designer. We can now set up the columns that are going into the table.
The first column name, Id, has already been set up:
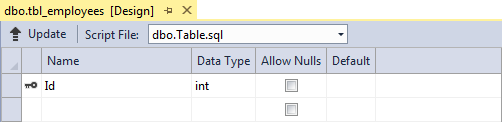
The Data Type is OK on int, which is short for Integer. The column has a key symbol to the left, which means it is the Primary Key. This is OK, too. The Allow Nulls is unchecked, which is what you want for a Primary Key. This means you can't have duplicate item for this column.
One thing we can do for the Id column is to have it update itself automatically. When you add a new item to the database, the next integer in the sequence will be added to the Id column. To set the Id column to Auto Increment, highlight the Id row then take a look at the properties area bottom right. Expand the Identity Specification item:
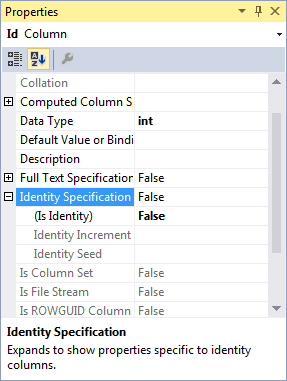
Now set Is Identity to True:
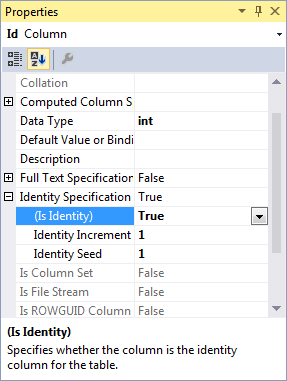
The Identity Increment has a default of 1, meaning 1 will get added to the Id column every time a new entry is added to the table.
With the Id column set up, we can add more columns.
Click in the Name box just below Id at the top of your table designer. Now type the new column heading first_name. We want this to be text. So for the Data Type, select nvarchar(50), meaning a maximum of 50 characters:

The Allow Nulls is ok checked.
Add a third column by clicking into the Name box again. This time, type last_name. Set the Data Type to nvarchar(50), just as before. Leave Allow Nulls checked.
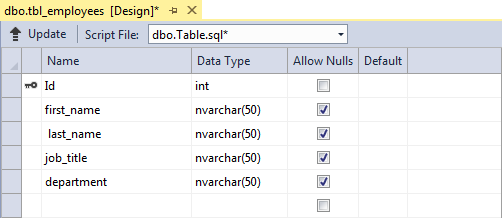
We only need two more columns, job_title and department. Add this using the same technique as above. When you're done, your table designer will look like this:
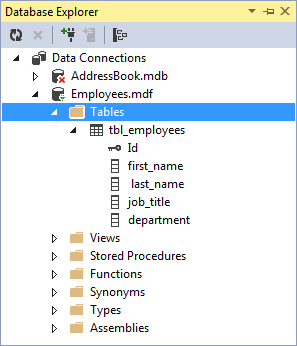
Again, click the Update button to save your changes. Now have a look at the Database Explorer on the left. You should find that your new columns are displayed:
Now that we have all the columns set up, we can add some data to the table.
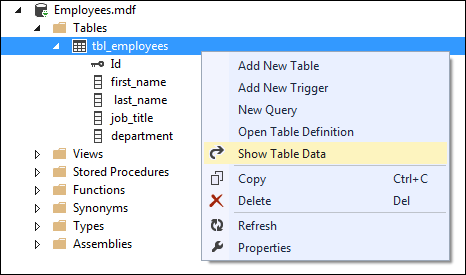
To add data to your table, right click the name of your table in the Database Explorer. Then click Show Table Data:
When you click on Show Table Data you'll see a new screen appear in the middle. This one:

The columns are the ones we set up earlier. Each row will be a single entry in the table.
Because we set the Id column to Auto Increment, it means we don't have to type anything into this box. So click into the text box under first_name. Enter Adara. Now press the Tab key on your keyboard. You'll be taken to the next text box to the right, the last_name field. Enter Hussein as the last name. Press the Tab key again to go to the job_title text box. Enter Lead Programmer here. Tab across again to the department text box and enter IT. Your screen will then look like this:
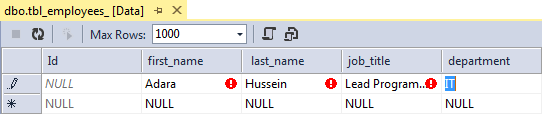
As you can see, there are red warning circles on the previous three entries. This is because the data hasn't been committed to the table. To get rid of the warning circles simply tab to the next row down. Tab to the first_name field again, on row two this time. (You can also just click inside a text box.)
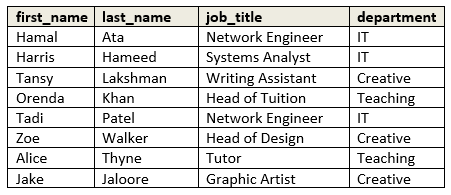
Now enter the following data in your table:
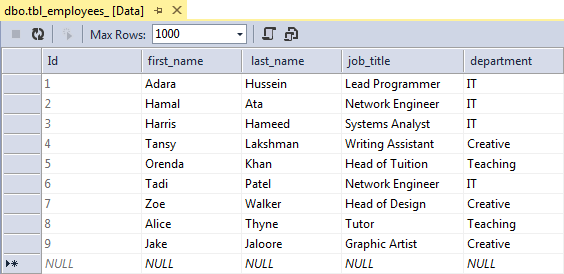
When you're finished, your table data screen should look like this:
Now that you have a database with some data in it, we can move on. Before you close this solution, remember where you saved it to, and the name of your project. If you left everything on the defaults when you installed Visual Studio, then your projects will be in your Documents folder. The database will be in the folder created for this database project.
Save your work, and you will have created your very first Compact SQL Server Express database! But it's a huge subject, and whole books have been written about SQL Server. We can only touch on the very basics here. What we do have, though, is a database we can open with C# .NET programming code. We'll do that next.
<-- create tables in the database | creating a c# net database project -->
back to the c# net contents page