Home and Learn: Web Design Course
Formatting Textboxes with CSS
You can use some CSS to format your text boxes. Add the following LINK to the HEAD section of your HTML code:
<LINK REL=Stylesheet TYPE ="text/css" HREF="../css/forms_1.css">
Create a new CSS page and save it to the correct folder. For the file name type forms_1.css. We saved our HTML page in a folder called pages. We have a CSS folder that is one folder up from this, and so saved our CSS file there. That's why our HREF reads "../css/forms_1.css". This means, "Move one folder up from where the HTML page is, and look for a folder called css. Then use the CSS script called forms_1.css."
For the CSS, type the following:

You now need to amend your text box code slightly. Change it to this:
<INPUT ID="tb1" TYPE="Text" Value="Enter your first name">
The first line of the CSS code sets the style for an INPUT with the ID tb1. That's why we've added an ID attribute with that name to the code.
The SIZE attribute has been removed because we're setting the size of the text box using CSS:
Height: 30px;
Width: 300px;
You can leave the SIZE attribute in, though, if you like - it won't affect the results.
The other four CSS properties for the text box set the background colour, the font family and size, and the text colour.
We've also added two pseudo classes for the INPUT elements. The first one is focus. When you click inside the text box the border changes colour. Adding visual cues like this helps users when filling out your forms.
The other pseudo class is for the invalid event. You'll see how this works when we get to the HTML5 form elements. But it will put a red border around an INPUT if the user has made a mistake.
Refresh the web page in your browser. With the new CSS styles applied, it should look like this:

When you click inside of the text box, it will look like this:

With just a few CSS styles, then, you can really improve the appearance of your form elements.
JavaScript Alert Boxes
So that you can see that something is actually happening here, we can add some simple JavaScript to get at our form values.
Add a NAME attribute to your text box code, highlighted in bold below:
<INPUT ID="tb1" TYPE="Text" Value="Enter your first name" NAME="textBox1">
Once a form element has a NAME attribute you can refer to it in code. (You can also use a form's ID attribute in code.)
The form itself needs a NAME attribute as well. So add this to your FORM tag:
<FORM NAME="frmOne">
So we've given the form the NAME frmOne.
For your form button, amend the code to this:
<INPUT TYPE="Button" Value="Submit" onClick="textBoxValue( )">
Notice that the TYPE is now "Button" instead of "Submit". This allows you to write your own submit code, which you'd want to do to check that form values have been filled in correctly.
The part that's going to do all the action, though, is this:
onClick="textBoxValue( )"
onClick is something called an event. It just means when the button is clicked perform some action. The action for us is a piece of code we're going to add in the HEAD section. We've called this piece of code textBoxValue( ).
In the HEAD section of your HTML code, add the following JavaScript:
<SCRIPT>
function textBoxValue() {
alert( document.frmOne.tb1.value );
}
</SCRIPT>
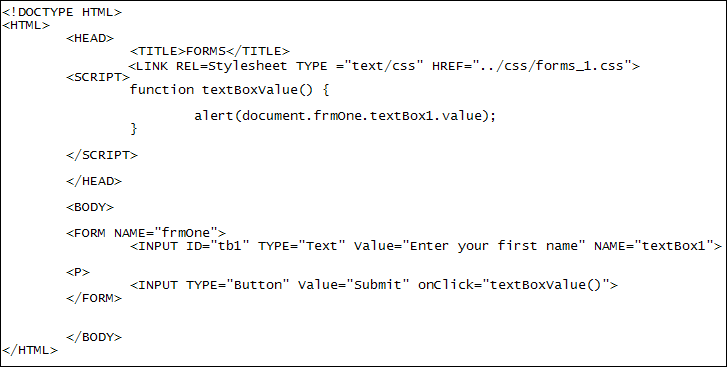
Your HTML code should now look like this:

All this script does is to display a popup alert box. The text between the round brackets of alert is this:
document.frmOne.textBox1.value
It starts with the word document, which refers to the current web page displayed in your browser window. You next type the name of the form (frmOne), followed by the name of the form element (textBox1). Finally, you type the attribute you're trying to access. For us, this is the VALUE that is typed into the text box called textBox1.
Save your work, and refresh the page in your browser. Click your new button (which will look exactly like the old one). Whatever you have in the text box should appear in an alert box. Here are the results in Internet Explorer:

The Firefox web browser displays the following alert box:

Exercise
Delete your default text. Type something else into your text box, then press
the Submit button. You should find the new text displays in your alert box.
In the next lesson, you'll see how to add labels to text boxes, and how to style form buttons.
<< Textboxes, submit, reset | Labels, textareas >>