Home and Learn: Games Programming Course
Unity Minimaps
We're going to create a minimap in this section. A minimap is top-down view of where your player/car is in the game. As the player/car moves, the minimap updates. It will look like this, if you want a square minimap:

Or this, if you want a round one:

Let's get started.
A minimap in Unity is projected onto something called a Render Texture. The Render Texture is then attached to a camera.
So, to create a Render Texture, move into your Textures folder in the
Projects area at the bottom of Unity (you can create a Textures folder,
if you haven't already). Right click on a blank area and select the Create
item. On the Create menu, select the Render Texture item in older
versions of Unity (we've chopped a few items off the bottom of the menu
below):

Or Create > Rendering > Render Texture, in newer versions of Unity.)
The Render Texture will appear as a black square image in your Textures folder. Rename the Render Texture to Renderer:

Now we need a camera so that we can use this renderer.
So, right click on your CAR-ROOT item in the Inspector. Create another camera. Call this one MapCam. Remove the Audio Listener on the camera, as it's not needed. Position and rotate this camera so that it's pointing down at your car. We went for these values in the Inspector:
Position
X: -1.2
Y: 42
Z: 0.18
Rotation
X: 90
Now locate the Target Texture item (if you used the Universal Render Pipeline, this item won't be there). If you can't see a Target Texture, expand the Output item. Then use Output Texture instead.

Click the tiny circle to bring up a dialog box. This one:

Select your Renderer from the list. The Inspector for the camera will then look like this:

Or this:
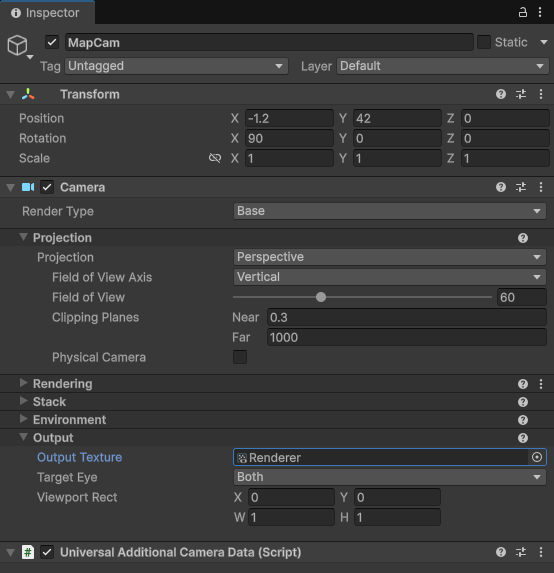
In the Camera setting below the Transform values, locate the Field of View slider. Play around with the slider and you'll see that lower values zoom you out and higher values zoom you in:

With your camera in position, click on your Canvas item in the Hierarchy to select it. Now right-click and select UI > Raw Image from the menu that appears. Rename the image to MapRender. Just like you did with the speedometer, go into 2D mode and position your new raw image. Move it to the top right. In the Inspector, set the Texture for your Raw Image to the Renderer you've just created:


(Note the Pos X and Pos Y values of 336 and 150. We'll need these for the round minimap.)
Just by selecting your Render Texture item you should see the view from your MapCam replace the white raw image.
In fact, if all you want is a square minimap, you're done! Play your game and it should look like this:
If you want a round minimap, read on.
Unity - Round Minimaps
To get a round minimap, you need a circle. Download this one and drag it into your Textures folder in Unity:

You need to convert this to a sprite. So, just like you did for the Gauge and the Pointer, select the circle in your Textures folder. In the Inspector, change the Texture Type dropdown to Sprite (2D and UI). Change the Sprite Mode to Single.
Back to the Hierarchy and right-click on your Canvas item. From the menu, select UI > Image. Rename the image to MiniMapBorder. In the Inspector on the right, set the Source Image to the circle texture:


You should have a purple circle in the centre of your screen. So, type those numbers from the MapRender item in the Hierarchy (336 and 150, for us. Yours may be different, though, depending on where you placed your minimap.) Type the numbers into the Pos X and Pos y values for MiniMapBorder. The purple circle should move on top of the minimap in the Scene:

Now duplicate this image. Rename it to Mask. In the Inspector, click the Add Component button. Type Mask into the search box and select the Mask item:

In the Hierarchy, drag and drop your MapRender item onto the Mask item:

Your Hierarchy will then look like this:

And your Scene like this:
You now have a circular minimap! If you want a border, click back onto the MiniMapBorder item in the Hierarchy. Change the Width and Height from 100 to 110 for both. You'll then have a purple border for your minimap:

The circle for the minimap looks a bit raggedy, though. But that's the mask and Unity's implementation of it. There's nothing you can do to set the anti-alias, unfortunately. (Unless you know a way. If so, give us a shout.)
Try it out. Play your game and drive around. You should see the minimap update to wherever you are.