Home and Learn: Games Programming Course
Importing Assets from the Unity Store
This is the final lesson in our basic racing game. In the first few lessons, you created a very simple boxcar. In this lesson, you'll learn how to import a car from the Unity Asset Store. It will look a lot better than ours is, obviously. Off we go, then!
Unity used to come with a lot of assets you could easily import into your projects, including a snazzy race car. These days, Unity is no longer supporting the Standard Assets package. But you can still get them. Click on Window at the top of Unity. From the Window menu, select Asset Store:

This will launch your browser. You used to be able to download eveything from within Unity, but these days they shunt you to their website where you have to create an account and login.
So, go to the Unity website and login. Click on the link for Assets then type Standard Assets into the search box. Locate the package for Unity Technologies Standard Assets. (There are others who have called their assets the same name. You want the one for Unity Technologies.) When you click the link, there should be a link on the right that says Open in Unity:

First, you may see a box which prompts you to update your coding editor. A prompt like this one

Download any updates for your editor. Then click the link at the top for Packages. Select the one on the list that says My Assets:

You'll then see a list of all the assets you've used in your projects. Scroll down and locate the Standard Assets one:
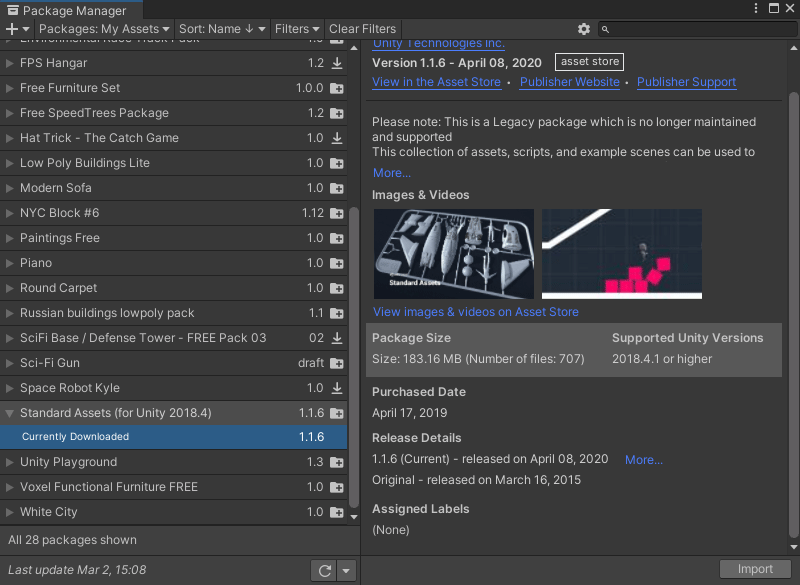
Click the Import button in the bottom right to import the assets. (Nearly there!) You should then see a screen line this one:

You don't really need all of these assets, but click the Import link anyway, without deselecting anything. Now go to your projects folder in Unity. You should see a folder called Standard Assets. The one we want is Vehicles:

Double click the Vehicles folder to move inside of it. Then double click the Car folder. You should see more folders there. The one we want now is Prefabs:

Double click the Prefabs folder and you'll see an item called Car:

Drag the Car item onto your Scene. Park it close to where your box car is. The new car will be called Car (1) in the Hierarchy.
The new car may be too big, though. So, with Car(1) selected, change the Scale in the Inspector. Change the X, Y and Z of Scale to 0.4. Now change the Y rotation to 90:

We can deactivate our old box car. To do this, click on your box car to select it. In the Inspector on the right, uncheck the Car item at the top:

When you uncheck your box car, it should grey out in the Hierarchy. Now we need to move our Main Camera.
Expand your Car item. Locate the Main Camera and drag it onto the Car(1) item. Car(1) should now have the Main Camera:

With the Main Camera selected, move it into a position to view the new car properly. If you click on the Game tab, the screen should look something like this:

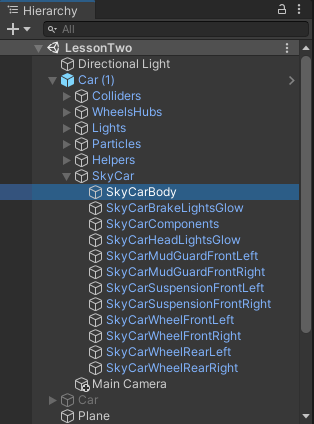
You can change the colour of the new car. In the Hierarchy, expand the item called SkyCar. Click on SkyCarBody to select it:
In the Project area, click inside of your Materials folder. Drag one of your materials onto SkyCarBody:

Your car will then change colour:

You probably can't try it out just yet because you may have a red error warning at the bottom of your screen about a file called SimpleActivatorMenu. To fix the error, click on the Utility folder in Standard Assets. Then double click the Scripts folder to move inside of it. Locate and then double click the script called SimpleActivatorMenu.
Once this script is open in your coding editor, locate this line:
public GUI.Text camSwitchButton;
Change it to this:
public UnityEngine.UI.Text camSwitchButton;
Save the file in your coding editor. Then go back to Unity. Unity should update, and the error will go away.
If you tried it out now, you'd find two issues. One, the timer doesn't work. And two, the car handles like a dog on this track!
To fix the car handling, click back on Car(1) to select it. Expand the Car Controller (Script) item in the Inspector. You can play around with the various settings. But the one that seems to fix the oversteer is the Maximum Steer Angle:
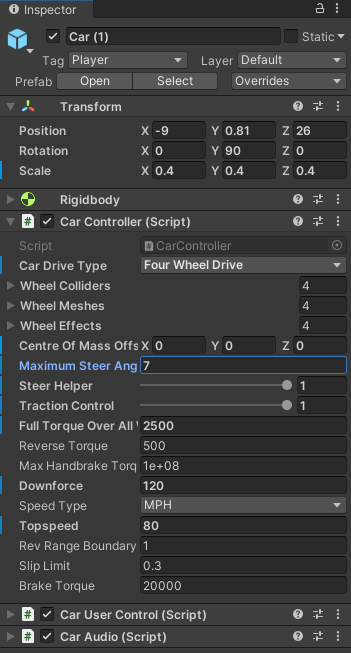
Type a lower value to make the car turn better on our track. But play around with the other values. We've reduced the top speed to 80.
The problem with the timer not activating is that we don't have a tag called Player anymore, since we deactivated our box car. The item we need to tag is called ColliderBottom, which is grouped under the Collider section of Car (1). Expand Colliders then click on ColliderBottom to select it:

With ColliderBottom selected, change the tag to Player in the Inspector on the right:

The timer should work OK, now. So, start your game and give it a play. You should notice that the engine sounds are lot better than we did for our very simple box car. This is because of the complexity of the audio script created by Unity. You can have a look at the script. It's in the folder Standard Assets > Vehicles > Car > Scripts. The file is called CarAudio. Double-click the file to open it up in your coding editor. It's very complex! Another script you can look at it while you're in the scripts folder is called CarController. This is the script that controls the movement of the car. Open it up to see how complicated it is.
But we'll leave it there for this simple driving game. You learned a lot in these tutorials: how to navigate around Unity, how to create and group simple shapes, how to move objects, apply materials to them, and a whole lot more. But let's create a new game now - a first person shooter. It's time to get the guns out!