Home and Learn: Data Analysis
Install Jupyter Notebook on Windows
We're going to be using Jupyter Notebooks to do this Pandas Data Analysis course. You're going to be downloading some CSV Datasets from us, so you'll need Jupyter installed on your computer. Except for the first lesson. You don't need to install anything for the Getting Started tutorial, which is here:
Pandas Dataframes - Getting Started
To run the code online, head on over to the Jupyter site here:
For the rest of the Data Analysis course, you'll need Python and Jupyter installed. This is pretty easy on Windows.
Install Python
If you haven't already done so, you can get Python here:
https://www.python.org/downloads/windows/
Scroll to the bottom of the page. Under Files, download the 64 bit version (Windows installer (64-bit)).
Once you've downloaded Python, double-click the downloaded file to launch the installer. You should see this:

Put a check in the box at the bottom, Add python.exe to PATH.
Also, make a note of where Python is installing (the red box and arrow in the image above). You're going to need this location shortly. But it's usually in your AppData\Local\Programs folder on Windows. Something like this:
C:\Users\Ken\AppData\Local\Programs\Python\Python311\
The 311 above means Python 3.11. Yours may be different. But you should see a file called python.exe inside of this folder.
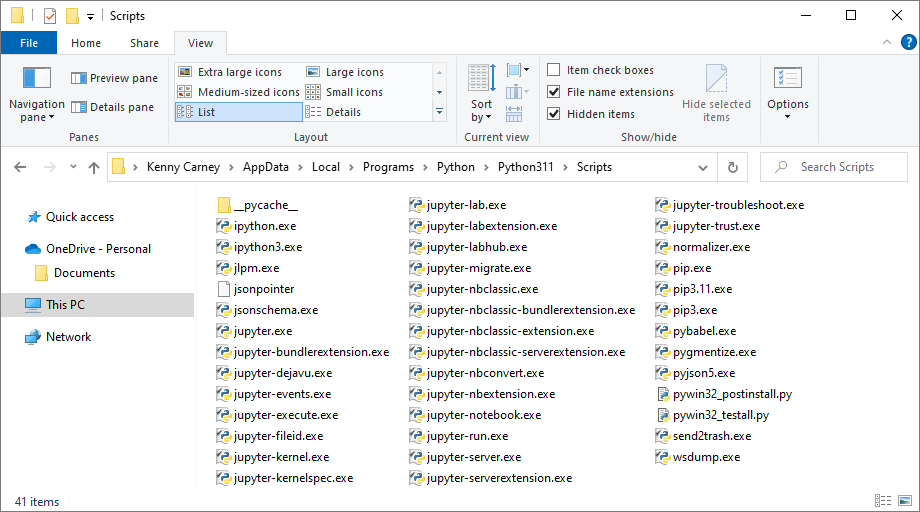
There should also be a folder called Scripts. Look inside of the Scripts folder and note there's a few entries for pip:

In the image above, we have pip, pip3 and pip3.11. You use pip to install other Python packages. Like Jupyter.
Install Jupyter Notebook
Now open up a Windows Command Prompt. You can do this by typing Command Prompt in the search box bottom left on your Windows Desktop. You should see a black or grey screen appear:

We need to change to our Python folder. You do this with the cd command (short for Change Directory). Enter this:
cd PATH_TO_YOUR_PYTHON_INSTALL
Relace PATH_TO_YOUR_PYTHON_INSTALL with the location you were asked to remember earlier in this tutorial. (Hopefully, you haven't forgotten this already! If so, do a search for python.exe.)
Press Enter to change directory:

Now install Jupyter with this line:
pip3 install jupyterlab
If this doesn't work, try one of the other pip files in your scripts folder:
pip install jupyterlab
pip3.11 install jupyterlab

Press return and you should see the installation:

When the install is finished, you'll see the prompt line reappear:

Look inside your Scripts folder again to see lots more files:
Back to the Command Prompt. To launch Jupyter, enter this command:
jupyter notebook
Your Command Prompt should look something like this:

When you press enter, you should see a browser appear with the start page for Jupyter:

Note the address bar at the top. You are running a server on your computer now (localhost:8888/) and this webpage is called tree.
You could make a start right now on the rest of the course. However,
if you were to close the webpage down, you'd have to restart the Command
Prompt, change directory to the Python folder, and enter the jupyter notebook
line again. It would make life a lot easier if you had a shortcut on your
desktop you could double-click to launch a Jupyter Notebook.
Create a Jupyter Notebook Shortcut
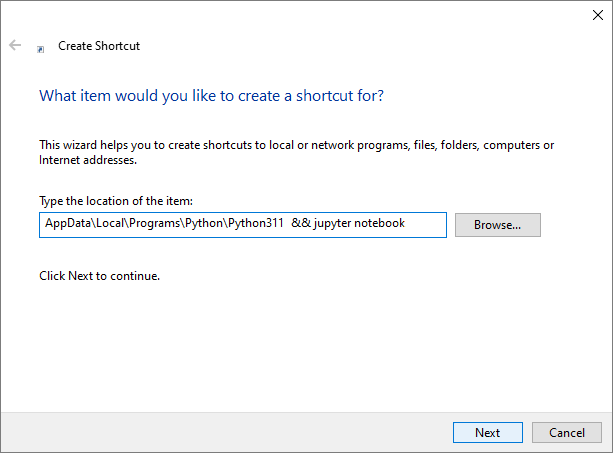
Right-click a blank area of your desktop. From the menu that appears, select New > Shortcut. You should see this:

Enter this in the textbox:
C:\Windows\System32\cmd.exe /k cd YOUR_PYTHON_PATH && jupyter notebook
Change YOUR_PYTHON_PATH to whatever the filepath is to your Python folder, the one you typed earlier (it's a good thing you remembered it!). For us, we would replace YOUR_PYTHON_PATH with this:
C:\Users\Ken\AppData\Local\Programs\Python\Python311
And the whole thing would be (all on one line):
C:\Windows\System32\cmd.exe /k cd C:\Users\Ken\AppData\Local\Programs\Python\Python311 && jupyter notebook
Click Next to see this screen:
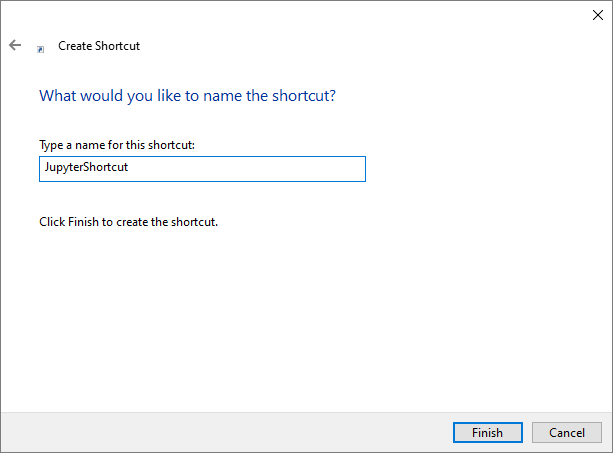
Give your shortcut a name and then click Finish. You should see a Command Prompt shortcut appear on your desktop. To test it out, close down your browser with the Jupyter Notebook in it. Close down the Command Prompt. Double-click your new shortcut and everything should start up again.
Now let's see how to use a Jupyter Notebook.