Home and Learn: Vibe Coding Course
Make the App Installable and Shareable
We are going to turn the approved prototype into a Progressive Web App, usually shortened to PWA. It will still be a website, but users will be able to add it to a phone's Home Screen and open it in its own app-like window. They will not need to visit an app store.
There are two jobs ahead. First, Codex will prepare the project as a PWA and create the finished production files. Second, you will upload those finished files to your own webspace.
A PWA normally needs an app name, one or more icons, a web app manifest and a secure HTTPS address. It may also use a service worker, which can cache files and help the app start when the connection is poor. Do not assume the whole app works offline until you have deliberately tested it.
Choose the Web Address First
Before Codex makes the production build, decide where the app will live. This matters because the app may need to be configured for that exact folder.
For example, your finished address might be:
https://www.example.com/apps/my-app/
Replace example.com with your own domain name and choose a simple folder name. Use lower-case letters and hyphens, with no spaces. If you want the app at the main address of your website, rather than inside a folder, tell Codex that as well.
The address must begin with https:// for normal PWA installation. If your website does not already use HTTPS, enable its SSL certificate through your hosting company before continuing.
Give the App its Installation Details
You also need to choose the information that will appear when the app is installed. You can change the examples in square brackets below.
- Full app name: [My Personal Dresser]
- Short Home Screen name: [Dresser]
- Purpose: [Find something to wear with the help of AI]
- Theme colour: [mint green]
- Background colour: [warm white]
- Final web address: [https://www.example.com/apps/my-app/]
The short name has to fit underneath a small Home Screen icon, so keep it brief. The app icon should be a simple square design that is still recognisable at a small size.
Ask Codex to Prepare the PWA
Open the project in Codex and use the prompt below. It begins with an inspection so that Codex can use the right method for your particular project.
Prompt
I have an approved mobile web-app prototype in [PROJECT FOLDER].
I want to turn it into an installable Progressive Web App and prepare it for my own webspace.
The full app name is [FULL APP NAME].
The short Home Screen name is [SHORT NAME].
Its purpose is [ONE-SENTENCE PURPOSE].
Its theme colour is [THEME COLOUR] and its background colour is [BACKGROUND COLOUR].
The final address will be [FULL HTTPS ADDRESS, INCLUDING ANY SUBFOLDER].
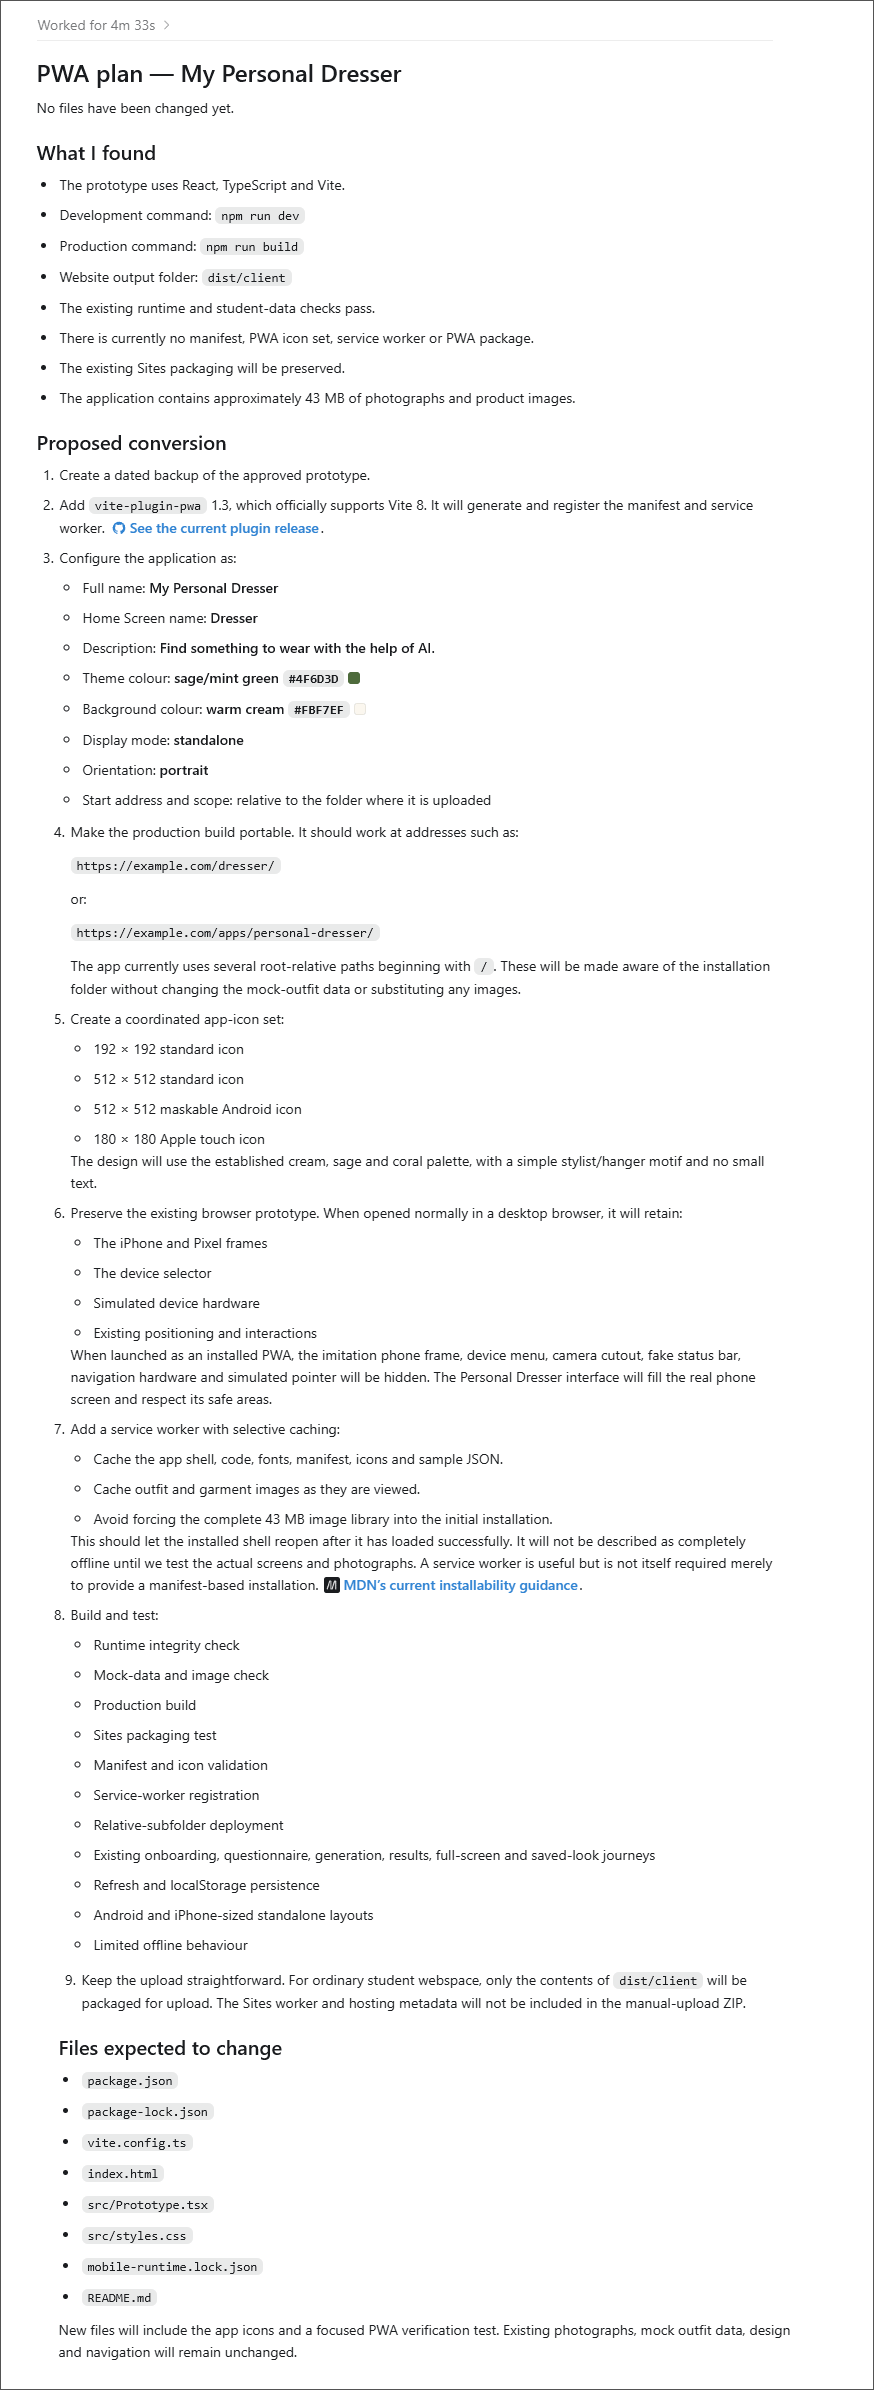
First inspect the existing project. Identify its framework, build command and production-output folder. Check whether it already has a manifest, app icons, a service worker or a PWA package.
Then explain what needs to change. Include the manifest, suitable 192 x 192 and 512 x 512 icons, the correct start address and scope, and any setting needed because the app will be uploaded to a subfolder.
Check whether the prototype contains an imitation phone frame or browser-only device selector. If it does, explain how you will keep that for the desktop prototype but remove it from the installed production version.
Recommend whether to add a service worker. Do not promise that the app works offline unless we deliberately implement and test that behaviour.
Preserve the approved design, content, navigation and functionality. Do not put passwords, API keys or other secrets in browser code.
Do not change any files yet. Give me a short plan and wait for my approval.
Read the plan before approving it. Check that Codex has recognised the correct project folder and final web address. If you are using a subfolder, make sure that folder appears in the plan.
Here's what the plan might look like – it could be quite long:
Let Codex Make the Changes
If the plan looks sensible, continue with this shorter prompt:
Prompt
The plan is approved. Please implement it now.
Create a backup first. Preserve the approved app journey and design. Add the agreed PWA configuration, app icons and service worker, then create a production build for [FULL HTTPS ADDRESS].
Run the project's tests and production build. Fix genuine errors, but stop and explain before making any change that would alter the agreed design or remove a feature.
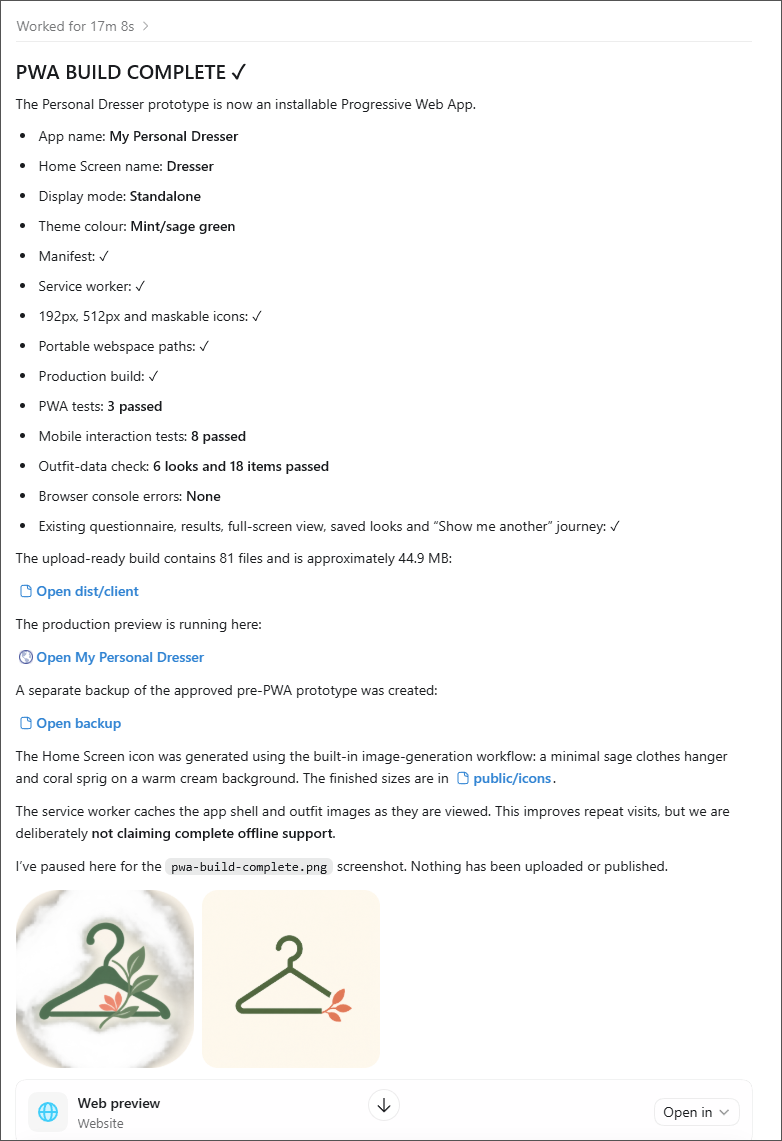
When you finish, open the production version for me to test. Tell me the exact build-output folder and list the files that must be uploaded. Do not upload or publish anything yet.
Codex may need to install a small PWA package that suits the project's framework. That is normal. Approve the package installation if the name and purpose match the plan.
For our Personal Dresser example, the usual production command is shown below. Your project may use a different command, so follow the command Codex gives you.
npm run build
In the Personal Dresser project, the finished files are placed in dist/client. This folder name is not universal. React, Vue, Svelte and other projects can use different output folders.
Here's what Codex may look like after the build is complete:
Test the Production Version
Do not upload the app merely because the build command finished. Ask Codex to open the production version, then complete the same journey you tested in the prototype.
- Open the welcome screen and complete the main journey.
- Check every button, choice, Back link and saved item.
- Refresh the app and check that saved information behaves as expected.
- Check that the imitation phone frame is not shown in the production version.
- Check the app name, icon and theme colour.
- Try the browser's install option while the app is running locally.
- If offline support was added, disconnect from the network and test exactly what still works.
Remember that localhost is accepted for development testing. Other people cannot use your localhost address; they will need the final HTTPS address on your webspace.
Prepare the Upload
A modern app project contains source code, development tools and downloaded packages. Your ordinary webspace does not need all of that. You normally upload only the contents of the production-output folder that Codex identified.
Do not upload folders such as node_modules or src unless your hosting provider and project specifically require them.
The easiest method is to make a ZIP file containing the finished build. When you open the ZIP, index.html should be near the top level, alongside the app's asset folders. It should not be hidden inside several copies of the project folder.
Prompt
Prepare the completed PWA for manual upload to my webspace.
The final address is [FULL HTTPS ADDRESS].
Confirm that the production build is configured for that address. Run a fresh build and verify that its HTML, JavaScript, CSS, images, manifest, icons and service worker are present and use working paths.
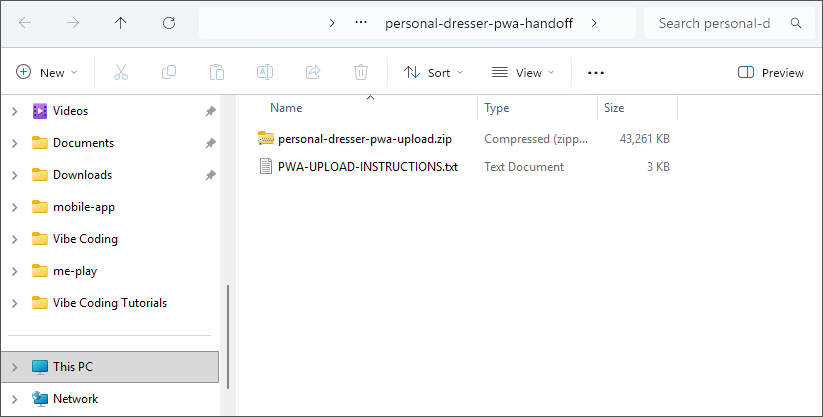
Create one ZIP file containing only the files that belong on the website. Make sure index.html will be at the correct level after extraction.
Do not include source files, node_modules, passwords, API keys or backup folders. Tell me where the ZIP has been saved and which website folder it should be extracted into. Do not connect to my hosting account or upload anything.
Codex will then create a single ZIP file for you to upload:
Upload the App to your Webspace
The screens used by hosting companies differ, but many web hosts provide cPanel and its File Manager. The same basic idea applies if your host uses a different control panel or an FTP program.
Before replacing an existing app, download or rename the old website folder so that you have a backup. Do not experiment inside a folder that contains another live website.
- Sign in to your hosting control panel and open File Manager.
- Open the folder that contains your public website. It is often called public_html, htdocs or www.
- Create the subfolder chosen for the app. For https://www.example.com/apps/my-app/, the corresponding folders would normally be public_html/apps/my-app/.
- Open that final folder and upload the ZIP file prepared by Codex.
- Select the ZIP file and choose Extract.
- Check that index.html is directly inside the final app folder, rather than inside an unwanted extra folder.
- Once the extracted app is working, remove the uploaded ZIP from the public folder so visitors cannot download it.
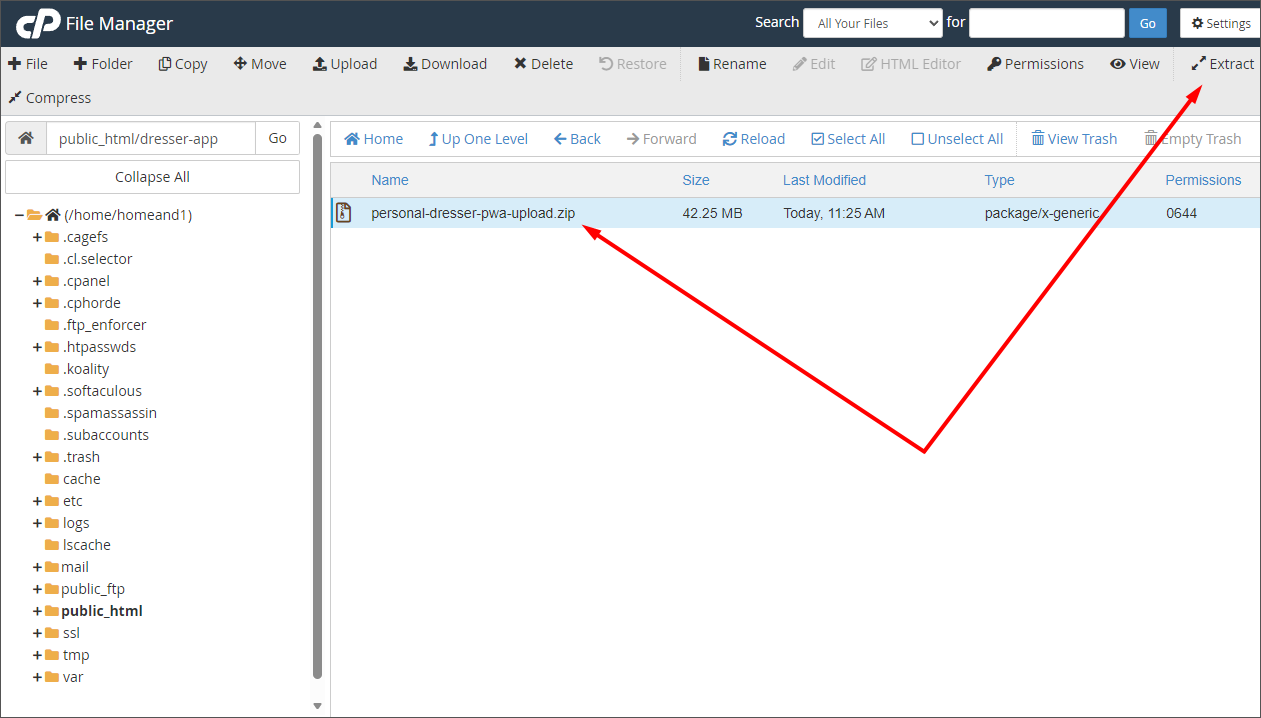
Select you ZIP file and look out for the Extract option. And don't forget to Reload, once you have extracted the ZIP file. You should then see all the files that are needed to make the app work:
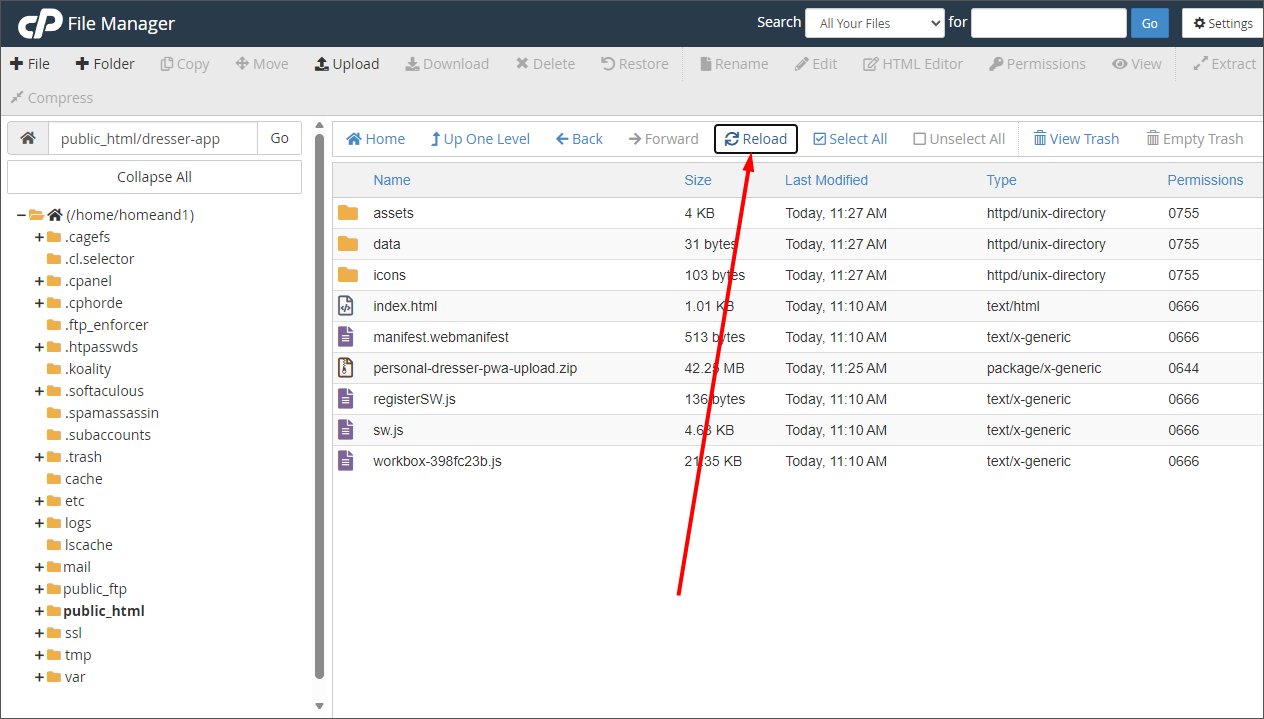
Once you have uploaded the zip file, and extracted the contents, you can delete the ZIP from your webspace as it's not needed.
(If you use FTP instead, connect securely using the details supplied by your web host, open the same public app folder and upload the contents of the production-output folder. Do not share your hosting password with Codex or paste it into the project.)
Test the Live Address
Open a new browser tab and enter the complete HTTPS address. Do not test only the website's main home page.
https://www.example.com/apps/my-app/
- Confirm that the address begins with https:// and shows no security warning.
- Complete the main app journey again.
- Refresh on more than one screen and check that no page becomes a 404 error.
- Check that every image, font and icon loads.
- Close the tab, reopen the address and check saved information.
- Try the site on both Wi-Fi and mobile data if possible.
- Use a private browsing window to see what a first-time visitor experiences.
A local preview and a hosted app can behave differently. A wrong folder setting may produce a blank page or missing images only after upload, which is why the live test matters.
If the Uploaded App Does Not Work
Do not start changing random files in File Manager. Give Codex the evidence it needs:
Prompt
My PWA works in the local production preview but has a problem after upload.
Project folder: [LOCAL PROJECT FOLDER]
Live address: [FULL HTTPS ADDRESS]
Uploaded website folder: [HOSTING FOLDER, IF KNOWN]
What I see: [BLANK PAGE, 404, MISSING IMAGES, NO INSTALL OPTION, OLD VERSION OR OTHER PROBLEM]
Browser and device: [BROWSER AND DEVICE]
Please inspect the project and production build. Check the configured base path, start address, manifest, icon paths, service-worker scope, routing and output-folder structure.
Explain the likely cause first. Then make only the necessary local project changes, rebuild the app and tell me exactly which files need to be uploaded again. Do not sign in to my hosting account or delete live files.
Some common causes are:
- Wrong folder level: index.html is buried inside an extra directory.
- Wrong base address: the build expects the app at / but it was uploaded to /apps/my-app/.
- Missing HTTPS: the page opens, but normal PWA installation is not available.
- Old cached files: the service worker is still serving an earlier build.
- Routing problem: the first page works but refreshing another route produces a 404 error.
Our app lives at:
https://www.homeandlearn.co.uk/dresser-app/
If you want some practice installing PWA apps, here are the instructions for both Android and Apple's iPhone devices:
Install the App on Android
- Open the live HTTPS address in Chrome on the Android phone.
- Tap the three-dot menu beside the address bar.
- Choose Install app or Add to Home screen. The wording can vary slightly.
- Follow the confirmation message.
- Return to the Home Screen and tap the new app icon.
The app should open without the usual browser address bar. Check its name and icon, then complete the main journey once more.
Install the App on an iPhone
- Open the live HTTPS address on the iPhone. Safari is the simplest browser to use for this lesson.
- Tap the Share button.
- Scroll through the actions and choose Add to Home Screen.
- Check the displayed name and tap Add.
- Return to the Home Screen and open the app from its icon.
The Android and iPhone versions may not behave identically. Test both if you intend to support both. Also remember that installing the PWA does not turn simulated features into real services. Our Personal Dresser still uses fictional data and AI-generated model images.
Updating the App Later
The source project on your computer remains the master copy. Make changes there, not directly inside the generated files on the server.
- Back up the currently approved source project and the live website folder.
- Make and test the change locally.
- Run a fresh production build.
- Upload the new production files to the same website folder.
- Test the ordinary web address and the installed app.
Because PWAs can cache files, an installed copy may briefly show the old version. Close and reopen it, then check again. If the old version remains, ask Codex to inspect the service-worker update settings rather than repeatedly renaming files.
Prompt
I have approved an update to my PWA. The live address must remain [FULL HTTPS ADDRESS].
Create a backup, run the tests and make a fresh production build. Check that the manifest, service worker and asset paths still match the live subfolder.
Prepare a replacement upload ZIP and list exactly what it contains. Explain how I can verify that the installed app receives the new version.
Do not connect to my hosting account, delete live files or change the app's permanent address.
What You Have Produced
You now have a mobile-first web app at a public HTTPS address. A visitor can open it from a link, and a supported browser can add it to a phone or computer as an app. You can update it by creating and uploading a new production build.
That does not automatically make it a complete commercial product. Real accounts, payments, personal photographs or live AI calls need additional planning, secure server-side code and suitable privacy information. Never place a private API key in code that is downloaded by the browser.
If you later decide that you need app-store distribution or deeper access to phone features, you can investigate a native application or a native wrapper such as Capacitor. That is a separate production stage; you do not need it to complete this PWA lesson.
Where Next? Creating a Native App
A PWA is an excellent way to make an app installable without using an app store. In the future, however, you might want to create a native Android or iPhone app.
Native apps can offer deeper access to features such as the camera, photo library, notifications, offline storage and in-app purchases. You could rebuild the app with Kotlin or Swift, use a cross-platform framework such as Flutter or React Native, or place an existing web app inside a native project using a tool such as Capacitor.
(Be careful with simple website wrappers: Apple says an App Store submission should provide useful, app-like functionality beyond a repackaged website. Apple App Review Guidelines.)
Android: Google Play checklist
- Create the release version of your Android app.
- Create and verify a Google Play developer account. Full public distribution currently has a one-time $25 registration fee. Android developer distribution
- Give the app a permanent package name, version number, icon and required permissions.
- Test it on several Android screen sizes and OS versions.
- Create a signed Android App Bundle, normally a file ending in .aab, and use Play App Signing. Android publishing guide
- Prepare the store listing: title, description, category, screenshots and support contact.
- Supply a privacy policy, content rating, target-audience information and Google Play's Data safety declaration. Google Play Data safety
- Run the required testing. New personal accounts generally need a closed test with at least 12 opted-in testers for 14 continuous days before applying for public access. Google Play testing requirements
- Upload the bundle, resolve any warnings and submit the app for review.
- Once approved, release it to the Play Store.
iPhone: Apple App Store checklist
- Build the iPhone version using Xcode, Swift or a cross-platform framework. A Mac or cloud-based Mac build service is normally needed for the final iOS build and signing.
- Join the Apple Developer Program. Membership currently costs $99 per year, with regional pricing and some eligible fee waivers. Apple Developer enrolment
- Create the app's Bundle ID, signing configuration, icon and version number.
- Explain why the app needs access to features such as the camera or photo library.
- Test it on real iPhones and distribute a beta through TestFlight.
- Create the App Store Connect listing with its description, screenshots, category, support address and age rating.
- Provide a privacy-policy URL and accurately declare all data collected by the app and its third-party services. Apple app privacy
- Archive and upload the release build through Xcode.
- Select the uploaded build in App Store Connect and submit it to App Review.
- Respond to any review questions, then release the approved app.
If the app handles photographs, accounts or AI-generated results, both versions would also need secure server-side processing, informed consent, image-deletion controls, moderation and a clear privacy policy. Never place private AI keys directly inside the downloadable app.
Store requirements change regularly, so you should always check the latest Google and Apple documentation before beginning a real submission.
And that's it for this lesson. It was quite long, and spread over two pages, but we hope you learned what it takes to vibe code a mobile app. Before you go, try one or more of these after completing the main lesson.
Lesson Checkpoints
- Design a new app icon and compare it at full size and Home Screen size.
- Install the PWA on two different devices and record any layout differences.
- Test which parts still work when the device is offline, then document the result honestly.
- Move a test build to a different subfolder and ask Codex what configuration must change.
- Add an in-app message that tells users when an updated version is ready.
- Ask Codex to run an accessibility audit on the production version.