Home and Learn: Games Programming Course
How to Install Unity VR Components
In this lesson, you'll learn how to install everything you need for VR development in Unity. You'll then be able to put your VR headset on and walk around a scene.
Import XR Stuff
First, we need to import the XR Management System that will enable us to create VR games. (XR is a general term that includes Virtual Reality and Augmented Reality. It's short for Extended Reality.) To do that, from the top of Unity, click the Window menu item. From Window, select Package Manager.
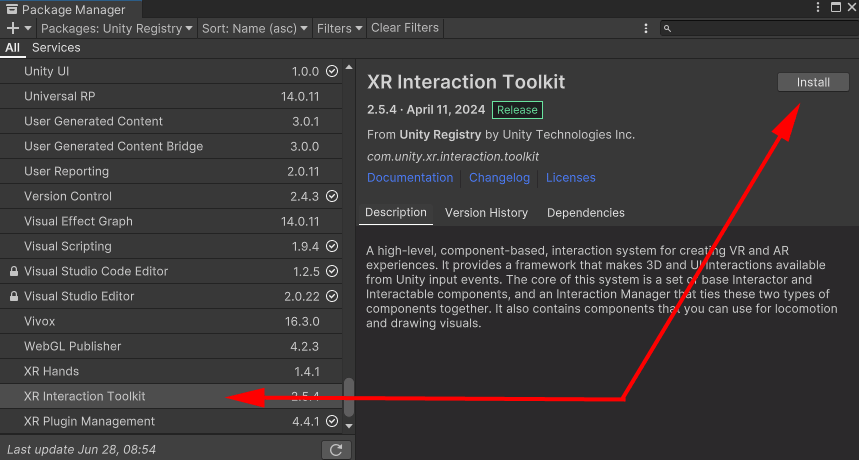
From the Package Manager, click the dropdown in the top left and select Unity Registry. Then scroll down to the bottom and select the XR Plugin Management. Click the Install button top right:

Once you've installed the XR Plugin Management, click on the XR Interaction Toolkit item from the list on the left. Import that as well:
When Unity has installed the Toolkit, it will ask you to Restart. Say yes. When Unity restarts, the Package Manager will still be displayed. Again, scroll down and select XR Interaction Toolkit. Click the Samples tab and import the Starter Assets:

If you look in your Project folder at the bottom of Unity, you should see a Samples folder has been added (and an XRI one). Under Samples, you should see the Starter Assets. This is where all the scripts live to enable all the VR controller stuff:

We now need to enable VR in Unity, so close down your Package Manager.
Enable VR in Unity
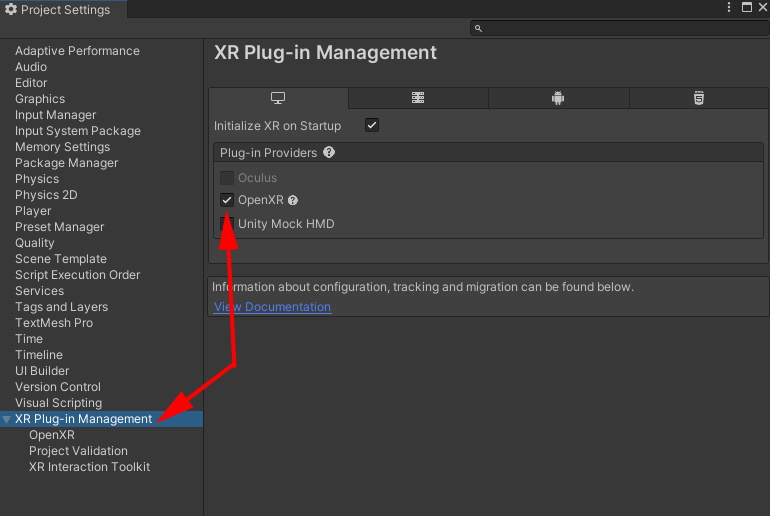
On the menu bar at the top of Unity, click the Edit menu. From the Edit menu, select Project Settings. On the left of the Project Settings dialog box, make sure Project Validation is selected under XR Plug-in Management. You'll probably see a yellow warning sign in Project Validation. If so, click the Fix button: (Or Fix All, if there's more than one warning.)

Now select the XR Plug-in Management item on the left, just above Project Validation. We'll be developing for all VR platforms, so select the Open XR item:
Give it a few seconds and Unity will import what it needs. When it's done, you'll see yet more yellow warnings. Click the Fix All button:

You may be left with 1 warning, when you click Fix All. To fix it, we need to choose the headsets we'll be developing on. So click the Edit button next to the new yellow warning:

You'll be taken to the Open XR screen. Here, where it says Enabled Interaction Profiles, click the plus button:

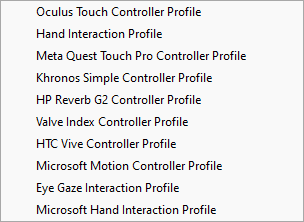
We've gone for the Oculus Touch Controller Profile and the Meta Quest Touch Pro Controller Profile:

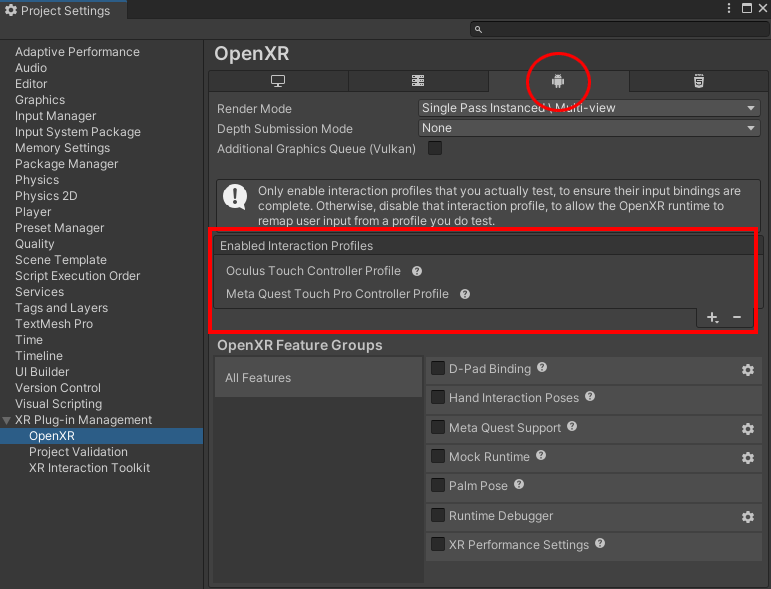
We're going to be testing on a PC. But, if want to build and run your aps and have them in the Meta store, you'll need to add the same Controller Profiles in Android. So click the Android icon at the top, as indicated by the red circle in the image below. Add your Controller Profiles again, under Enabled Interaction Profiles:
And that's it - we're done with the installs. You can close the Project Settings dialog box. We can now add an XR Rig to our Unity Scene. An XR Rig is what you use to walk around in VR.
Add an XR Rig to your Unity Project
To add an XR Rig to your Project, in the Hierarchy on the left, right click to see this menu:

Notice the XR item near the bottom. Select this and then the XR Origin (VR) item from the sub menu:

When you select XR Origin (VR), you should see a new item appear in the Hierarchy called XR Origin (XR Rig):

Expand this item to see what's there:

You can see that there's a Camera Offset item. Under this, there is a Main Camera and items for Left Controller and Right Controller.
Because there's a Main Camera under the XR Rig, you don't need the other one in the scene. So select it in the Hierarchy and hit the delete key on your keyboard to get rid of it, leaving only the one Main Camera under the XR Rig.
Make sure XR Origin (XR Rig) is selected in the Hierarchy. Now look at the Scene. You should see it as a Game Object:

If your XR Rig is not in a good position, you can drag it around using the colored arrows: green is the Y direction, red is the X direction, and blue is the Y direction. Or you can position it using the Inspector on the right. Here's ours:

Notice that the rig has two scripts attached, an XR Origin script, and an Input Action Manager script. The XR Origin script handles the camera work. The Input Action Manager hooks up the VR controllers.
To see the Input Actions, highlight the Samples > Starter Assets folder in the Project area at the bottom of Unity. Now double click the XRI Default Input Actions item:

You should see this:

The Inputs are the ones on your two VR controllers. The Actions are which button, trigger, grip, or joystick you used. They have already been set up for you in the Interaction Toolkit. But if you wanted to, you could set the Input Actions up yourself, or add new items to it.
Expand a few Action items in the middle. For example, select the XRI LeftHand Interaction item on the left. Under Actions, expand the Action Value item. You should see that its Binding is set to Trigger [LeftHand XR Controller]:

In other words, everything on your controllers has already been mapped out for you. The only thing you need to do is to say what you want to happen when something is pressed on your controllers.
But you need to check if the Input Actions have been selected for both controllers. So, in the Hierarchy on the left of Unity, select your Left Controller item. In the Inspector on the right, expand the XR Controller (Action-based) script. You need to have check marks in all the boxes.

We've cropped the image above. Scroll down in your Inspector to see all the items. There's a lot!
If you see no check marks, click the two sliders to the right of the question mark. You'll see a popup Preset box:
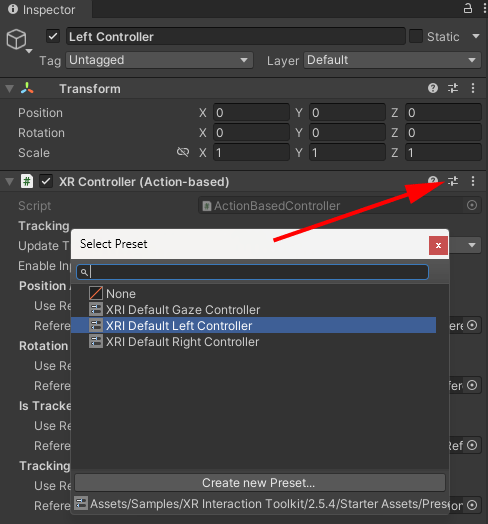
Select XRI Default Left Controller from the Preset popup box. You should then see check marks next to all the items in the XR Controller (Action-based) script.
Now do the same for the Right Controller: select it in the Hierarchy on the left, go to the Inspector on the right, add the XRI Default Right Controller item.
You can test it out now on your VR headset. (If you're not sure how to do this, see this tutorial on our site, is you have a Quest 3 (or 2): Set up a Meta Quest 3 for VR development.) The only thing you'll be able to do at the moment is look around. You won't be able to move.
So, stop your VR game in the headset. Go back to Unity and we'll get the move and turn joysticks working.
VR Move and Turn
To move around, you need to add something called a Locomotion System to your scene. You can then add move and turn providers to your Locomotion system.
In the Hierarchy on the Left of Unity, right click and select Create Empty from the menu that appears. Rename the empty game object to LOCOMOTION. Right click LOCOMOTION and add two more empty game objects. Rename them to Move and Turn. Your Hierarchy should look like this:

Select your LOCOMOTION game object in the Hierarchy. In the Inspector on the right, click the Add Component button. Type Loco in the search box to see a dropdown:
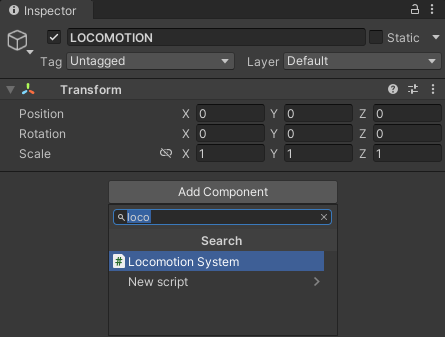
Select Locomotion System to add one to your Locomotion game object. The Locomotion System needs an XR Origin. So drag and drop your XR Origin (XR Rig) item game object from the Hierarchy on the left onto the empty XR Origin slot under your new Locomotion System object.
Instead of dragging and dropping, you can click the round circle highlighted below, and then select an item from the box that appears:

Now that the Locomotion System has been added, click on your Move game object in the Hierarchy. Click the Add Component button in the Inspector on the right. This time, enter Move as the search term. Select the Continuous Move Provider (Action) item:

The Continuous Move Provider needs a Locomotion System. Select the one you set up from the list:

There are a few settings to tweak here. First, you might want to set the Move Speed to something other than 1, otherwise you'll be crawling along. Type 3 here. You can also enable Strafing (sideways movement) and Flying. You can opt to use Gravity, which you'll probably want to do for most games. The Gravity Application Mode can be set to Immediately. This means, if you were falling from a height, gravity would kick in straight away. The other option is Attempting Move, meaning gravity will only kick in if you attempt to move, and you'll be left hanging there like a cartoon coyote who's just stepped off a cliff.
For the Forward Source, select your Main Camera. (Or drag and drop from the Hierarchy.)
The two most important options for your Continuous Move Provider are
the Left Hand Move Action and the Right Hand Move Action
options. The joystick on the left-hand controller is usually the one you
use to move. The right-hand joystick is used to turn. So, under Left
Hand Move Action, check the box for Use Reference. As the Reference,
click the circle and type Move in the search box:

Select the item XRI LeftHand Locomotion/Move. And that's it - you can now move around.
VR Turning
We need to turn as well.
In the Hierarchy on the left, select your Turn game object. In the Inspector on the right, add a new component. In the search box, type Turn. When you do, notice that you have two options: Continuous Turn Provider and a Snap Turn Provider:

The Snap option turns you a set number of degrees when you hit the right-hand joystick (the default is to turn 45 degrees). The Continuous option just keeps you revolving when you hit the right joystick. This can lead to motion sickness. We'll go for a Snap Turn Provider (Action-based), so select it from the list.
Again, you need to add your Locomotion System to the Provider. So add it just like last time. Leave the other options on their defaults. Under Right Hand Snap Turn Action, check the box for Use Reference. In the Reference, type snap in the search box:

Select the option for XRI RightHand Locomotion/Snap Turn.
Put your headset on and try it out. Hit the Play button in Unity. You should now be able to move and turn around.
If you want to test out the Continuous Turn Provider, add one as a component. Add the Locomotion system. Check the Use Reference box and select the XRI RightHand Locomotion/Turn (Input Action Reference) item. Before testing it out, uncheck the Snap Turn Provider:

Run your game again and notice the difference when you turn.
Character Controllers
You may have noticed that you can walk through everything, at the moment. To stop you from walking through objects, you can add a Character Controller to your XR Origin.
In the Hierarchy on the left, select your XR Origin (XR Rig) item. In the Inspector on the right, add a Character Controller component:

Set the Radius to 0.2. If you leave it on 0.5, you won't be able to get close to the table. Also, set the Y value to 1 to make yourself a little taller:

(The Slope Limit is how steep a slope you character can walk up. The default is 45 degrees, which is fine.)
As well as a character controller, add a Character Controller Driver component. Add the Move item from your Locomotion System in the Locomotion Provider slot. The Character Controller Driver lets you walk under things. You can set a min and max height here.
And that's it! If you got this far, you can now move around a scene in VR. And not just the scene we created here. As an exercise, try downloading a scene from the Unity Assets store. Just click the Window menu at the top of Unity. From the Window menu, click on Asset Store. In the Asset store, you can search for Environments. On the right, select Free from the Pricing menu. Look out for ones that have demo scenes. You can get some great free envirmoments and buildings that you can walk around in VR. (You may need to start a new project, delete the default scene and add any demo scene provided. Then add a new XR rig and set it up, just like you did here.
But save your work. We'll continue with this project in the next lesson below. The next thing we'll do is to grab things off that table. We'll need some hands first, though.
<--Back to the Unity 3D Course Contents Page