Home and Learn: Games Programming Course
Unity C# Script, Animate Hands
In the previous lesson, we added a pair of hands to our VR character. We also added a Blend Tree so we could do some animations when the grip buttons are held down on the VR controllers. But we need to write a C# script to hook everything up. We'll do that now. It's only a short script, so don't worry!
Create a C# Script in Unity and Install and Editor
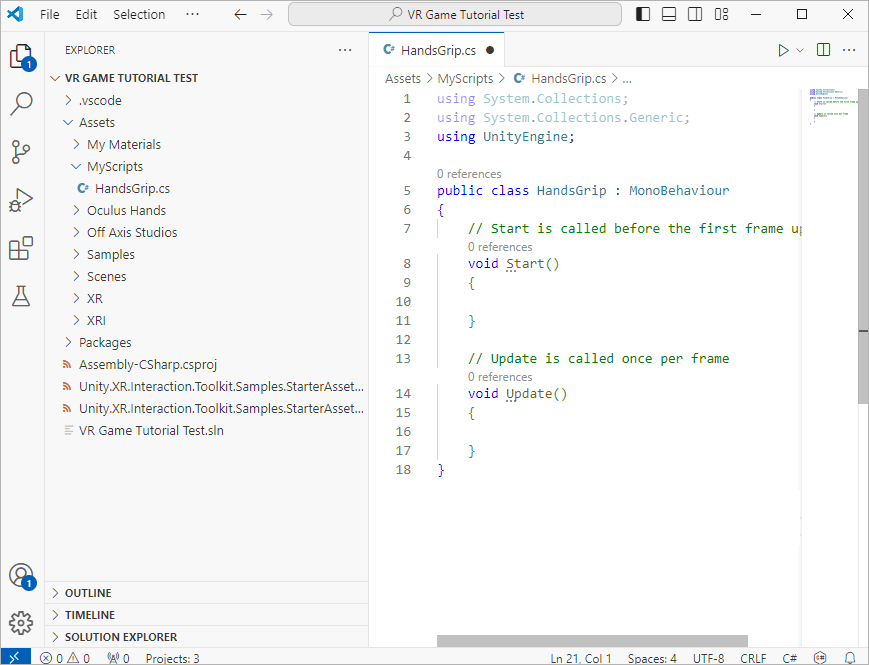
Create a folder for yourself in the Assets folder of the Projects area at the bottom of Unity. Call the folder MyScripts. Inside of this folder, right click. From the menu that appears, select Create > C# Script. Name the script HandsGrip:

To open up the script and start coding, you need to have an editor set up in Unity, if you haven't already got one. A very good editor is Visual Studio Code. Visual Studio Community Edition is also good. Both are from Microsoft and are free. They also integrate well with Unity. You can get them here: (Visual Studio Code is the smaller of the two to download and the least fussy.)
Visual Studio Community Edition
Close down Unity, and Unity Hub. Now install the editor of your choice.
Restart Unity Hub and your project. Now click the Edit menu at
the top of Unity. From the Edit menu, select Preferences. From
the Preferences dialog box, select External Tools from the list
on the left. At the very top of the External Tools box, there is an item
called External Script Editor. The editor you installed should be on the
list:

Close down the Preferences box. Now double click that script you've just created. You should see some code appear in your chosen editor. Here's ours in Visual Studio Code:
Animating the Hands with C# Code
Right at the top of your code window, under line 3 in the image above (the line that says using UnityEngine;), add this line:
using UnityEngine.InputSystem;
Inside of the Class, add these two lines (add them just under line 6, in the image above):
[SerializeField] private InputActionProperty gripAction;
private Animator anim;
Inside of the Start method, add this line:
anim = GetComponent<Animator>();
In the Update method, add these two lines:
float ourGripValue = gripAction.action.ReadValue<float>();
anim.SetFloat("Grip", ourGripValue);
Your code should look like this (you don't actually need lines 1 and 2 and can delete them, if you want):

Let's go through the code.
Line 4
This adds a reference to Unity's inbuilt Input System. This was
set up for us in the Starter Assets, if you remember. You can double
click the file called XRI Default Input Actions and take a look
at it, if you want. It's this that we're getting a reference to on line
3:

You can use C# code to access all of your Input Actions, like trigger and grip holds, button and menu presses, etc. We want to access the Grip Action.
Lines 9 and 10
We set up some variables here, one called gripAction and one called
anim. The gripAction variable is of Type InputActionProperty.
It's this that allows you to read any actions that you set up. It's a
SerializedField so that we can select the action we need in the
Inspector. We'll do that soon. The anim variable just gets a reference
to the Animator attached to the hands.
Line 15
We get the animator component from the hands and store it in the anim
variable. This will allow us to access our animations.
Line 21
The InputActionProperty has an action property. We're going
to add the Grip value soon when we set the SerializedField. But the value
is a float. We read the float and put the value into the float
variable we've called ourGripValue. (The value will be a float
number from 0 to 1.)
Line 22
Finally, we need to set a float for our Blend Tree. Remember, we set up
a parameter called Grip. (The Type of parameter we set was a float.
If we'd set up a parameter with type int, we'd use SetInt. A Boolean
would be SetBool, etc.)
In between the round brackets of SetFloat, we need the name of the parameter we set up, which was Grip for us. After a comma, you need a float value for Grip. The value we need is coming from the ourGripValue variable. In other words, you squeeze a grip on your VR controller and this value ends up in ourGripValue.
Save your code and return to Unity. We now need to add it to both hands.
Select your hand_L game object in the Hierarchy, the hand model under Left Controller. In the Inspector on the right, click the Add Component button. Type Hand in the search box, then select your HandsGrip script:

(You can also drag and drop scripts from the project area to just under the Add Component button.)
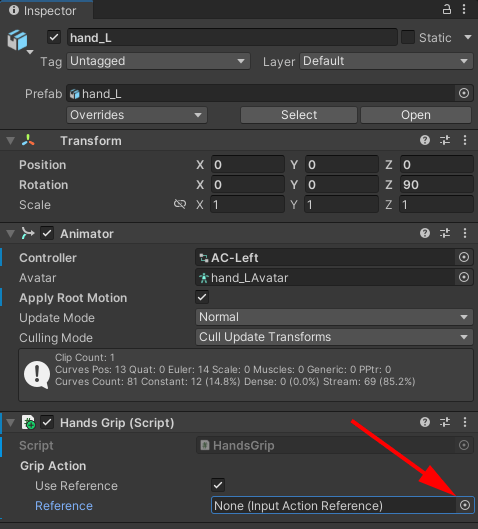
Once you add the script, you should see this in the Inspector:

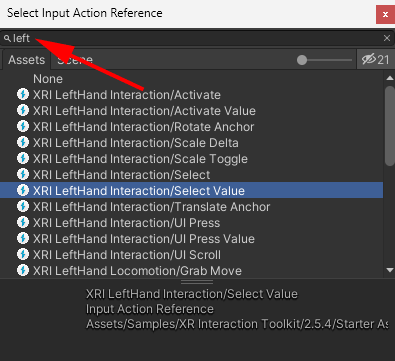
The Grip Action section on our script component comes from that SerializedField we set up. We called the variable gripAction. Put a check in the box for Use Reference. Then click the circle indicated in the image below. You should see a list of all the available actions that are set up in the Input Manager:
Type left in the search box. Then select the one that says XRI LeftHand Interaction/Select Value:
Your Inspector should look like this:

Now do the same for the hand_R game object in the Hierarchy: add the script, check the Use Reference box. This time, select XRI RightHand Interaction/Select Value:

Finally, after all that hard work, you can try it out. Put your VR headset on. Now pull the Grip buttons on your controllers. You should see both hands turn into fists. Release the grips and the hands will go back to their idle state, as in the short video below:
In the next lesson below, you'll learn how to pick things up with those animated hands.
<--Back to the Unity 3D Course Contents Page